interactive

"HEY, NOW YOU'RE A FLOCK STAR"

Disclosure: I include affiliate links to the products used in my projects and make a small commission when you purchase via those links, at no extra dimes to you. Thank you.

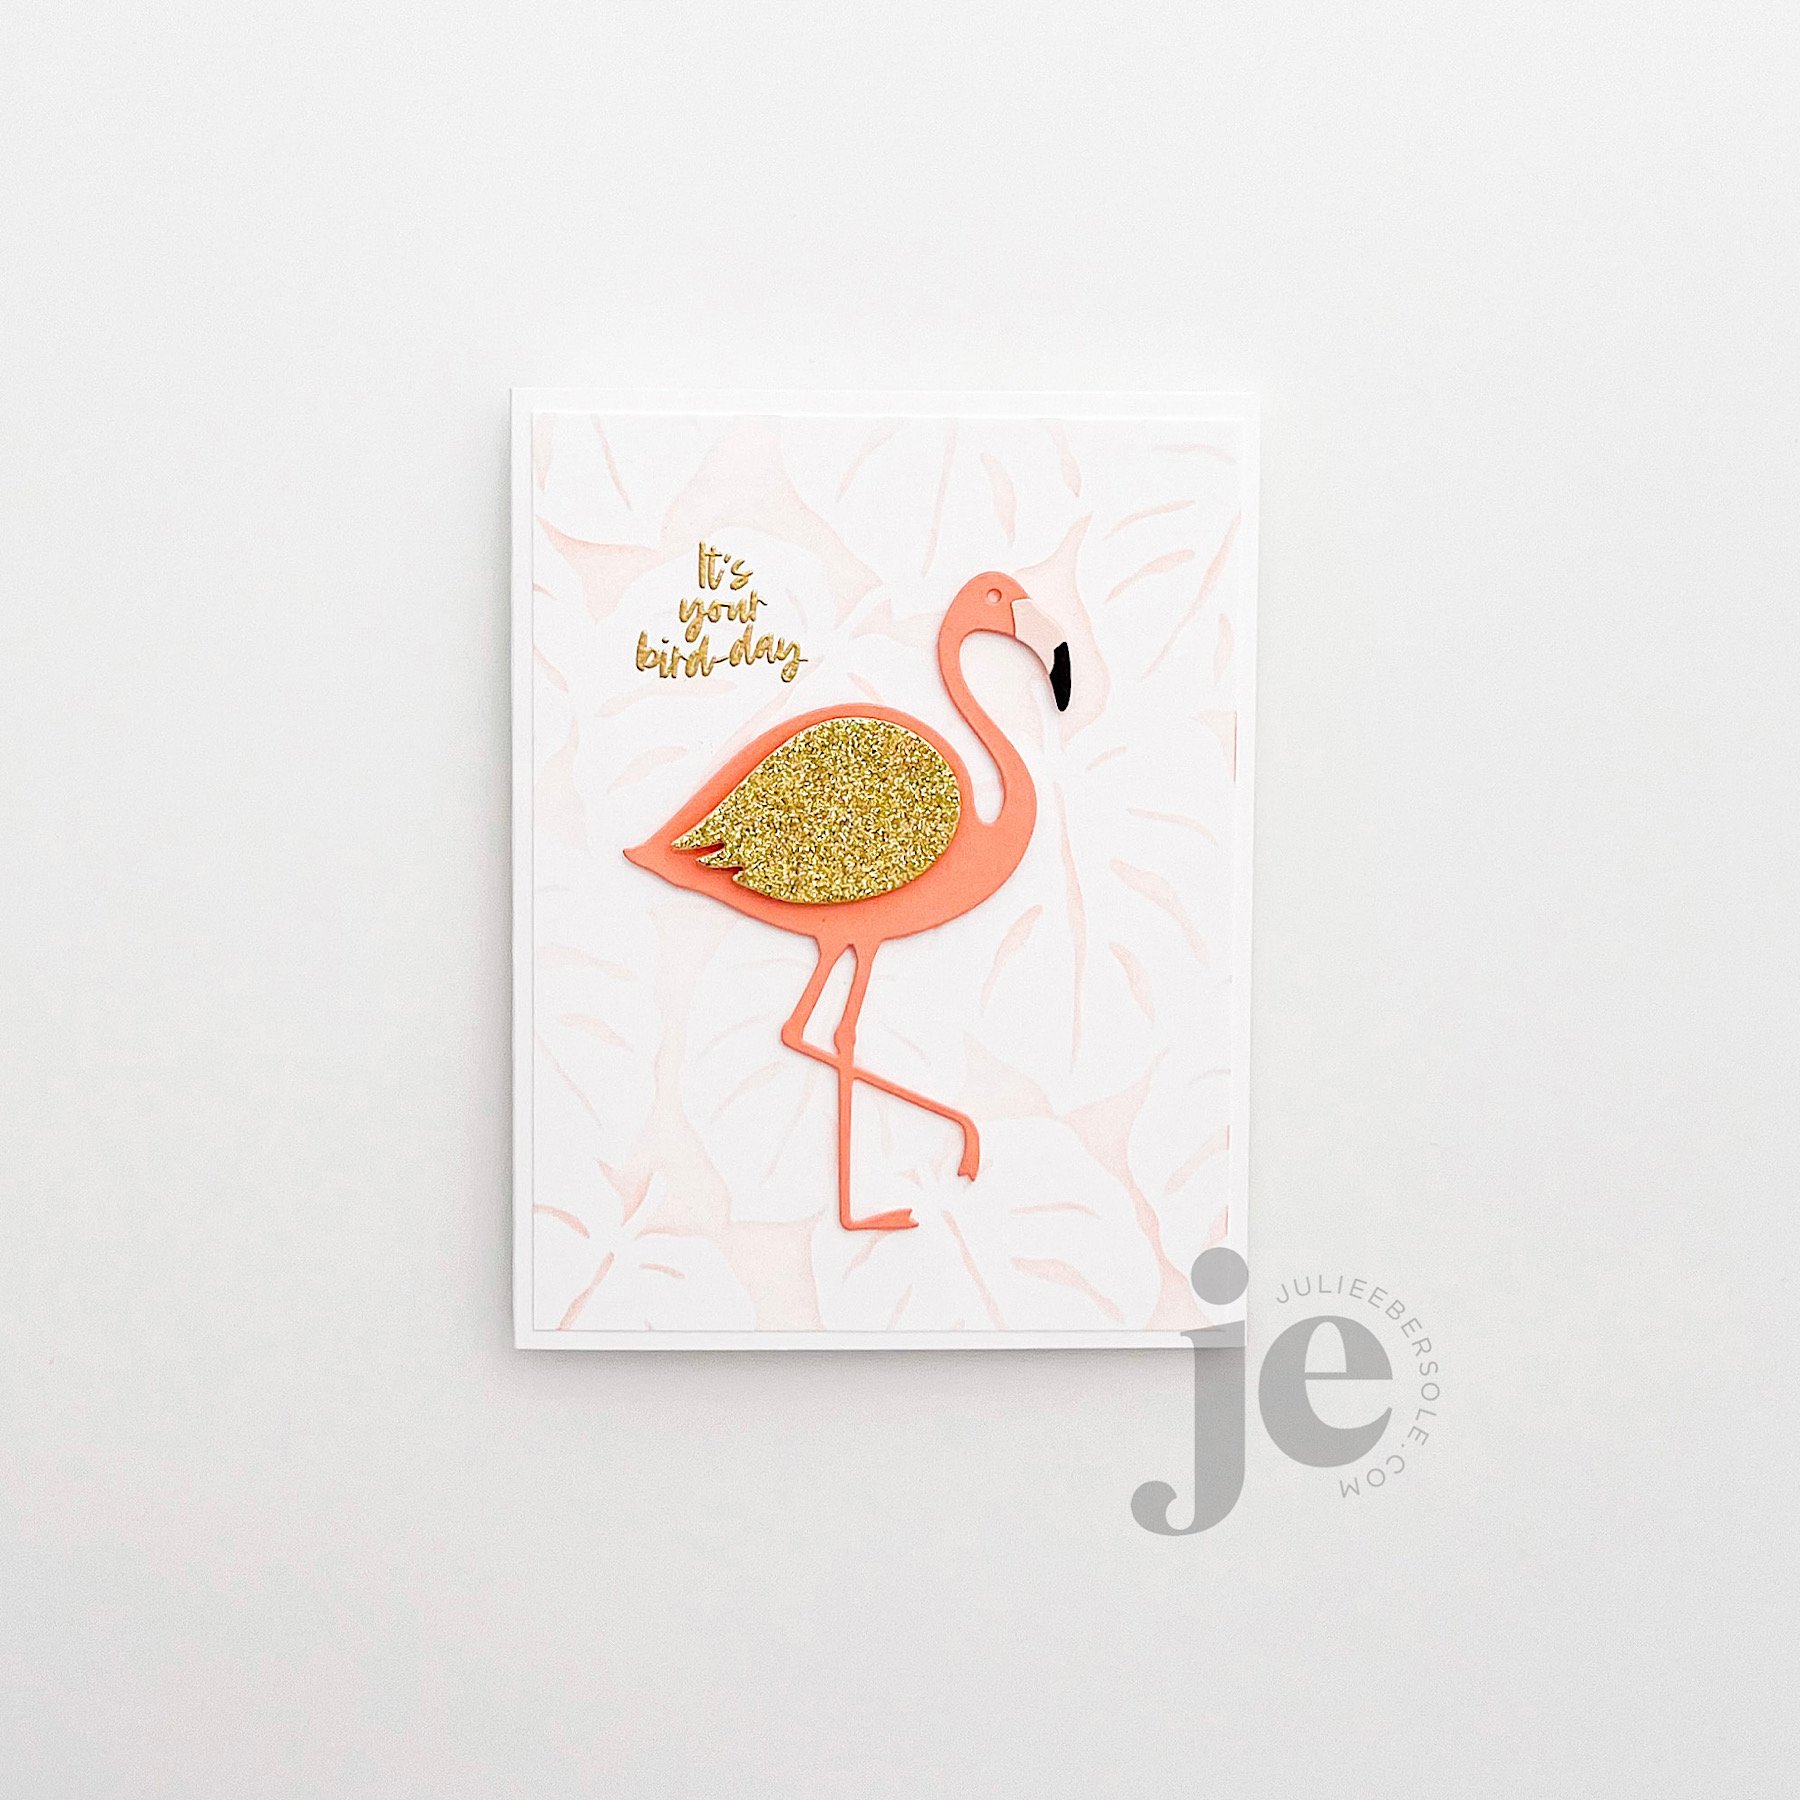
Flock Star , from the the July 2023 Essentials by Ellen Release , makes it super fun and easy to make an interactive card. Fans of the movie “Shrek” may recognize the opening song “All Star” by Smash Mouth, which actually inspired this particular combo. I’d never heard of the band until I saw the movie. Hence, the pun “Flock Star”. (snort)

The dies feature a debossed wing design on the body of the flamingo, making it easier to determine where to stamp whatever sentiment you want to use from the stamp set, so it will be revealed when the hinged wing is pivoted up or down. There’s also an additional wing, without a hole for the brad, if you want to layer another wing over top to conceal it. Options are nice, right?!

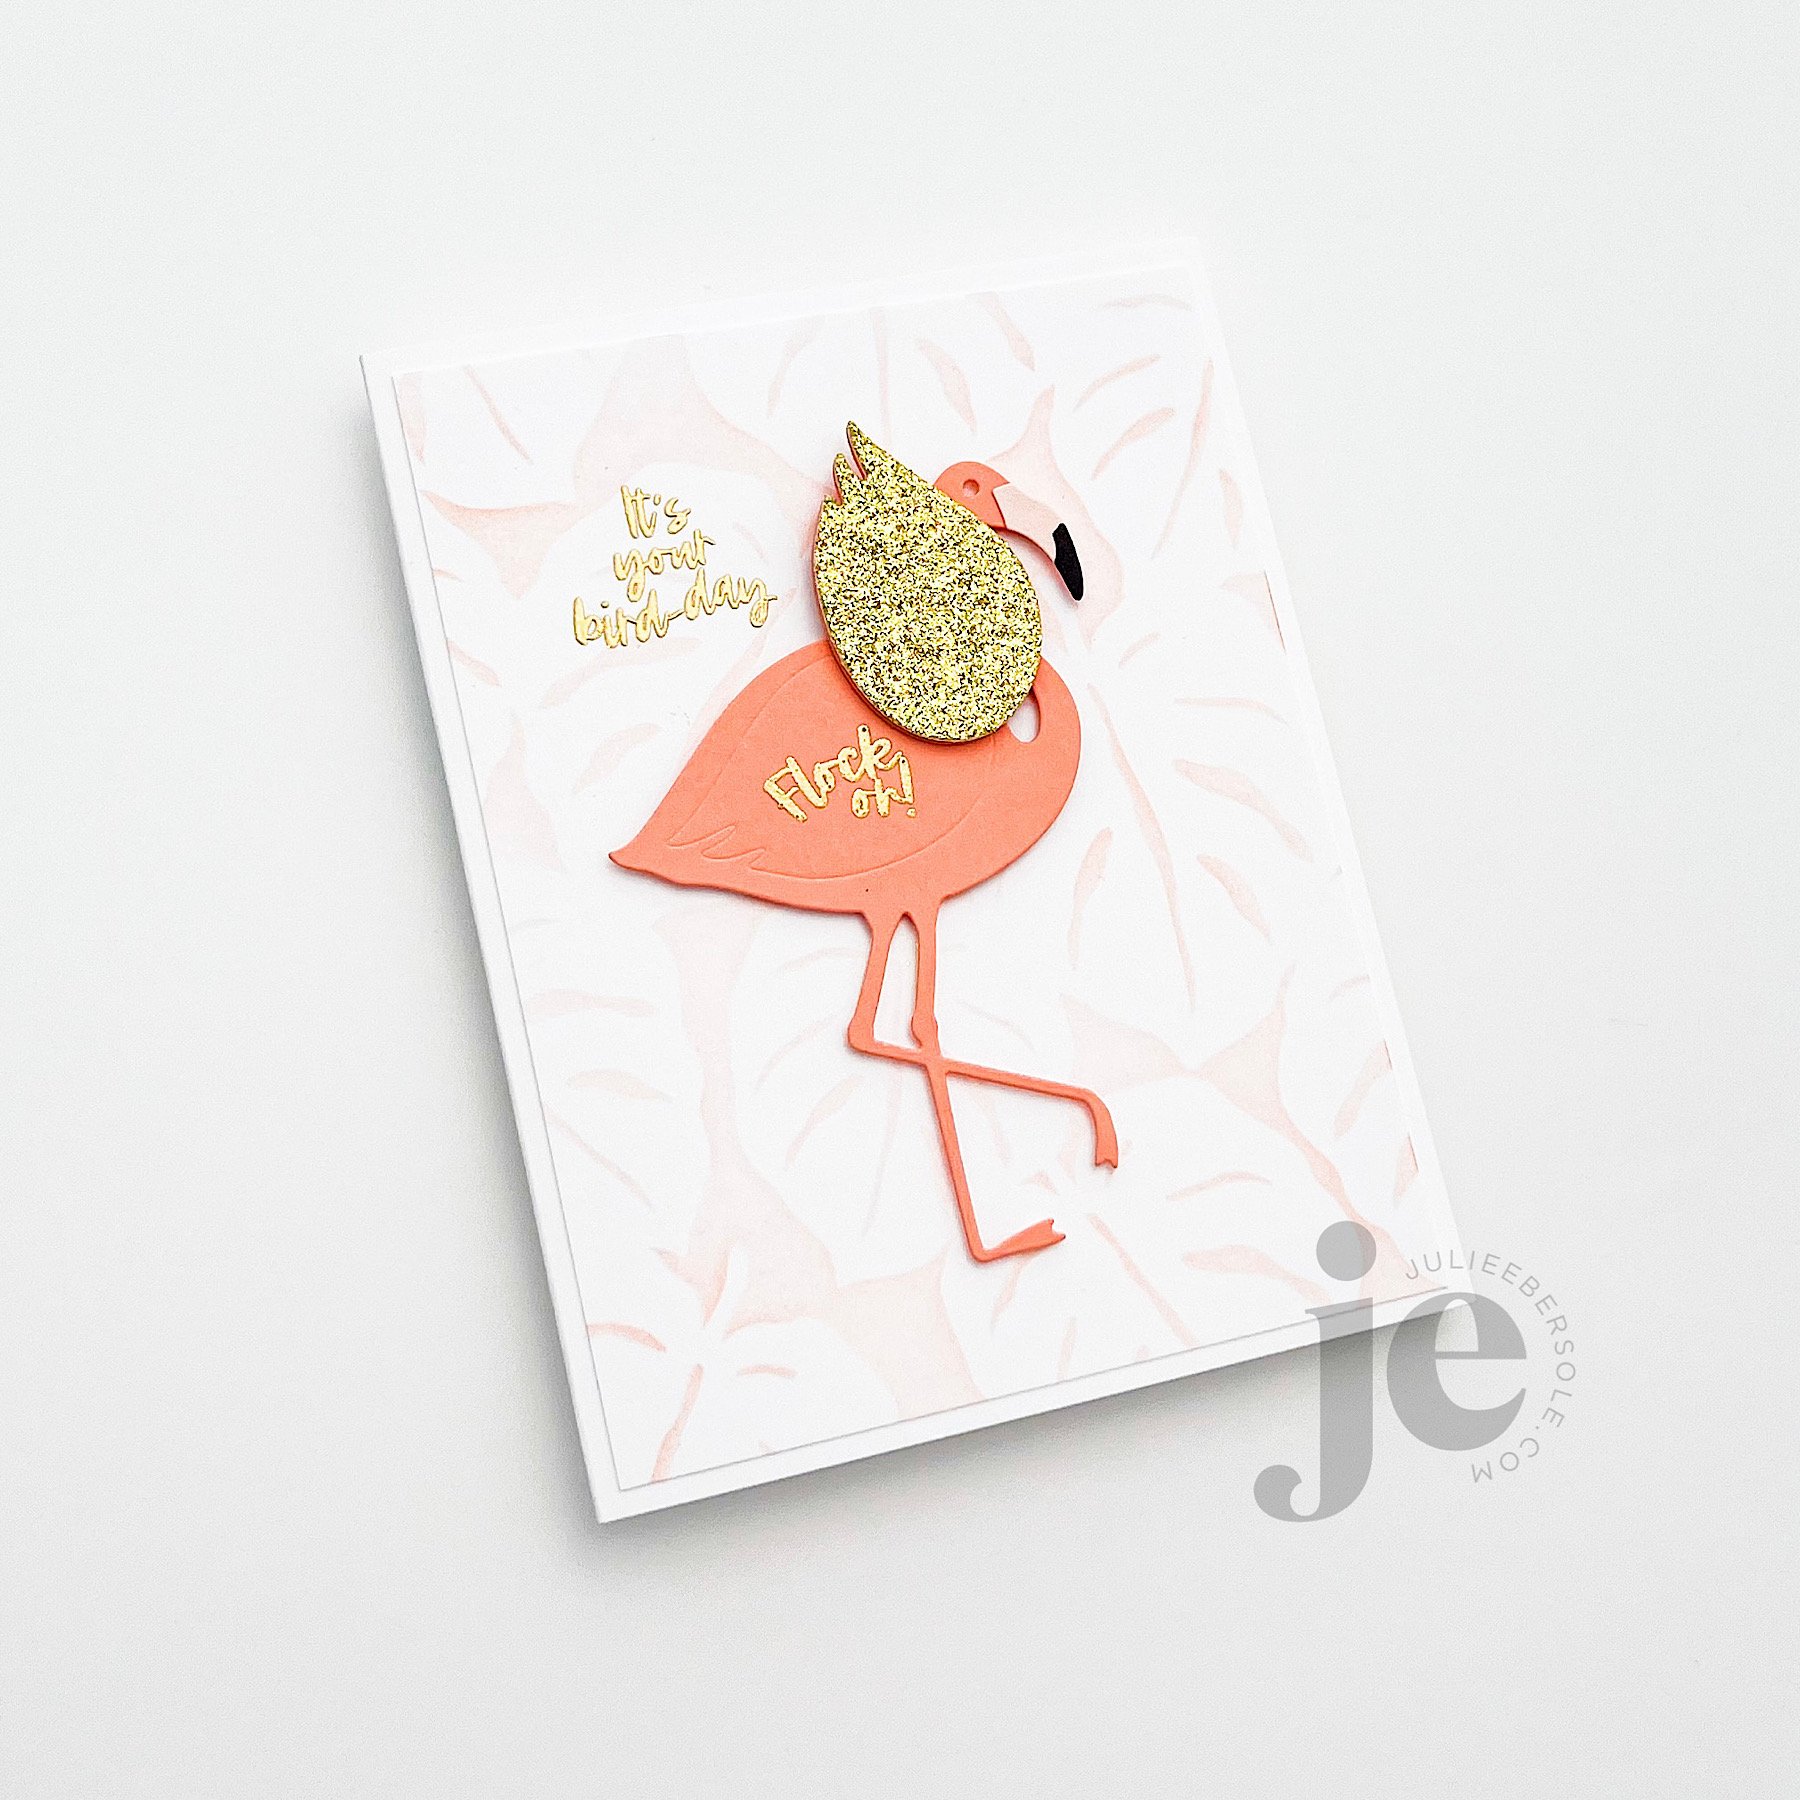
I gold embossed the sentiments (detail gold embossing powder), but it would also look great just with black ink. I just felt the gold was a nice touch because of the glittery gold card stock I used to cut the concealing wing. It’s popped up with a little foam tape over the pivoting wing.

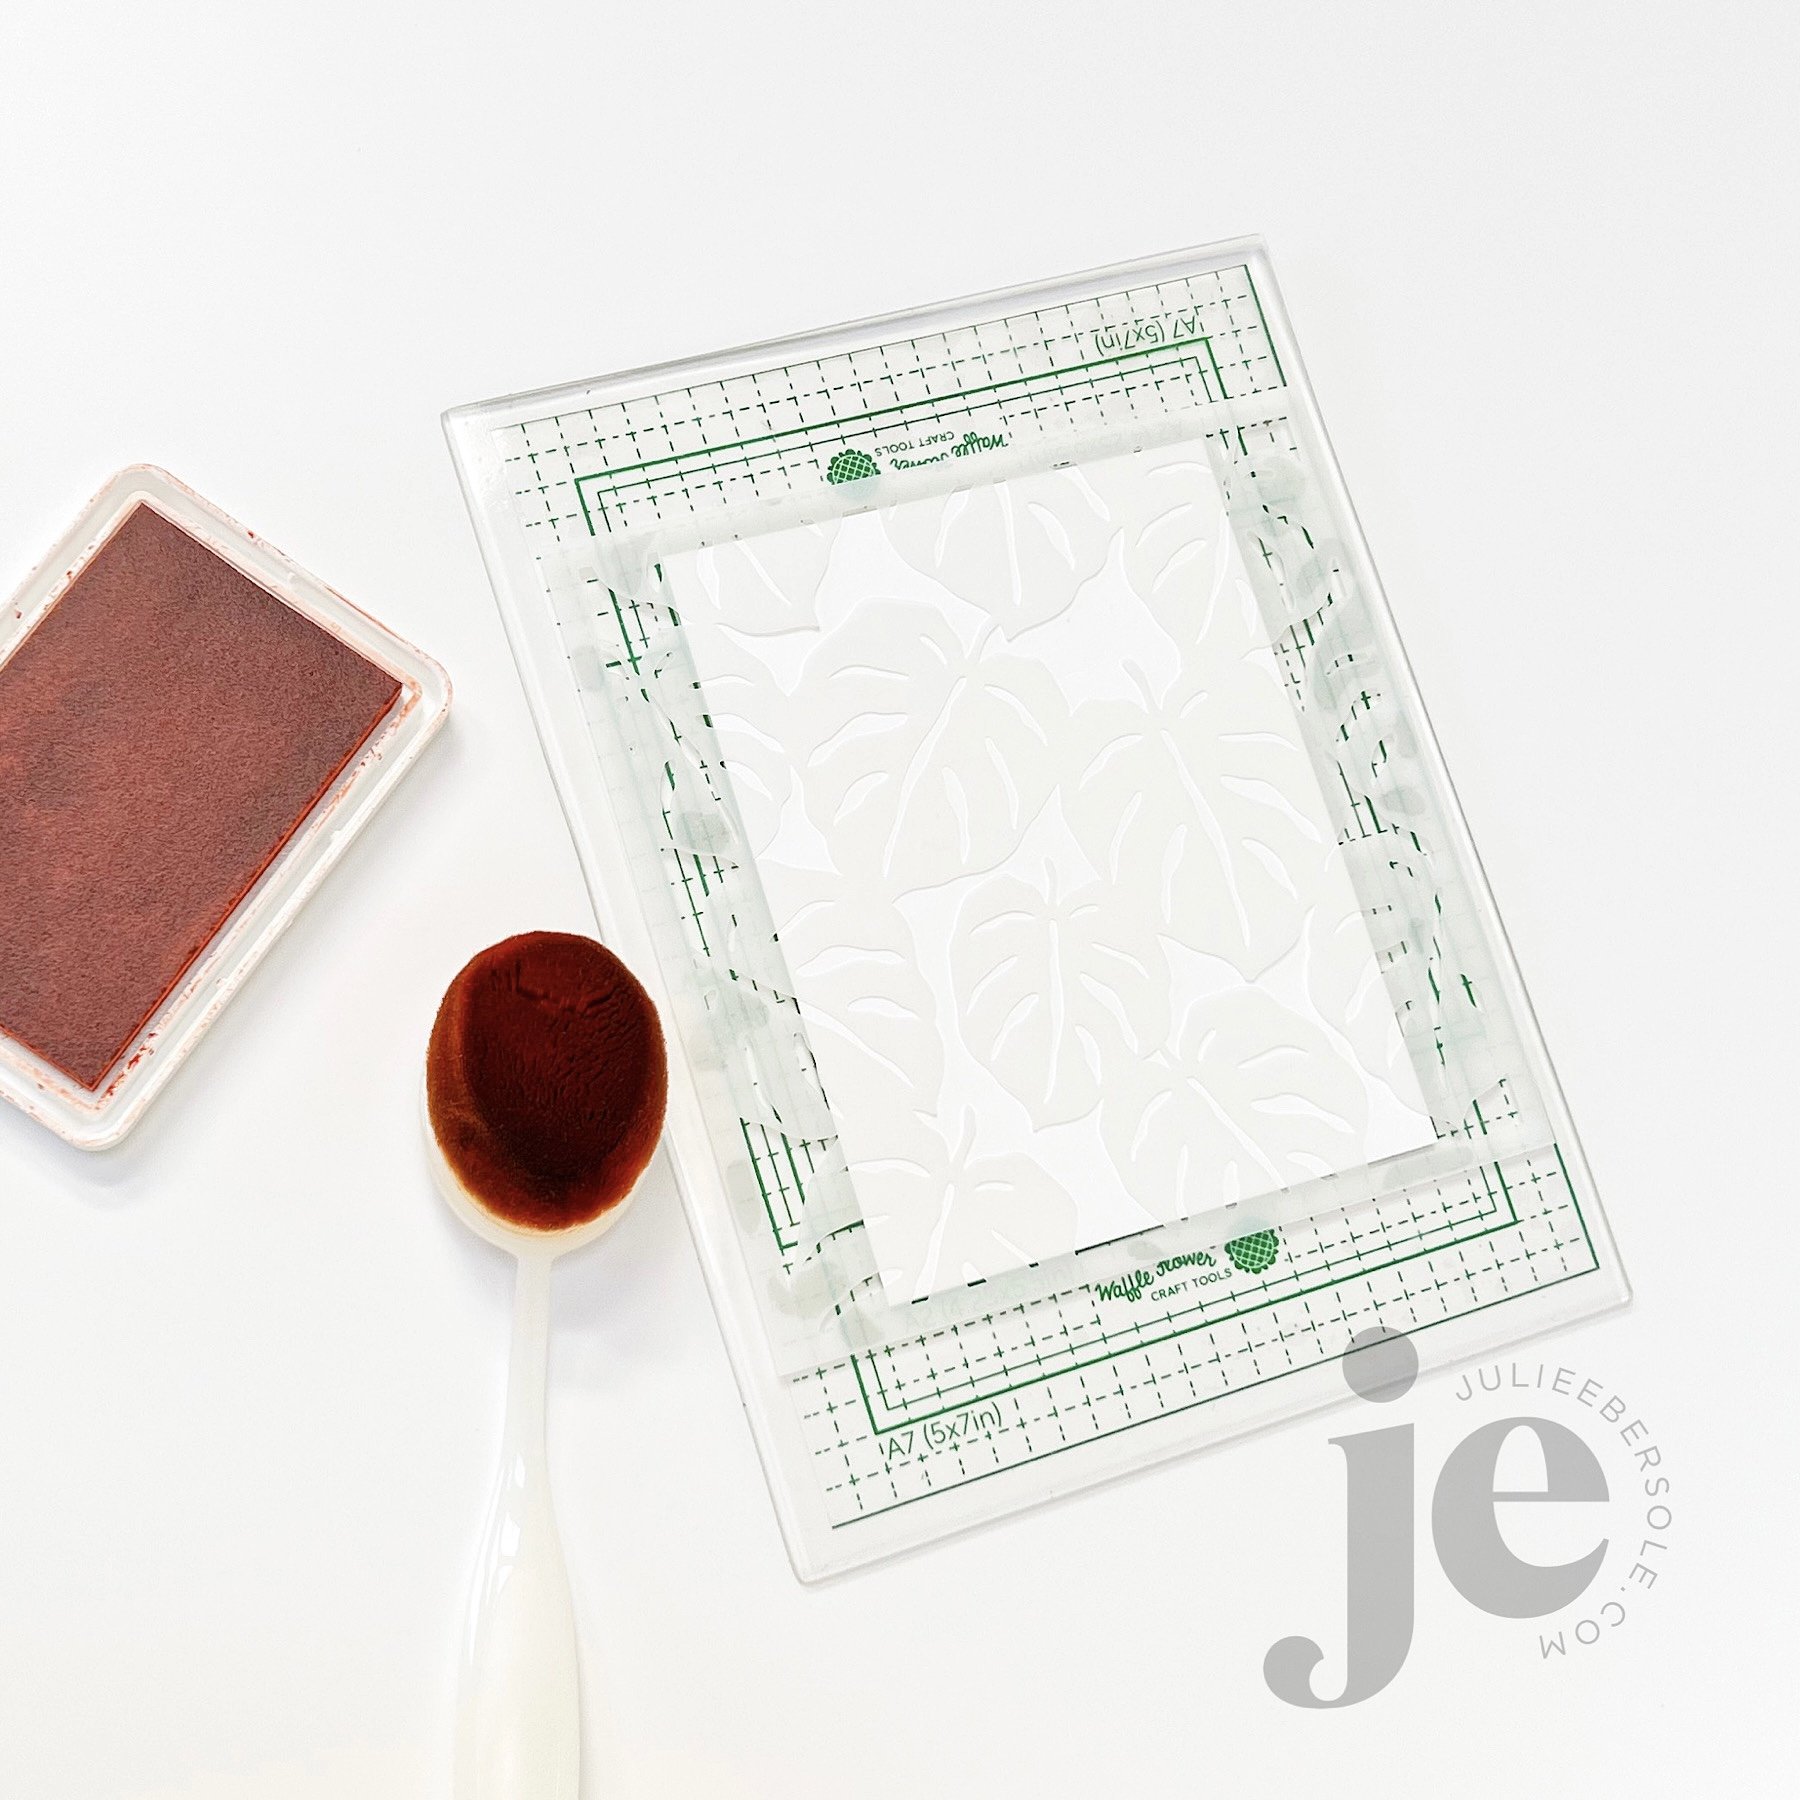
I think I’ll be swooning over the Monstera Stencil for all eternity—when I was designing it, I really wanted it to have a uniquely hand-drawn or hand-cut look. You don’t want to know how many renditions I went through before I was finally satisfied, LOL! I have a tendency to obsess over things like that. OCD much? In any event, I love it SOOOOO much, so I’m going to cut myself some slack over the time it took to get it “just right”.

I’ve been practicing my ink-blending; I’m always so heavy handed but I really really want to achieve that lovely, delicate effect I’ve always admired by the talented Laurie Willison and I think I’m finally getting there.

One thing I also wanted to mention is this seriously cool, new Grip Mat by Waffleflower! I’ve been using it to anchor my paper down for stenciling and stamping!!! You can read about it on their site; they’re taking pre-orders for it now, if you’re interested. You can get a smaller one that will fit your Mini MISTI, too. I swapped out the foam layer in my MISTI platform and dropped this in, with the acetate grid they’ve designed to go with; I won’t have to deal with magnets/tape again. It truly is brilliant!!!

I have more samples to share with the products I designed for the release over the coming days. For now, you can hop over to Ellen’s site and check out the whole release HERE—it is such a lovely collection!

Thanks for stopping by and don’t forget to slather yourself in sunscreen when you’re enjoying the fabulous summer weather—it’s been gorgeous here!

PUSH-ME-PULL-YOU FRIENDSHIP CARD

Finished card is A-2 size

Consider this a (basic) tutorial (one of many different types that already exist, for sure!) for creating a reverse action/double slider card; it works for either portrait or landscape layouts—just make sure your images and sentiments are going the same direction.

I used the smaller slit from the Push-me Pull-you Die set. Is this set necessary for making this type of slider? Nope! You can use a straight-blade trimmer or a craft knife + a metal edge ruler, if that’s what you have. I just find the slit die works great and is the perfect size for this particular type of slider card, and I love that you can completely adjust the gap between the slits to suit your project, whereas on a duo slit die, the gap is fixed.

BASE MATERIALS:

  • 2 pcs. White card stock - 4.25 x 4.5” (for the back cover and for the mechanism itself)

  • 1 pc. Preferred color of card stock - 4.25 x 4.5” (for the front cover)

  • 2 pcs. White card stock - 3 x 4.5” (for the “handles”)

    • Optional: 1 pc. White card stock - 4 1/8 x 4 3/8” (for layering onto the front cover and allowing for a slight mat or border effect)

  • 1 strip of thin plastic or cellophane - 3 x at least 8” long (excess can always be trimmed off during assembly; grocery shopping, zipper style and cellophane bags work or you could even use ribbon, if you have some laying around that meets the dimensions)

VIDEO TUTORIAL

Now, if you prefer to skip the mat layer (the green “front cover” one shown in my prototype), just swap it out for white and you can skip the optional smaller layer. But, if you want to stamp directly onto that, make sure to do so while it’s flat and before you start assembling things.

And, don’t forget: Stickles LAST!!!

Have a fab day!


EASY SWING VALENTINE CARD (INTERACTIVE)

Swing (a.k.a. flip) cards have been around for a long, loooong time—nowadays, you can, of course, purchase dies that make the cuts and score lines for you, which is always nice! However, if you’ve never made one and want to give it a try, they’re quite simple/easy to do; just make sure that the shape you’re using is symmetrical (equal on both sides opposite each other, i.e. a circle, a butterfly, a square, a rectangle, an oval, a star and, in the case above, a heart) for best effect. Anything asymmetrical will be problematic.

BASIC SWING/FLIP CARD INSTRUCTIONS:

  • Start with a card base measuring 5.5 x 8.5”.

  • At 2 1/8” from the left short side, draw a faint pencil line.

  • Center a symmetrical shaped die along the pencil line and use washi tape to anchor in place.

  • Position the top cutting pad over the die and paper, aligning the edge with the pencil line; this insures that there will only be pressure applied up to that point.

  • After completing the die cut, remove die and tape and erase pencil line.

  • Score card base at 2 1/8” from the left short side (in the same position as your original pencil line), taking care not to score through the shape itself (start from the top of the card base and score right up to the top of the shape, skip over the shape, and then continue to score from the bottom of the shape down to the bottom of the card).

  • Score another line at 4.25” from the left short side (this will be the gutter/main fold) of the card.

  • Fold the card in half along the gutter, creasing well, then fold the smaller section back on itself, creating a “z-fold”.

  • As you open and close the card, the shape will swing or flip back and forth; embellish each side as desired.

  • Finished card is A-2 (4.25 x 5.5”) size when folded.

TIP:

If you plan to create a similar “Conversation Hearts” with a knock-out text effect, it helps to use alphabet dies that have extra letters, OR use phrases that don’t require multiples of the same letter. Here are some “Valentine” phrases that don’t require multiples of any given letter:

  • HUGS

  • HEY GIRL

  • WINK

  • U R HOT

  • CUTIE

  • U R LOVED

  • SWAK

  • U ROCK

  • HUG ME

  • ILYSM (Acronym for “I love you so much”)

  • SOUL MATE

  • LOVE BUG

  • XO

You’re welcome!


EBE SUMMER OF STAMPING RELEASE 2 NOW LIVE

EBE Release 1 Promo - 19 July.jpg

The 2nd release for Summer Of Stamping 2021 is now LIVE (click HERE to see the goodies)! We’re hopping over on Instagram and giving away prizes, so be sure to check out the hop, scope out all the eye candy and leave some comment love along the way for chances to win! The Instagram hop begins HERE.

OK, I must admit that I’ve ALWAYS wanted to create a tropical themed set featuring a hula dancer and now I got one! (fist pump) YASSSSSSS!!!

feat. Aloha Stamps & Dies | Tilt & Rock Die Set ; Palm trees from Jungle Stamps & Dies

Because the above are still shots, you may not realize it, but in these samples ↑ ↑ you can make the hula girl’s skirt TILT to and fro or things like the palm trees ROCK back and forth using the Tilt N’ Rock Die Set EEP!!!

Here’s a VIDEO TUTORIAL on how to use this fun die set! Now, just think of all the different things you can add this kind of motion to . . . I know your wheels are turnin’ like mad, aren’t they?!

feat. Aloha Stamps & Dies

This serene beauty from the set reminds me of a trip the Mister and I took over 35 years ago—our one and only trip (so far) to Hawaii. This needs to be rectified because I’d really love to go again, but I get SO crabby in hot climates . . . When I was making this design, I just loved how the “cool” color scheme looked so calming and inviting, with just the little pops of yellow here and there.

If you’d like more info on products that coordinate well and were used in creating these samples, please visit the release page HERE; they are showcased there for your convenience.

Thank you for taking a moment to stop by my little place here, out of what I’m sure is a busy summer season! July is our family’s travel month, so we’ve been on the go, here and there and the weather has been AMAZING (‘cept for that wretched heat wave we had a few weeks back!)


Disclosure: Yup, those are affiliate links to the products used in my projects and I make a small commission when you purchase via those links, at no extra cost to you. Thank you for buying all the things!

A NEW ESSENTIALS BY ELLEN RELEASE AND A RAINFALL TUTORIAL

CLICK ON THE GRAPHIC ABOVE  TO GO STRAIGHT TO THE FEBRUARY 2021 RELEASE PAGE! ⬆️

CLICK ON THE GRAPHIC ABOVE TO GO STRAIGHT TO THE FEBRUARY 2021 RELEASE PAGE! ⬆️

YAY! It’s release day at ellenhutson.com ! ⬅︎ Check out all the lovelies—I’ve been a busy girl! •grin•

There’s so much to see and share—too much for one post, so I decided to focus on a few products today and share a video tutorial on a project I just fell in love with (more projects in the coming days, promise):

The rainfall or rain shaker card has been around for a long time, but I’ve never actually made one! And, there are several different ways to make one, of course. But, you know when you look at a product and wonder if you can do something with it that it wasn’t originally intended for? Yeah, that’s what happened here with the Never-Ending Fringe Die . . .

Inside message:  “Does somebody need a hug?” (from Just Squidding)

Inside message: “Does somebody need a hug?” (from Just Squidding)

These are seriously too much fun! I definitely gotta get more beads—I just have those pretty silver-lined ones, but how fun would it be to have a variety of colors??? •wheels are spinning• Have you tried making one of these before? I already pre-cut a whole bunch of stubby fringe so I can bust out more of these babies! EEP!!!

Sooooo, what do you think of the latest release? Do you have a favorite?

Thanks for stopping by and hope you are continuing to stay healthy and safe out there!


SUPPLIES:

Disclosure: Affiliate links used wherever possible; when you purchase via my links I may receive a small commission at no extra cost to you, so please—buy all the things! And, thanks so much for your support!