watercolor

MORE HUGS BY WAFFLE FLOWER

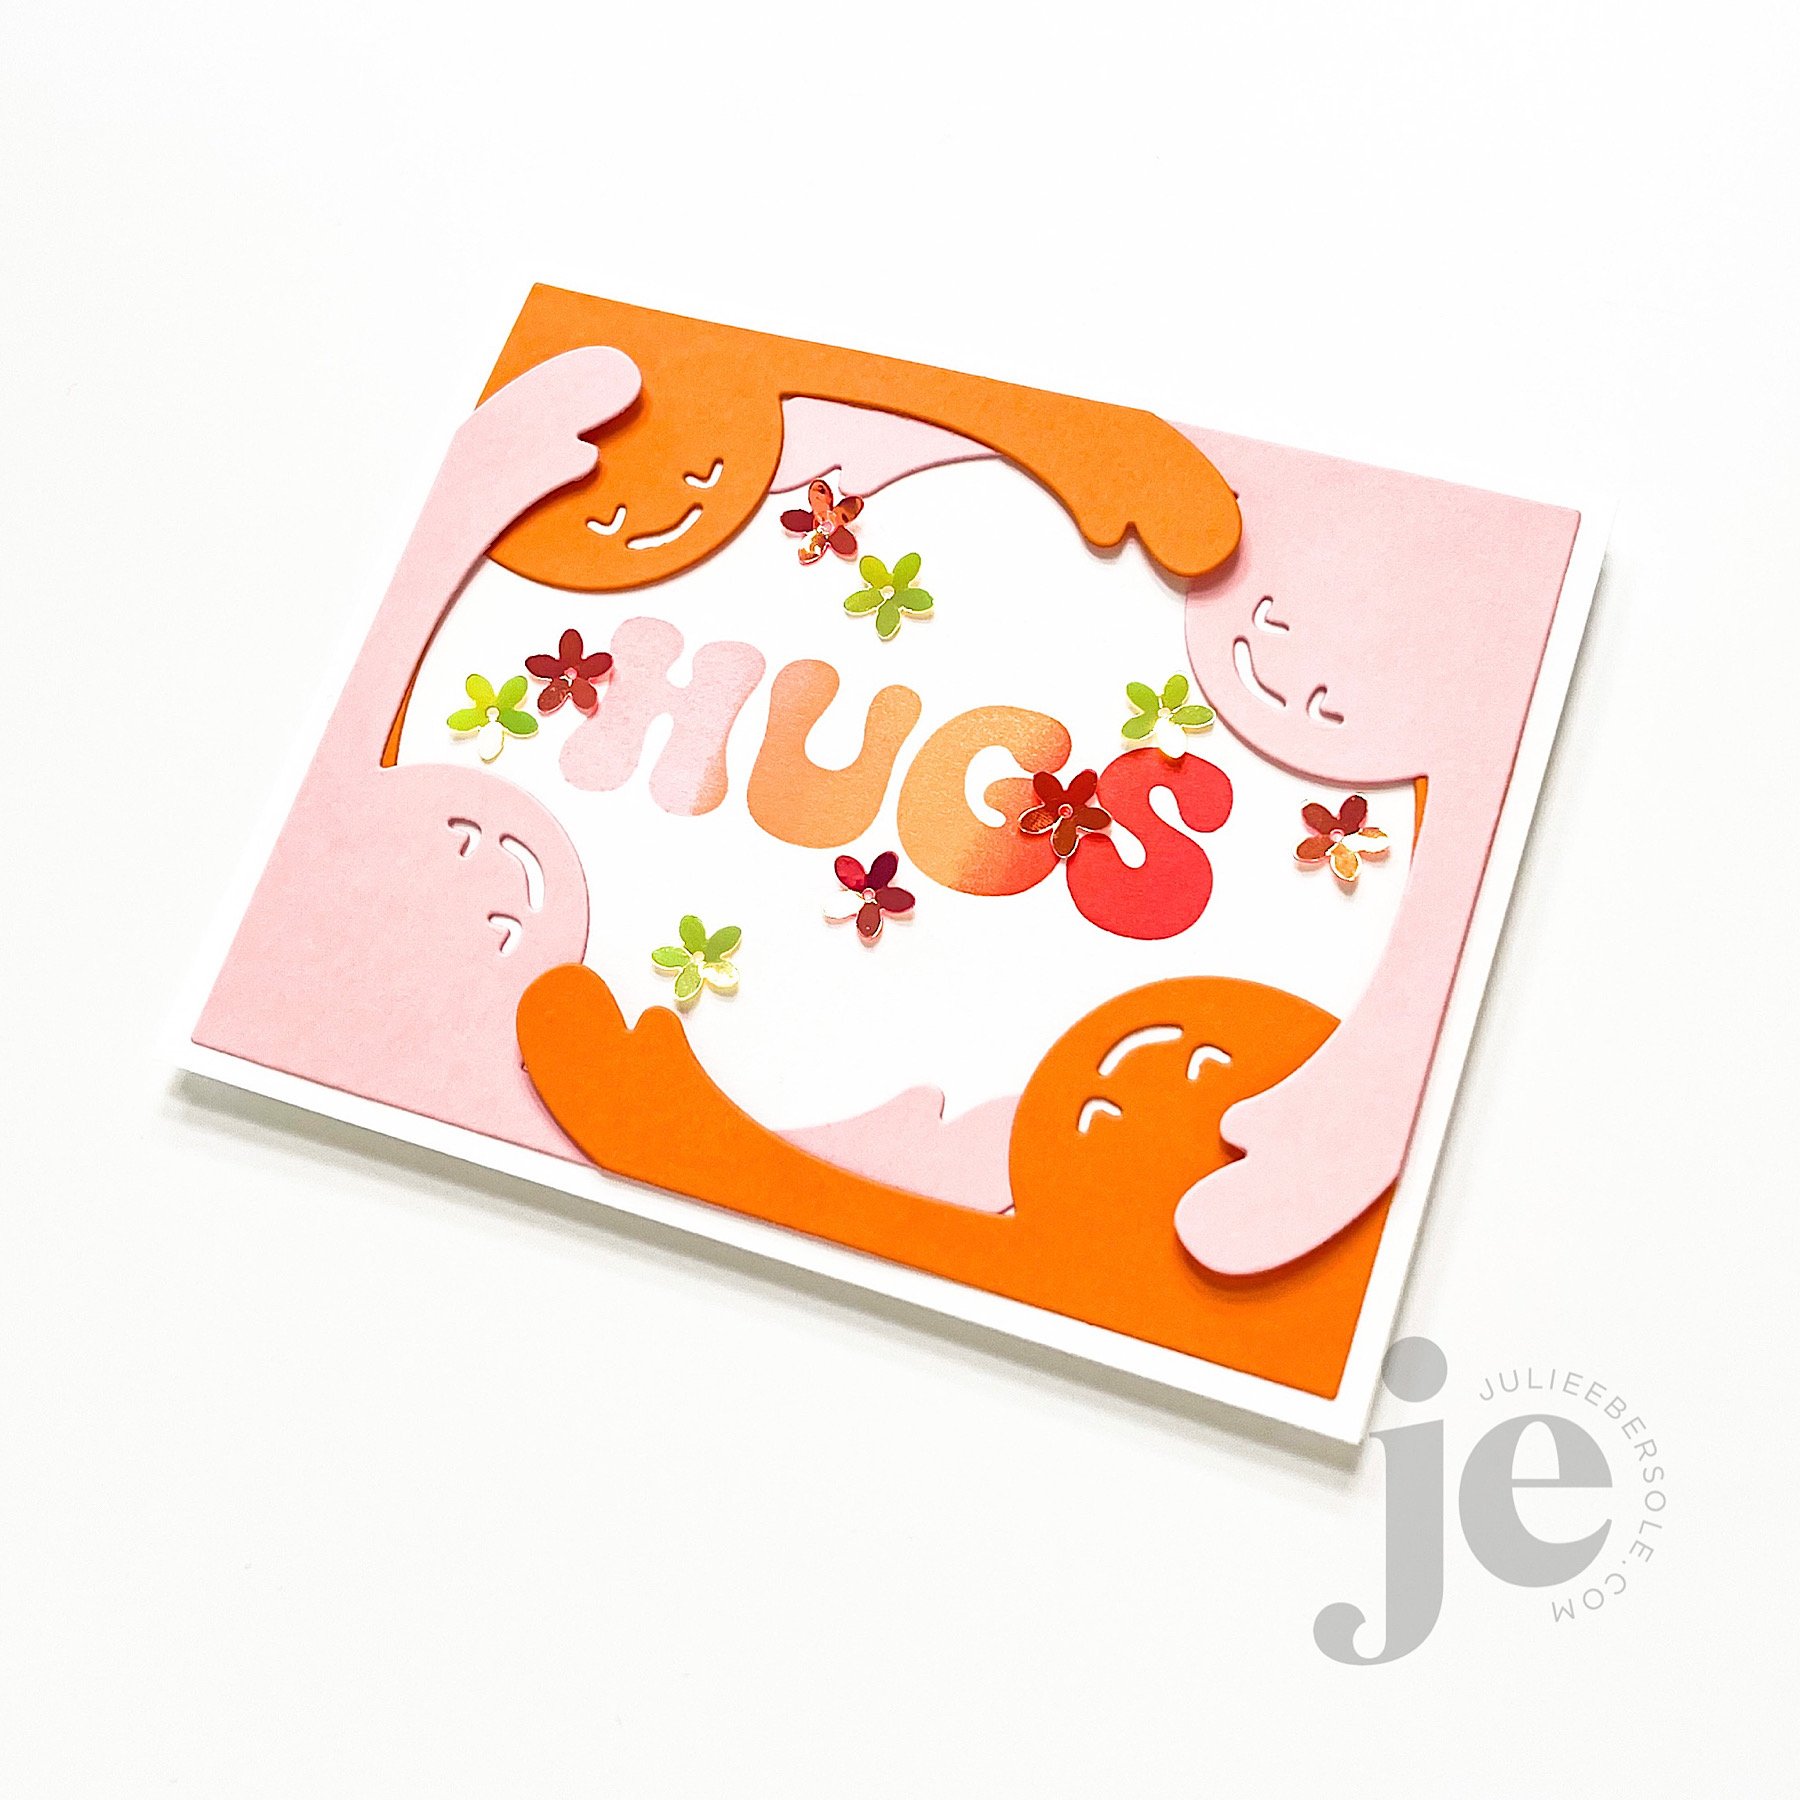
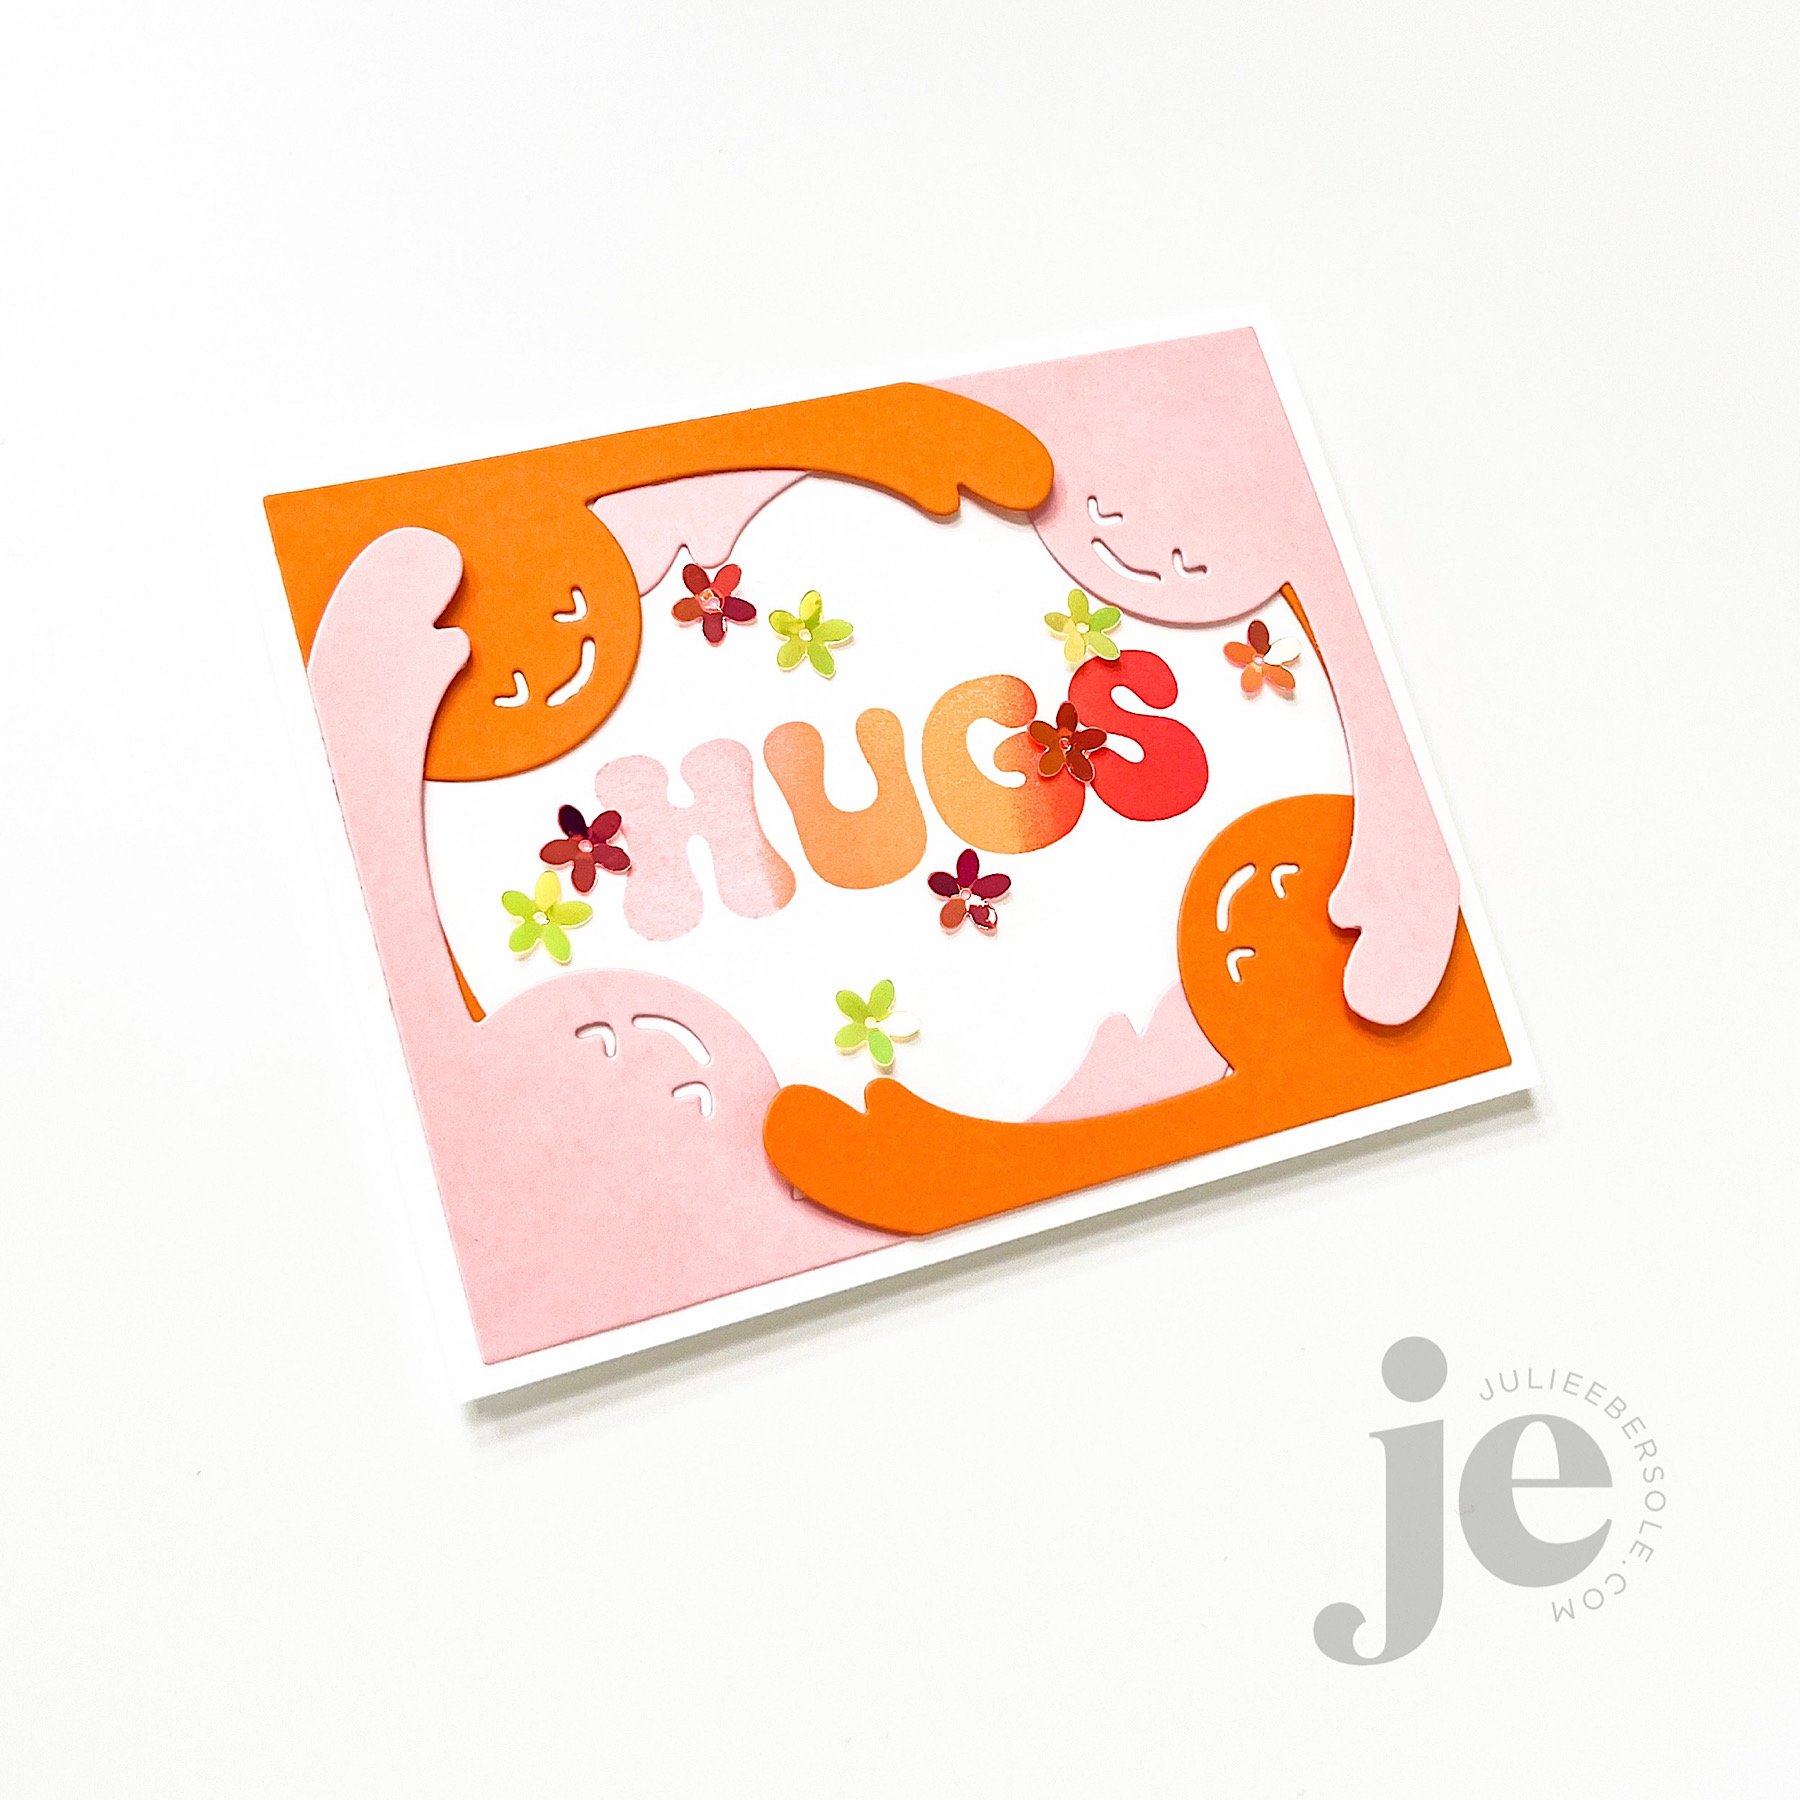
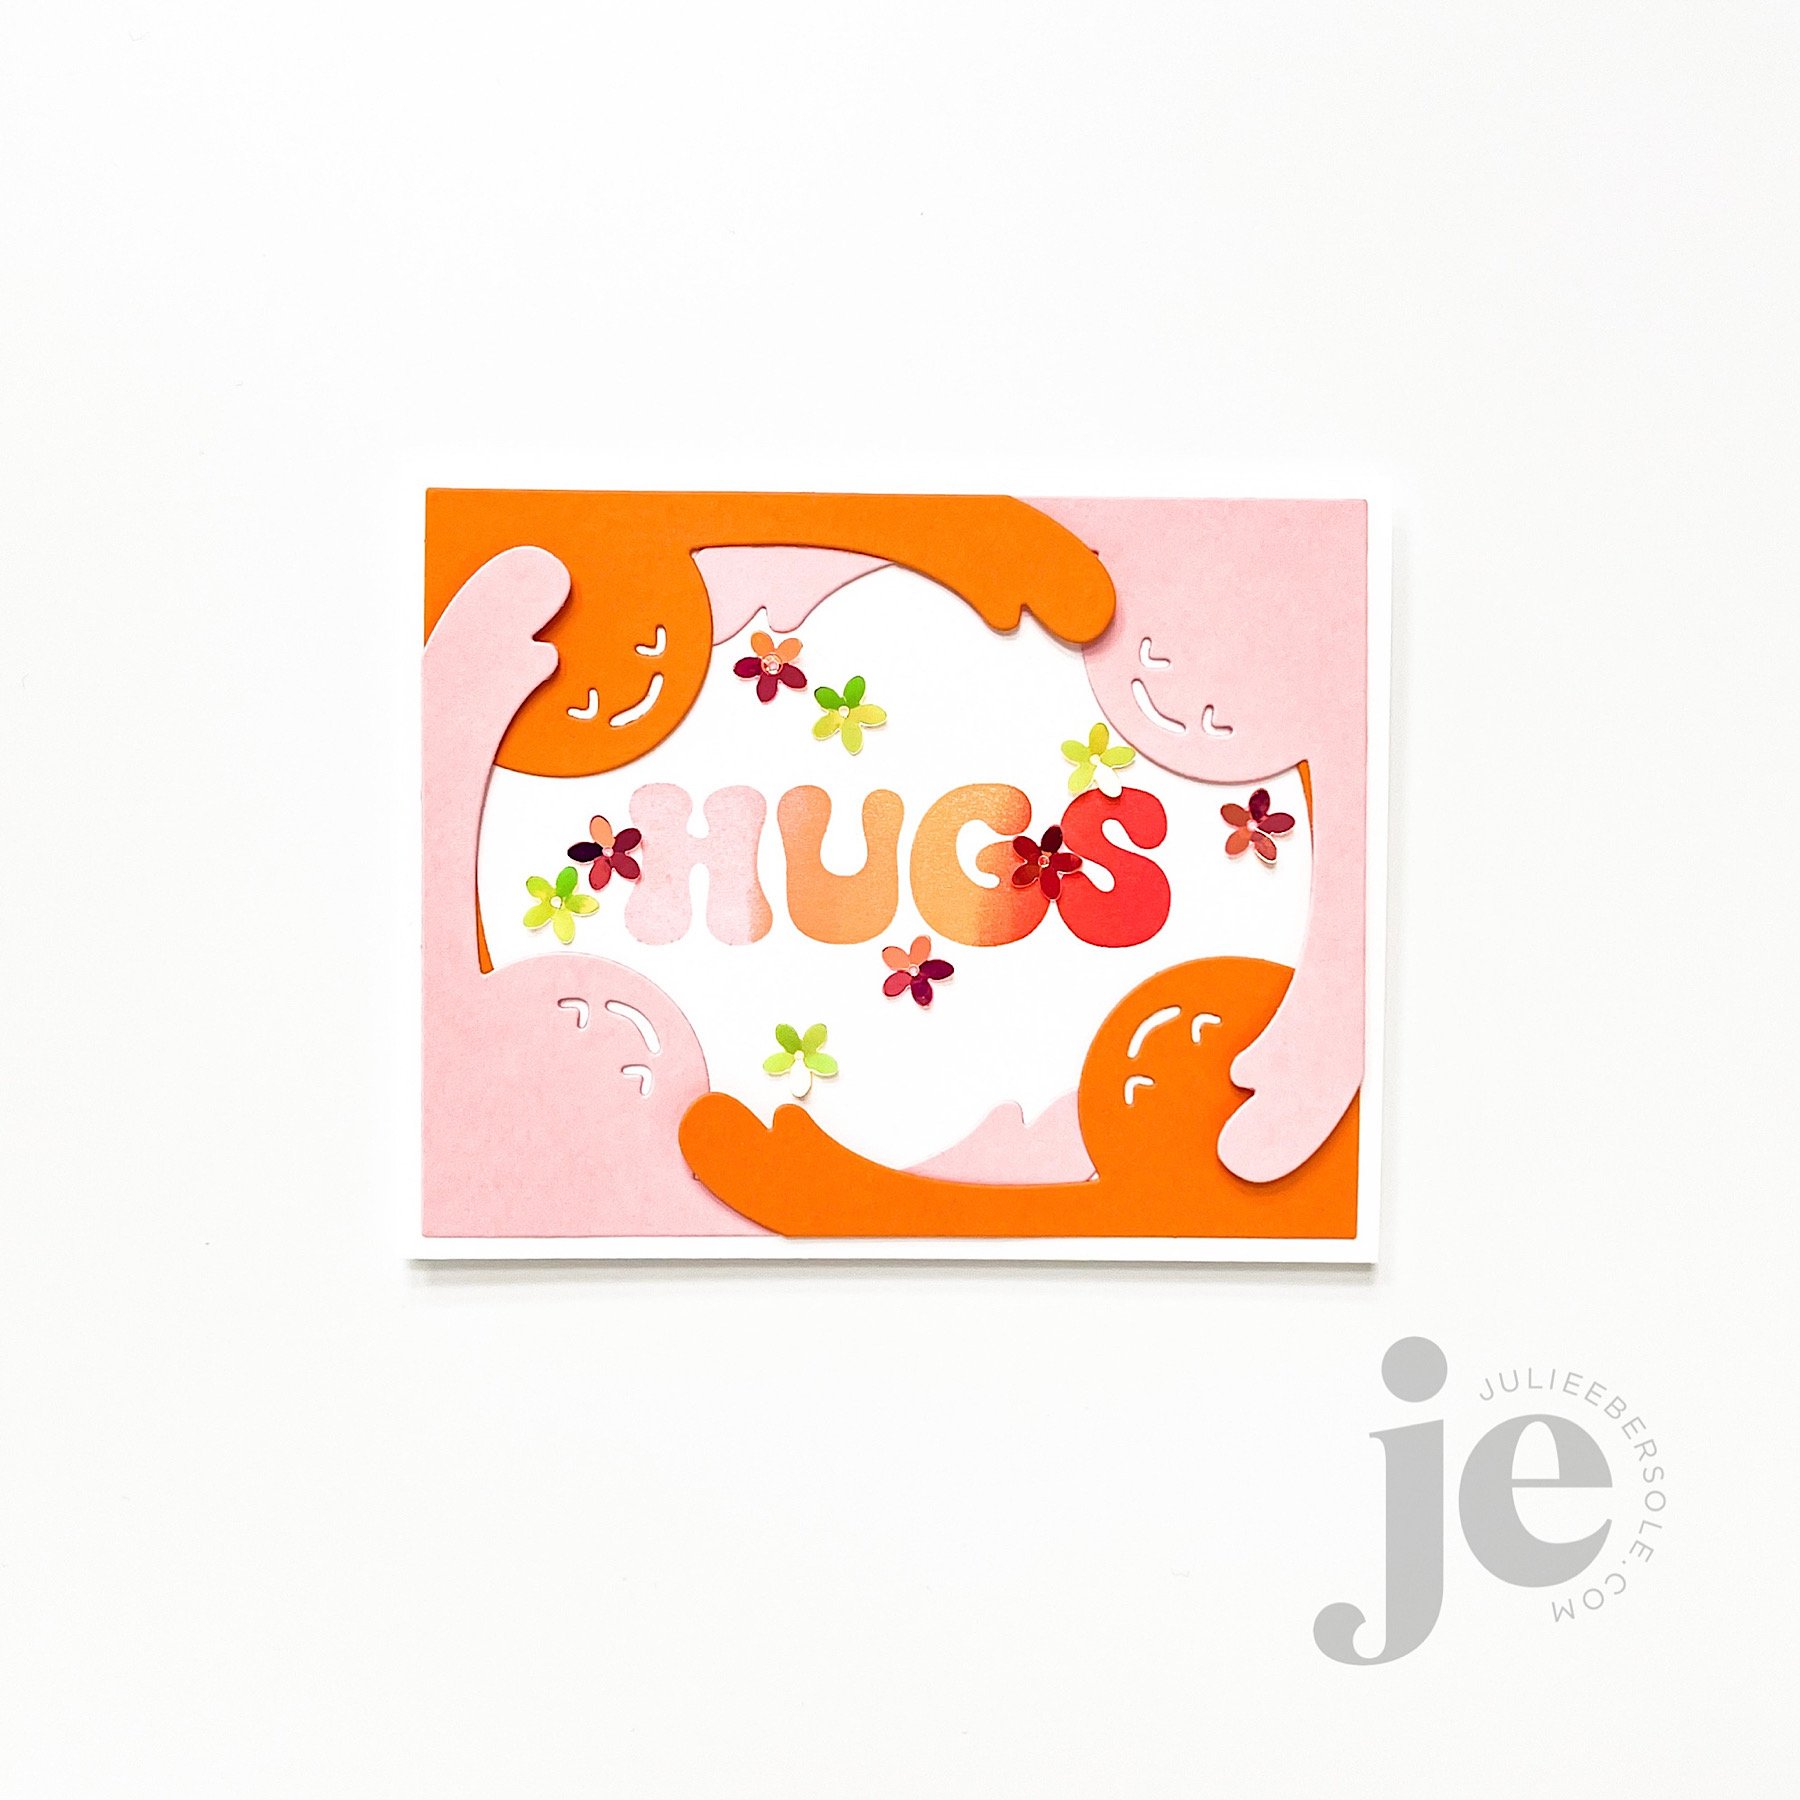
Waffle Flower’s recent release centers around hugs, and I have two sweet hugs cards to share! The first one, above features the Retro Hugs Stamp & Die Combo. It’s so gosh darn FUN to have a design style that was popular when I was growing up resurface and be embraced not just by myself but also by my daughter and granddaughters! I think that qualifies as multi-generational! Am I right?!

I thought it would be fun to “frame” the sentiment with the huggers, arms overlapping. I added pop dots under just the hands resting on top to add a little dimension. I’m STILL into this “warm” combo of pink, orange and coral hues, blending from one to the next. I usually ink up the area I want the palest color first, using these cosmetic blending sponges and stamp, then apply the mid-tone color, blending the edges where the two colors meet on the stamp, and then finally the final/darkest color. I used Glossy Accents to mount some flowery, concave sequins from my stash. Glossy Accents is great for things like this because it maintains its “loft” as it dries and it stays crystal clear.

Inside the card, I used the exact same ombré inking on a stamp that reads, “huggers gonna hug”. SO STINKIN’ CUTE!!!

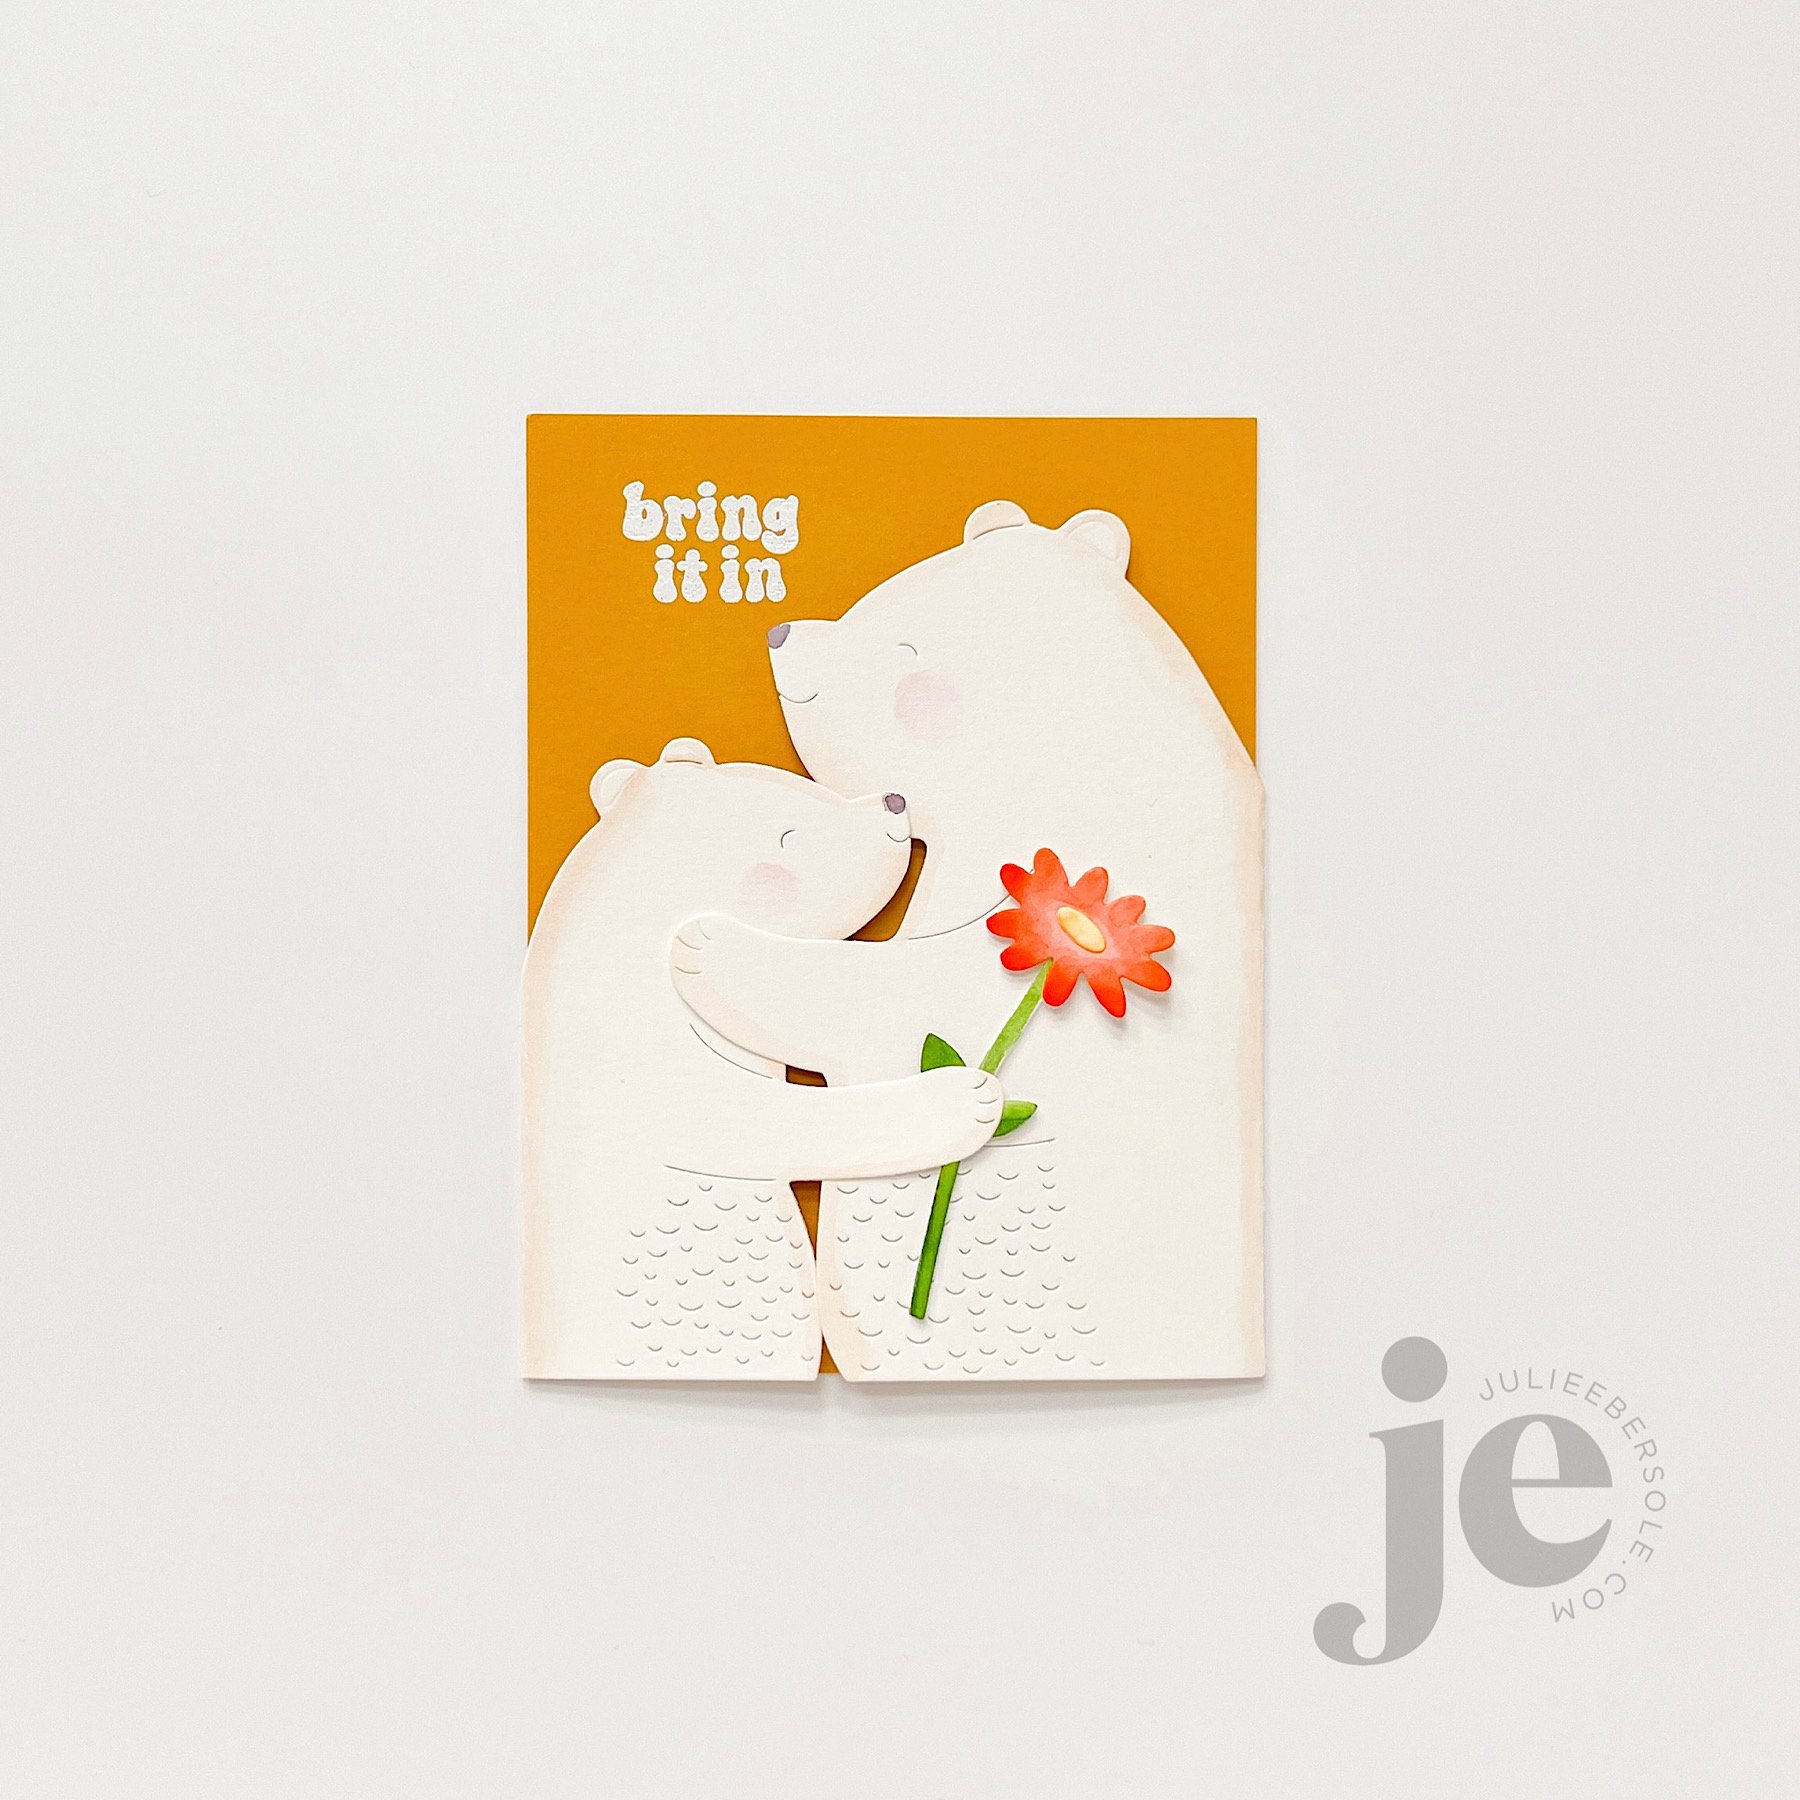
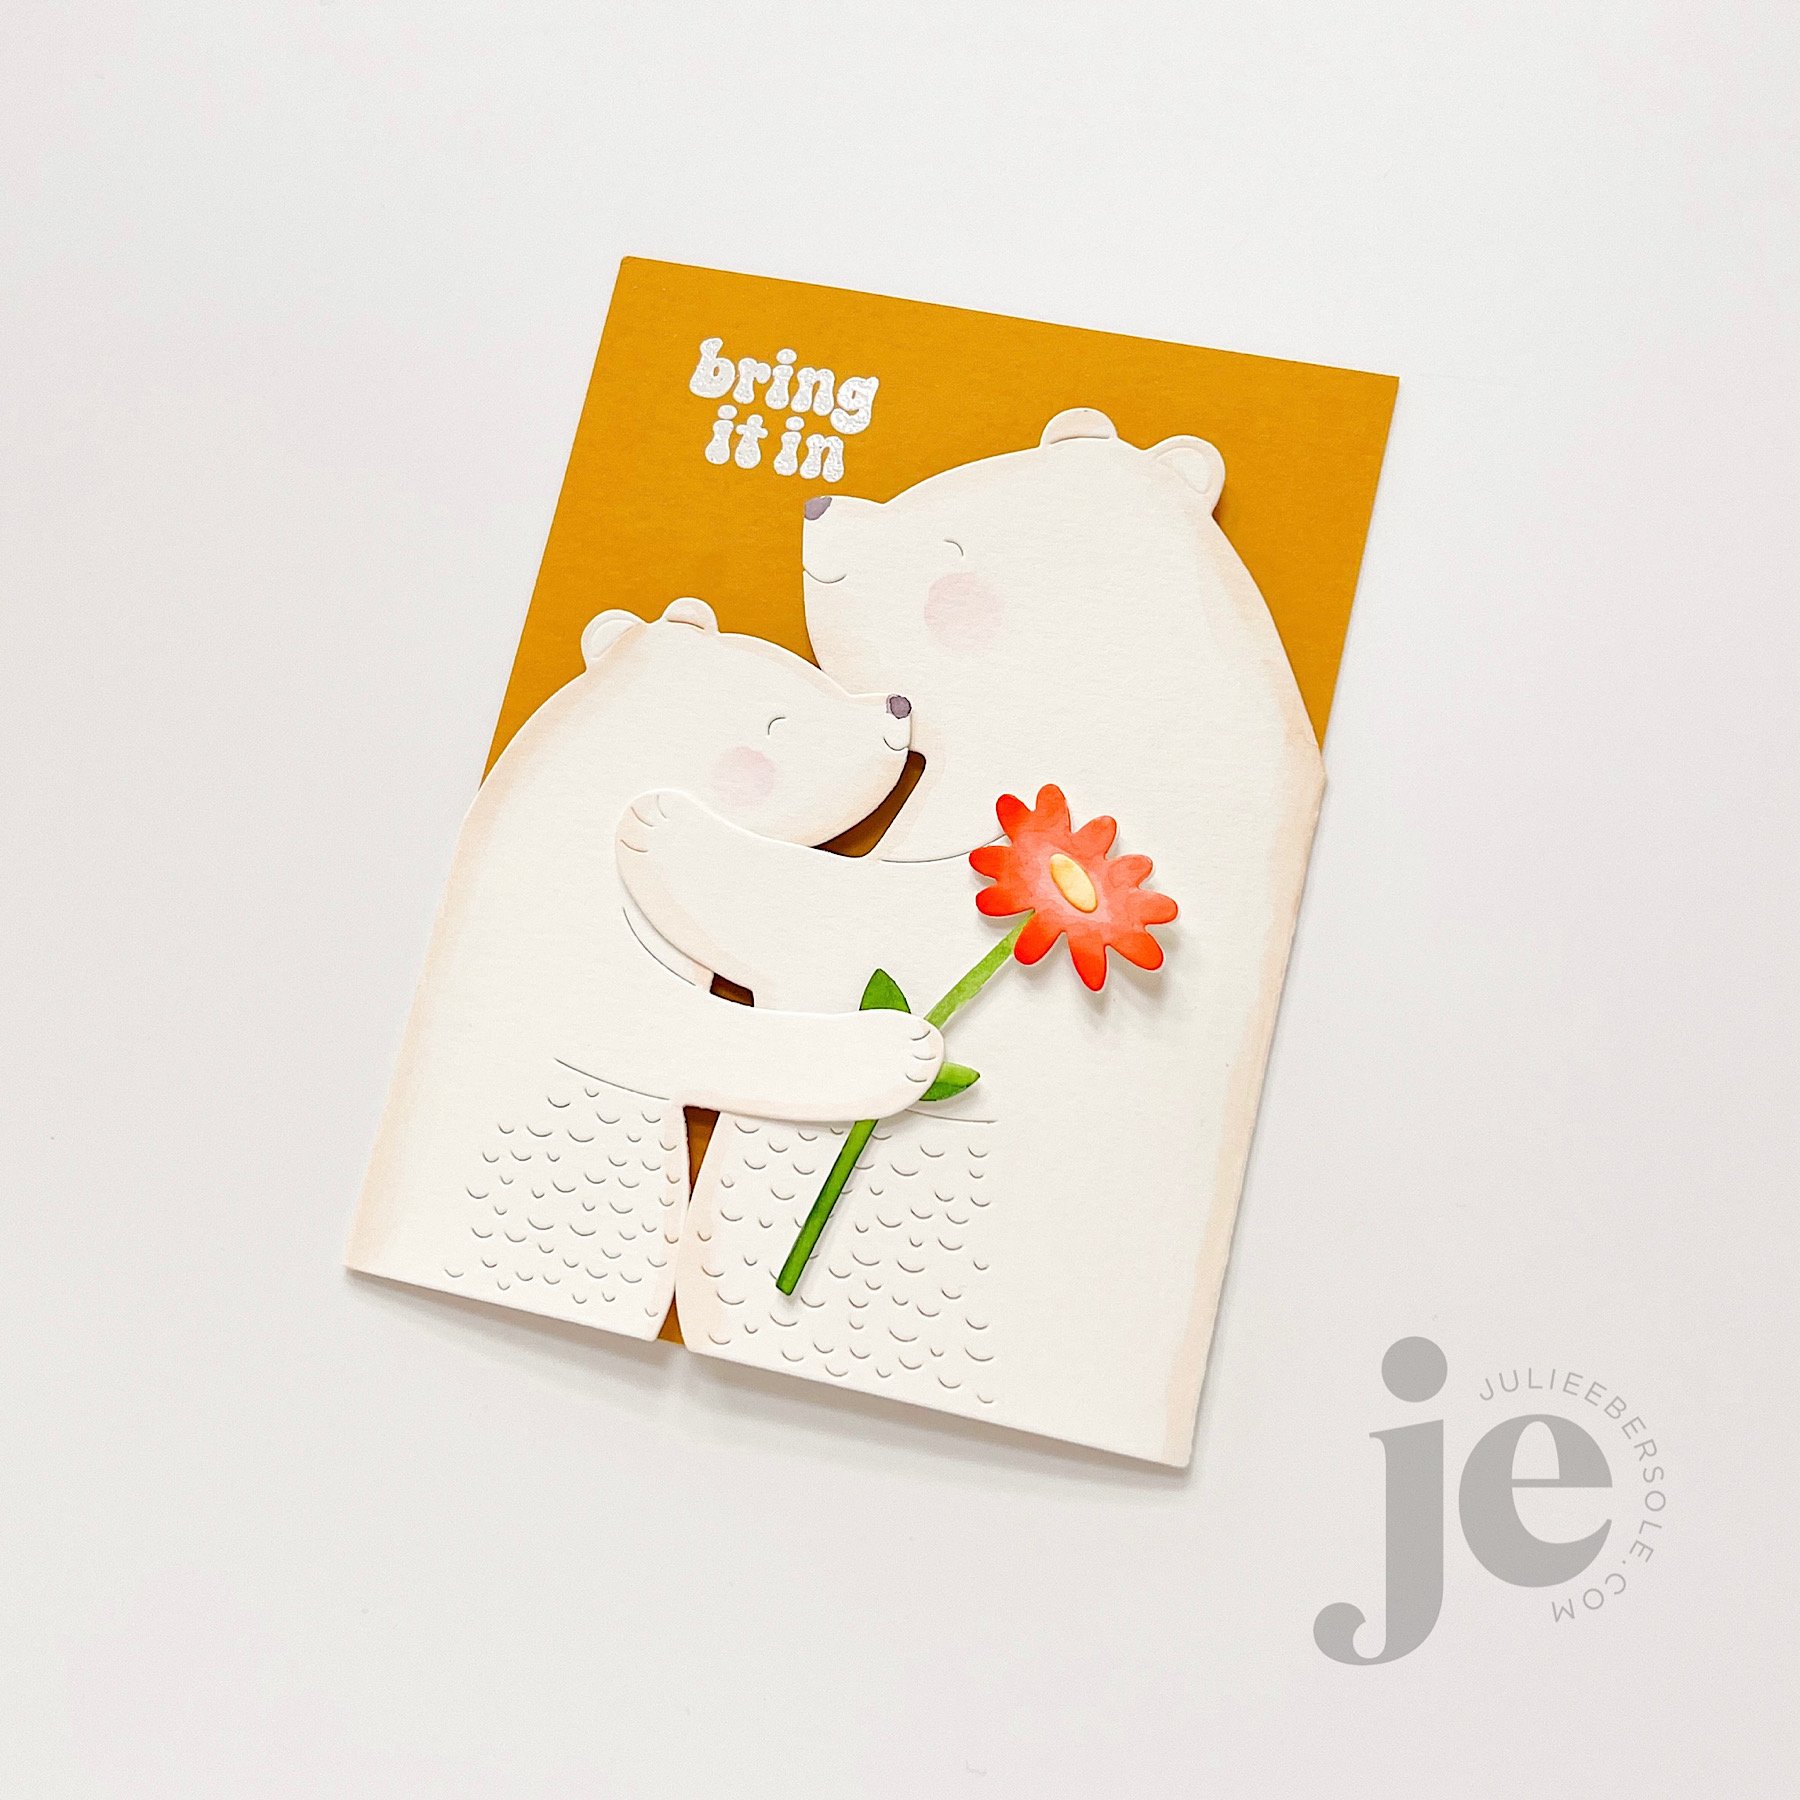
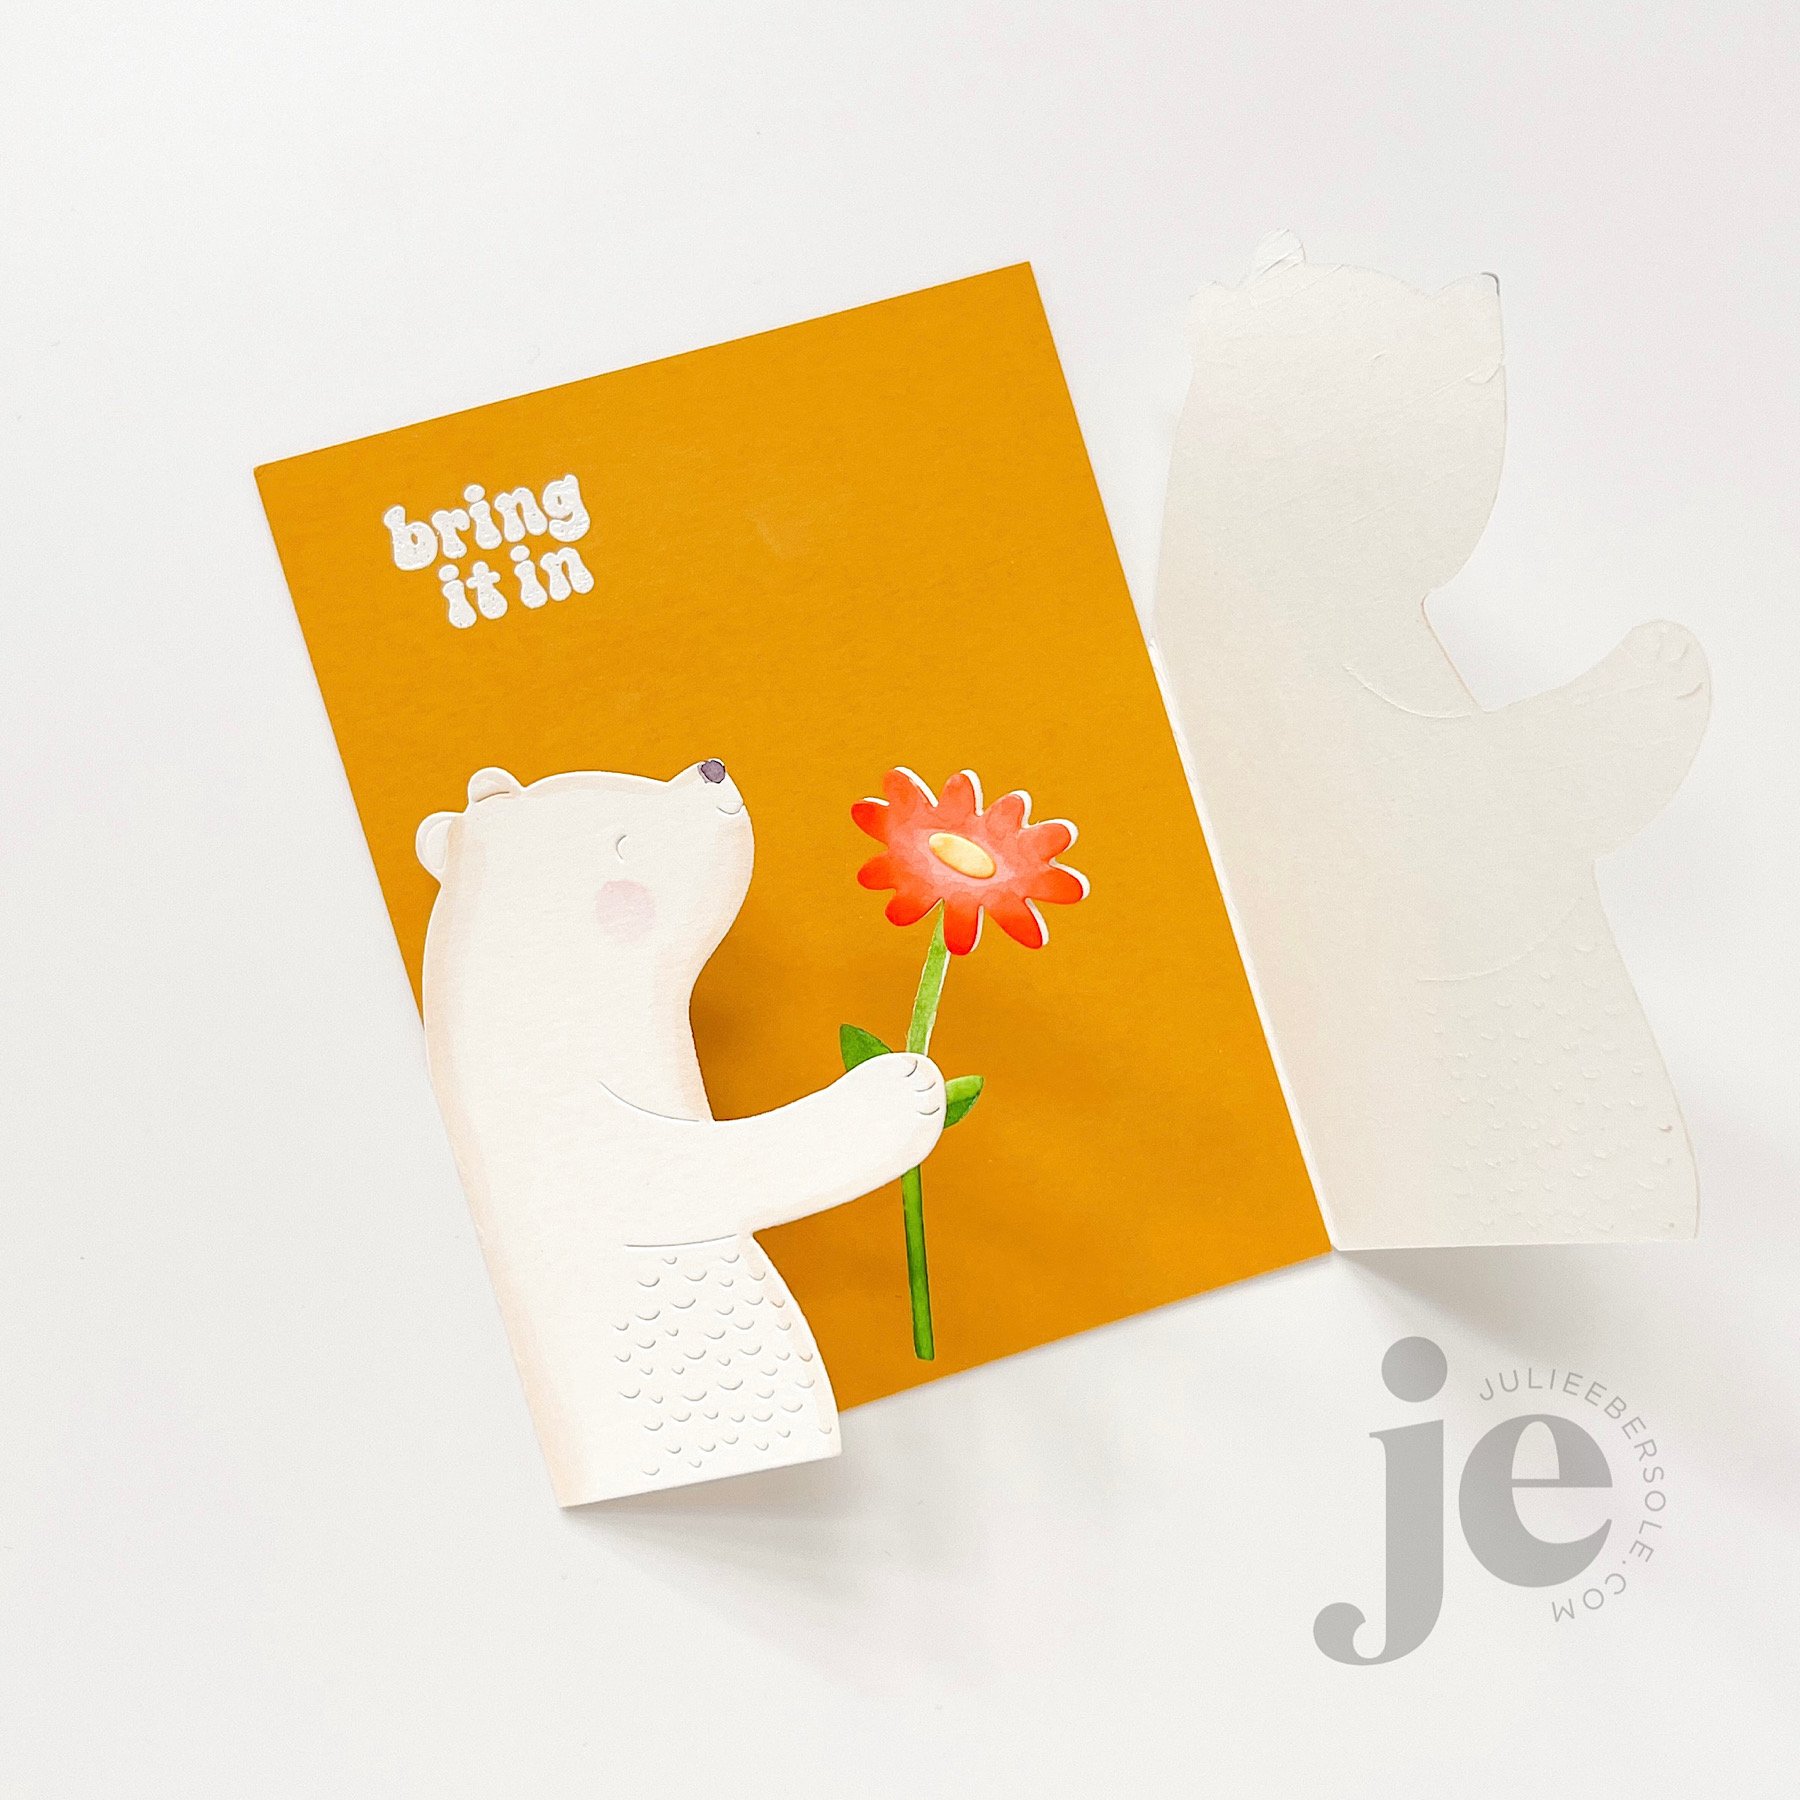
The Bear Hugs Die Set includes each of the bears you see, a flower, some hearts, butterflies and more . . . The bears have flaps so you can attach one to each side of a quarter sheet of card stock and then fold them towards each other, creating this ultra adorable interlocking gate-fold type hug.

I watercolored the bears around the edges with a very light hand using a brown tone, and the flower after die cutting them, and borrowed a sentiment from the Retro Hugs Stamp Set to white emboss a greeting in the upper left corner of a quarter sheet of warm gold card stock (one of my all time favorites). To finish it off, I mounted an extra quarter sheet of plain white card stock to the back, to conceal the flaps.

Although the bears intertwine, depending on the thickness of paper used, you may need to wrap it with twine or make a “belly band” to keep it fully closed. Without anything to hold it closed, it will partially open, and looks ADORABLE displayed on the mantel. Just sayin’ . . . (grin)

My two designs are super simple, but I’m so tickled with how quickly and easily they came together!

Thanks for stopping by and I hope your weekend was relaxing and fun—summer is getting so close now!


Disclosure: I include affiliate links to the products used in my projects and make a small commission when you purchase via those links, at no extra dimes to you. 🙂 Your support is appreciated more than I can say!

SUPPLIES:

Waffle Flower Crafts Retro Hugs Stamp & Die Combo - EH

Waffle Flower Crafts Retro Hugs Stamp Set - EH

Waffle Flower Bear Hugs Die Set - EH

Catherine Pooler Cotton Candy Ink - EH

Catherine Pooler Apricot Ink - EH

Catherine Pooler Coral Cabana Ink - EH

Versamark Embossing Ink - EH

Detail White Embossing Powder - EH

Heat Embossing Tool - EH

MISTI - EH

Neenah Solar White 80# Card Stock - EH

Canson XL Watercolor Paper 140# - EH

Pink Card Stock - EH

Orange Card Stock - EH

Golden Card Stock - EH

Watercolors - EH

Glossy Accents - EH

Sequins - *from my stash; original source: HAI Supply

Dimensional Adhesive - EH

Double Sided Adhesive Tape - EH

MONDO RHODODENDRON

A while back someone asked if I could add our WA state flower, the Rhododendron to the mondo floral series. This set went through many (understatement, OY!) renditions before I landed on this . . . There are about 1,000 species of Rhododendrons. 😳

How in the world are you supposed to choose ONE to translate into a stamp??? The two outside my front door are kinda scraggly looking, but the ones next to my Mother-in-law’s house are ginormous, lush things, with vibrant fuchsia coloring! Her Rhodis make me think of giant floral pom-poms, LOL!

The Gold Finch is also the WA state bird, so it seemed fitting to include her—that flash of yellow is so bright and cheerful!

Clear embossed over black pigment ink , on my favorite Canson XL Watercolor paper and then watercolored with Gansai Tambi before die cutting it out.

I like the effect of the flower itself, repeated as a background to support the focal.

This time, the Rhodi was stamped in a softer pink color, with the Gold Finch mounted over top of it and a hexagon frame cut from gold foil card stock.

If any of you are Washingtonians, I hope this set holds a special place among your stamps! Also, did you know ALL Azaleas are Rhododendrons, but not all Rhododendrons are Azaleas???

I don’t know if that’s a “fun” fact, but it’s a fact . . . ROTFLMBO!

Also, a note of thanks to those of you who left a comment or messaged me via email about my previous post . . . XO∞

You’re the bestest!!!


Disclosure: Affiliate links to the products used in my projects, that I like and use may be included; I make a small commission when you purchase via those links, at no extra cost to you. Thank you for all your support!

ALL WRAPPED UP + TAG IT: CHRISTMAS

feat. All Wrapped Up Stamp Set/ Essentials Arches Dies / Farmhouse Tags Dies/ Tag It: Christmas Stamp Set/ Essential Snowflakes Dies

feat. All Wrapped Up Stamp Set/ Essentials Arches Dies / Farmhouse Tags Dies/ Tag It: Christmas Stamp Set/ Essential Snowflakes Dies

These sweet li’l buddies are helping each other get prepped for the holidays . . . I love loVE LOVE when a darling image takes up enough presence on a card that I don’t have to ponder or agonize about how to combine and layout a card design—All Wrapped Up is the answer to that wish, at least for me, anyhoo!

Ya’ know, those Essential Arches dies are actually PERFECT for making tall snow-globe windows for shakers and/or card fronts—this is a simple window card (clear plastic is sandwiched between the car front and an additional die cut panel so you can peek through). The sentiment beneath is revealed when you open up the card . . . It’s just so sweet, I can’t even . . .

A word to the wise, tho—do all your white paint spattering BEFORE doing anything else; it needs a little time to air-dry before you start die cutting into it and assembling all your pieces. Ask me how I know . . . (chortle). However, if you’re in a hurry, take a clean paper towel and press it down carefully over top to soak up any excess paint droplets.

My paint spatter method:

  1. Squeeze a little white acrylic paint onto an acrylic block. It doesn’t take all that much so don’t get crazy.

  2. Squeeze a little water at a time from your waterbrush into the paint and mix it right on the block until you have a consistency you like.

  3. Hold the acrylic block over the area you want to spatter and use your paint brush to flick it off the block down onto project. Repeat until you have all the spatter you want, then set it aside to dry.

2021-holiday-WM-02.jpg

All Wrapped UP also works lovely for tags—GAAAH!!! All the heart eyes! If you love to layer your tags, that skinny one, combined with the sentiments in the Tag It Set are perfect for doing that—anything that makes mass production easier gets 5-stars from me because I’m always last-minute Lucy at getting things wrapped so I tend to keep tags pretty minimalist. (face palm)

Do you like making tags? My daughter is not a card maker, but she does enjoy making tags for holiday gifts.


GIVE ME ALL THE STARS!

I adore stars—this basic shape is truly suitable for so many different occasions and applications! I think the largest sizes of the star shapes would make great banners for the holidays or birthdaysuy

For the creations below, I did full panel watercolor washes onto quarter sheets of my favorite watercolor paper using my Kuretake Gansai Tambi watercolors and a wide flat brush—one of the best investments I’ve ever made to my crafting tools.

Once they were dry, I flattened them under some heavy books overnight and then they were ready to go for whatever I wanted to do with them, which was the following (so far, heh, heh, heh!) . . .

Using the negative from my die cutting session made the perfect backdrop for my li’l Boo, here! I laid down a variety of sizes onto the panel and ran it through in one fell swoop! I’m telling you, it does not get any easier than this!

I had used the Piercing Plate 2 on white card stock for a textural effect on white card stock which I trimmed 1/4” smaller than the base card (standard A-2). Then I mounted the starry watercolor panel onto that and trimmed the edges of that to be flush; mounted that to the base card. I love that some of the stars “bleed off” the edge.

For just a tad more interest, I made a messy nest of black thread from my emergency sewing kit (I don’t really sew, but a girl’s gotta’ do what a girl’s gotta do when the button of her pants pops off, am I right?!)

On this one, I took all the solid cut outs and layered them around my moon, which was first cut using the Alpine Snowfall die, which. isa knock out die, and then cut out using the Essentials Circles. I didn’t bother poking out all the chads in the “moon”, because I liked how it looked when some fell out and others still clung—it’s more moon-like, IMHO. Gotta’ love those multi-functional dies, LOL!

Hope your weekend is stellar! (chortle)

Stay healthy and safe out there!


HALLOWEEN STAMPING GOODNESS

Today I’m sharing three sweet and adorable Halloween Boo-quet projects here on the blog—also used this set on a Haunted House Treat Box Tutorial over on the Ellen Hutson YouTube Channel that turned out so STINKIN’ CUTE, it’s gonna kill me to wait until Halloween to gift them to the grand weebles! GAAAAH!!!

This was a super fast card, excellent for a last-minute Halloween greeting! So fun to string the balloon boo-quet to kitty’s tail! The matching die set has individual dies, in addition to one for the boo-quet as a whole, so you can pick and choose which of those to pop up, if you want! Options . . . always options, LOL! (wink!).

QUICK TIP: Stamp the balloon strings first, then position and stamp the ghost/bat balloons; so much easier to line them up accurately!

It’s hard to tell in the photo, but our sweet little witch has a pale pink watercolor wash on her dress. I foiled a quarter sheet of black card stock with the Tiny Stars Hot Foil Stamp and then die cut the clouds from that, popping them up, but upside down. Sometimes, I just like ‘em that way. My card, my prerogative. (hair flip)

After die cutting the black clouds in the previous project, I had some leftover, of course . . . So, I figured why not use it to make a background for my little witch to go trick-or-treating with her buddy and broom—and at that point I decided it would be fun to die cut a circle large enough to accommodate the sentiment and turn it into a quick little shaker element!

If you haven’t been bitten yet by the hot-foil stamping bug, I must say, it’s super satisfying—I just love the look of those shiny stars, debossed into the paper. I could just putz around and hot foil stamp the day away—which is actually a smart idea because then you could have a number of pieces ready to go when you need them. Truth.

What do you do more of? Halloween greetings or treat packaging? I’m a mixed bag because both are so much fun to make.

Hope your week is going splendid!