DIY

DIE CUTTING JIG FOR MASS PRODUCTION

faux-letterpress-thanks-001-01.JPG

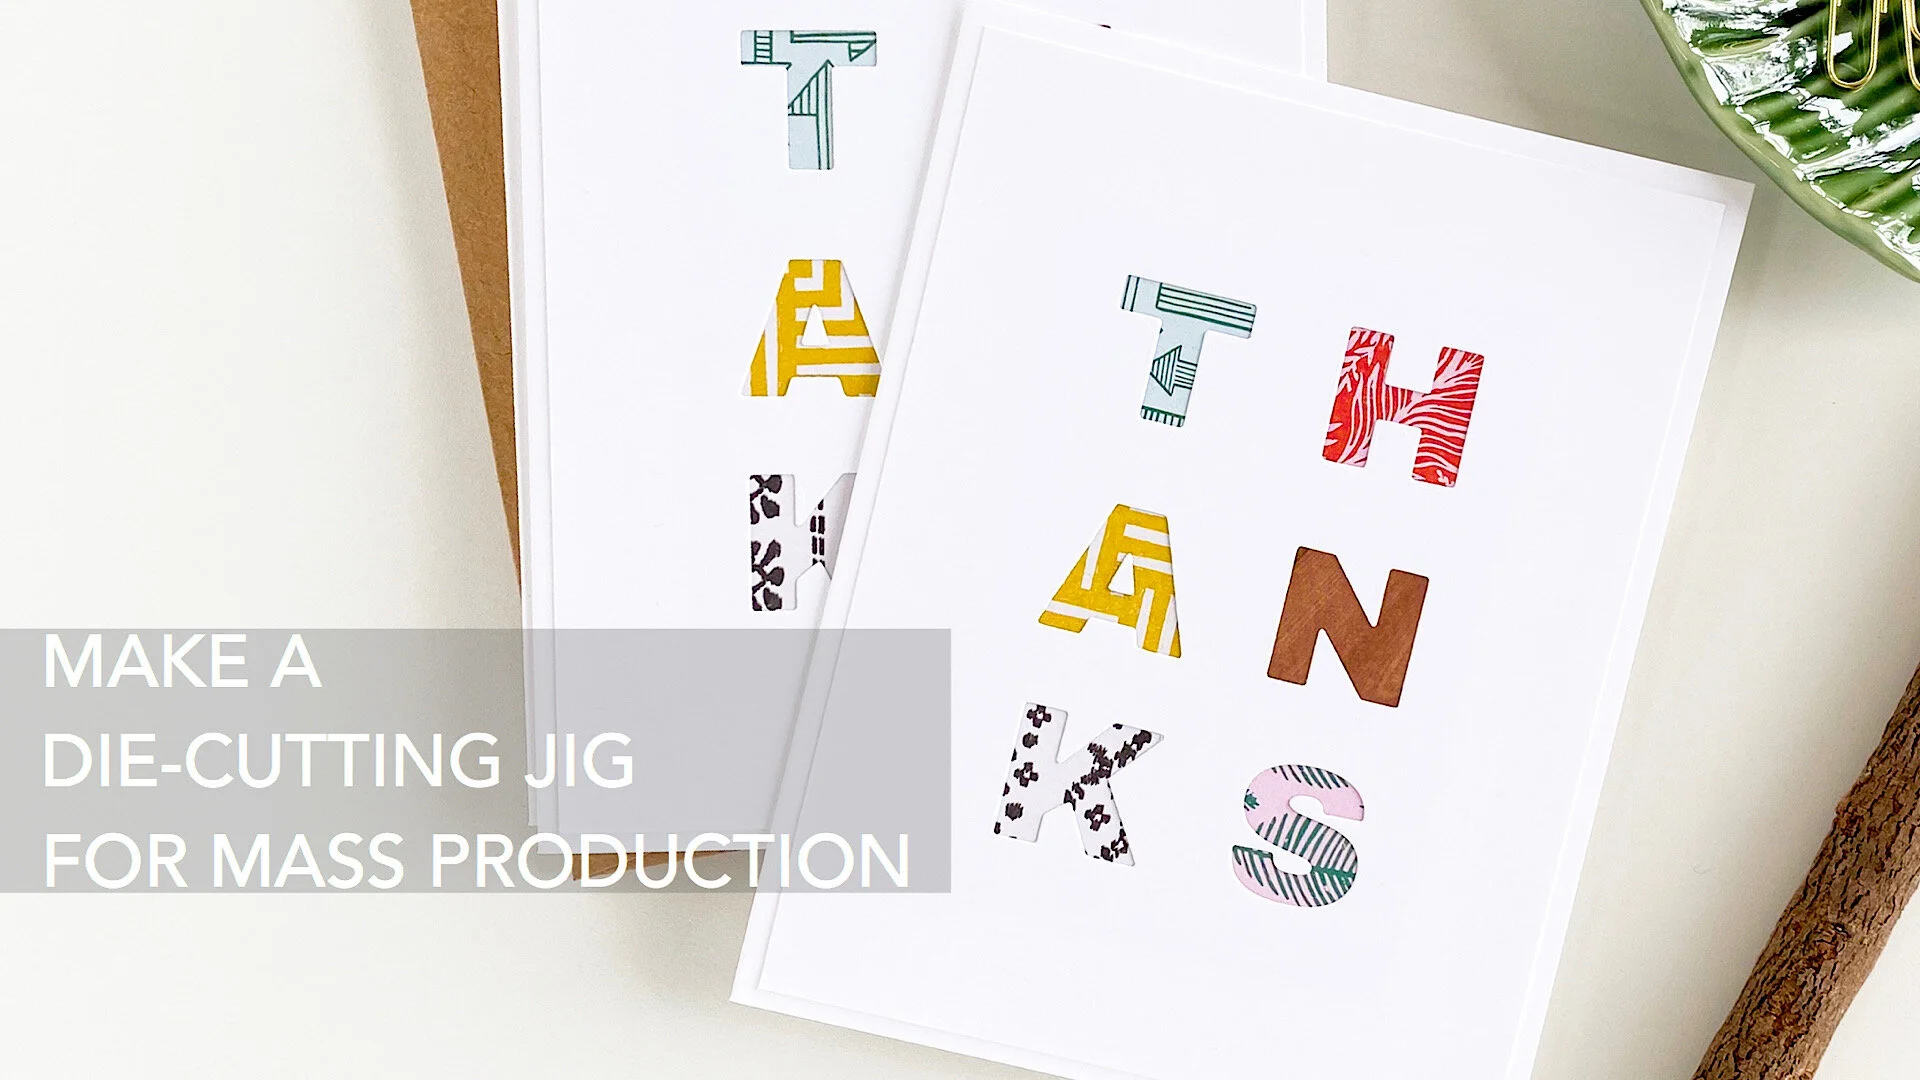
Saw a boxed set of letterpress cards that made me swoon; voices in my head started jabbering. Had to come home and make it real.

Please note: if I weren’t a crafty gal, I’d have bought these in the blink of an eye. Seriously.

First method used was utterly, painfully slow . . .

Had a flash of brilliance. Filmed it. ↓

Felt smugly genius.

faux-letterpress-thanks-001-02.JPG

And, if you figured something similar out already, do me a favor:

Keep it to yourself and allow me my delusions.

•hair flip•

Have a nice day!


SUPPLIES:

Affiliate links are included in this post; if you purchase via my links, it will not cost anything extra and I receive a small commission. Thank you ever so muchly for your kind support!

DIY POM POM GARLAND

diy-pompomgarland-001-01.JPG

I love pom poms. And I’ve wanted a pom pom garland for my Christmas tree for the longest time, but the cost of those beautiful handmade garlands always stopped me in my tracks; a single 6’ garland can run $35 +/- and upwards. My tree is 7.5’ . . . based on the size, I would need somewhere between 30 and 36’ of garland to wrap around it . . . You do the math . . . Seriously, I just couldn’t bring myself to spend that much on a garland, alone, for my tree.

Part of my plan, of course, involves some weebles (a.k.a. grandbabies); I really REALLY wanted my tree to be entirely child friendly—no wild shrieking “DON’T TOUCH!!!” out of the adults. And no worries about broken glass from fragile collectible ornaments and possible boo-boos.

diy-pompomgarland-001-02.JPG

I hit the craft store and purchased a 1 pound skein of yarn (Caron brand, white). Pulled out my pom pom makers, and got BUSY! If you’ve never made your own pom poms, I gotta say, they’re easy, fun, and a great way to decompress/alleviate stress! AND, you can watch your favorite TV shows while you’re pumpin’ out the poms! I wasn’t able to edit and share this before the holiday, BUT, I now have a quick video tutorial for those of you who have not yet been introduced to the ways of pom pom makers—you’ll be ahead of the game for next year’s tree, OR, there are lots of other things you can make with pom poms . . . (I’m collecting ideas HERE on Pinterest).

I used very nearly the entire pound of yarn to make two 12’ and two 6’ garlands for my tree.

LINK: How-to video for the little paper house ornaments featuring dies I designed is HERE.

LINK: How-to video for the little paper house ornaments featuring dies I designed is HERE.

I’m so happy with how it turned out!

Hope you had a Merry Christmas and I wish you an amazing 2020!

My joy. ❤️

My joy. ❤️


SUPPLIES:

HALLOWEEN TREAT PACKAGING IDEAS

2019-08-halloween-treats.jpg

Halloween’s a comin’ and you gotta’ treat your boo’s, eh?! Well, I got ya’ covered with a variety of ideas—these were (literally) wicked fun to make!

  1. I have a serious addition to little paper sacks and fun paper straws and used some from my stash to make this adorable witch’s broom following this ridiculously easy tutorial. If you’re looking for similar kraft/favor bags, I did find these, which are sized identically to mine, on Amazon: Extra Small Kraft Bags and Black and White Patterned Paper Straws

  2. I modified one of my favorite The Stamp Market Dies, Gift Bag & Tags, to make a larger size bag with assembly flaps. That sounds really confusing but if you watch the video, you’ll totally get it (scroll down or watch on YouTube HERE.). If you are one of those sewing-machine-happy-fanatics (onto paper), then by all means, skip this trick. But, if the idea of dragging out and setting up your sewing machine makes you wanna stick a fork in your eye, (yes, I really am that lazy a paper crafter!) this is an awesome and easy way to modify. (wink) Just sayin’ . . . I’d slip a cookie into this bag. Of the Snickerdoodle variety. (personal favorite)

  3. This Pillow Box by Lawn Fawn looks so cute garnished with a peachy pink web and a bat (bat is on a Mini Action Wobbler for added fun). OH, and, BTW, I gave my bat some fur using a white gel pen. I think he’s ADORABLE all furry!!! EEP!!!

  4. The small bag die in the Gift Bag & Tags set is PERFECT for gift cards—I mean, seriously!!! A Halloween gift card for a coffee treat??? YAASSSSS!!!

Seriously, with these ideas, your Halloween treats are gonna’ be the talk of the ‘hood. BOOM!!!

Before I forget—Ellen Hutson is having a sale on dies Aug 15-17th! Dies are 20% off in the Die Cutting Category with code: welovedies2019 at check out!


DIY FOILED LETTERPRESS

Letterpress has always been my favorite type of stationery—I adore the clean, white space, elegant simplicity, and the luxurious texture of the paper and the debossed images and text.

I’ve been searching for a long time to find a way to do this at home, without an actual press (which I have no room to store/operate anyway). I’ve tried lots (and LOTS) of different methods, but none of them really ever gave me the professional looking results I was hoping for. This has come the closest, and what I also find exciting is that it didn’t make me tear my hair out with lack-luster results. It’s FUN, I didn’t get frustrated, and holy crow, I wanna foil and letterpress ALL THE THINGS!!!

WIN!!! YASSSSSS!!! MAJOR WIN!!! •fist pump•

Can you hear the monkey clappin’????

Notes and suggestions for what I found worked for me are listed directly beneath the video. All supplies I used are listed at the end of the post.

BASIC INFO:

  • The Gemini FoilPress is designed specifically for use with the Gemini Junior; it is also compatible with the regular Gemini, if you use the Extender Plate (available separately). I don’t know if it works with a manual machine, i.e. the Big Shot because I haven’t tried and am unlikely to—the last thing I want to do is break or void the warranty on either machine.

  • The FoilPress uses THERMAL foil; this foil transfers images using a “hot foil stamping” method that requires heat and pressure. Thermal foils will also transfer with sticky mediums such as double-sided sticky tape, double-sided adhesive foam, sticky embossing powder, dries-tacky types of glues.

  • Toner reactive foils, such as iCraft Decofoil, Minc Foils, etc. perform as described; they require toner and heat to transfer (foil images). Toner foils will also transfer with sticky mediums such as double-sided sticky tape, double-sided adhesive foam, sticky embossing powder, dries-tacky types of glues. HOWEVER, these foils do NOT work with hot foil (metal) stamps (dies). Sidebar: The Minc is a heat laminator type machine and is designed to work with toner images, NOT hot foil stamps. Would I risk it? Nope.

  • The FoilPress comes with pretty much everything you need to get started, however, you may need your Gemini Junior Magnetic Shim and/or the Gemini Junior Metal Cutting Shim in some instances.

  • You can foil using the FoilPress on pretty much any paper surface, including card stock, letterpress paper, and vellum (results may vary; I haven’t tried vellum as of this writing). You can also foil with the FoilPress on other flat materials such as leather, thin wood veneers, acetate, cotton fabrics, ribbon. Non-paper surfaces will require multi-surface thermal foils; multi-surface thermal foils are not suitable for paper, according to Crafter’s Companion. I haven’t tested that personally, but I’ll take their word for it.

  • You can use ANY low profile dies to foil with the Gemini Foil Press and Gemini Junior so long as their maximum depth is no more than 1mm; any thicker could damage your machine and will void the warranty.

  • Crafter’s Companion advises against foiling with embossing folders; doing so will void the warranty.


NOTES & SUGGESTIONS:

  • Download the Material Matrix from Crafter’s Companion and keep it somewhere you can refer to it easily when foiling. The Manual is a good starting point and I encourage you to take a few minutes to read it.

  • Always use foil stamps design side up (when foiling low profile dies, place them blades up on the platform; you do not want to cut into the purple silicone heating pad).

  • Place foil pretty (colored) side against the foil stamp/die; the “ugly” side of the foil goes against your paper.

  • Keep in mind you are working backwards/in reverse order, so you won’t be able to see through the foil when placing your paper on top of it; a template like I show in the video may be helpful. Use the grid lines to help with planning your layout and to align things straightly.

  • Once you remove the heated platform from the base, leave it disconnected or use the top panel power button to shut off the heating element until you are ready to foil your next project; it doesn’t take long to reheat when you reconnect/power on the temp setting. If you keep it connected and constantly heating, you will decrease the longevity of the heating element, as well as end up with inconsistent results from overheating.


SANDWICHES:

Hot Foil Stamps/Low Profile Dies (as listed in the manual)-

  1. Stamp/Die design (or blades) UP

  2. Foil, pretty side down against the stamp/die

  3. Paper

  4. Top Plate (heat resistant plate)

Cut n’ Foil Stamps (Dies)* - Heat setting LOW, Timer 10 seconds

  1. Cut n’ Foil stamp (die) design UP

  2. Foil, pretty side down against the stamp/die

  3. Paper

  4. Gemini Junior Metal Cutting Pad

  5. One (1) card stock shim (I used 60# card stock; you can try 80#, but I will admit when I tried 2 shims, it was too much pressure for a crisp clean foil and cut.)

  6. Top Plate (heat resistant plate)

*With the Cut n’ Foil stamp I happened to be using in the video, I couldn’t get good results with the manual’s suggested sandwich nor the timing. Experiment to find your sweet spot, as every machine is calibrated slightly differently.

Hope you found this helpful and that it has you excited about the possibilities now available! This is not intended to be a fully comprehensive guide to the FoilPress—I’m just sharing what worked for me during my play time. OK? OK.

Let me know down below in the comments, if you’d like to see more FoilPress videos from me!

Cheers!