Kuretake Gansai Tambi

RELAX & CREATE - PAINTING SKIN TONES WITH JUST 3 COLORS

mini-voices-together-001.JPG

Surprisingly enough, you can use just 3 colors from your collection of Gansai Tambi watercolors to develop a wide range of skin tones! Watercolor is my favorite coloring medium, and it was fun to experiment with custom mixes. This card was actually inspired by some recent designs by my friends (and creatives extraordinaire) Lisa Spangler and Jessica Frost Ballas! I loved Lisa’s use of watercolors on her Mini Voices In My Head Designs, and Jessica’s minimalist approach with a basically black and white color scheme, accented by a pop of red.

gansai-tambi-for-skintones.jpg

You’ll see in the beginning of the video that I used the three colors shown above, and diluted them down with water from my waterbrush, and then played around with mixing the colors—I suppose I could have made a color chart, but honestly, when I have to mix colors, I tend to do so on the fly—and if I should need to repeat the mix down the road, I oddly enough remember the colors I worked with. What can I say? It’s a gift.

KIDDING.

I AM KIDDING YOU.

Also, I have to mention that I LOVE using the Waffleflower Mini Media Mat as a palette—it is just sooooo handy! And if the colors dry up while I’m working, I just rehydrate them with a couple drops of water by squeezing the waterbrush.

In one part of the video, I use a “thirsty” brush to wick up wet color from an area where I got a little heavy-handed; “thirsty” just means dry. I swipe my paintbrush against a clean paper towel to soak up the water (if I need, to, I might even pinched it with paper towel to get it REALLY dry); when I apply the dry brush to an area that has too much water or too much paint, it wicks it up into the bristles (hence why they call it a “thirsty” brush). I off load that onto paper towel, then I can go back and wick up more, if needed.

As you can probably tell, I had increased difficulty getting those rosy cheeks I was after when I tried to do them on the darkest skin tones; I’m going to need to practice. Rosy cheeks are a thing for me. I literally can’t help myself from painting rosy cheeks. Weirdness.

 
mini-voices-together-002.JPG

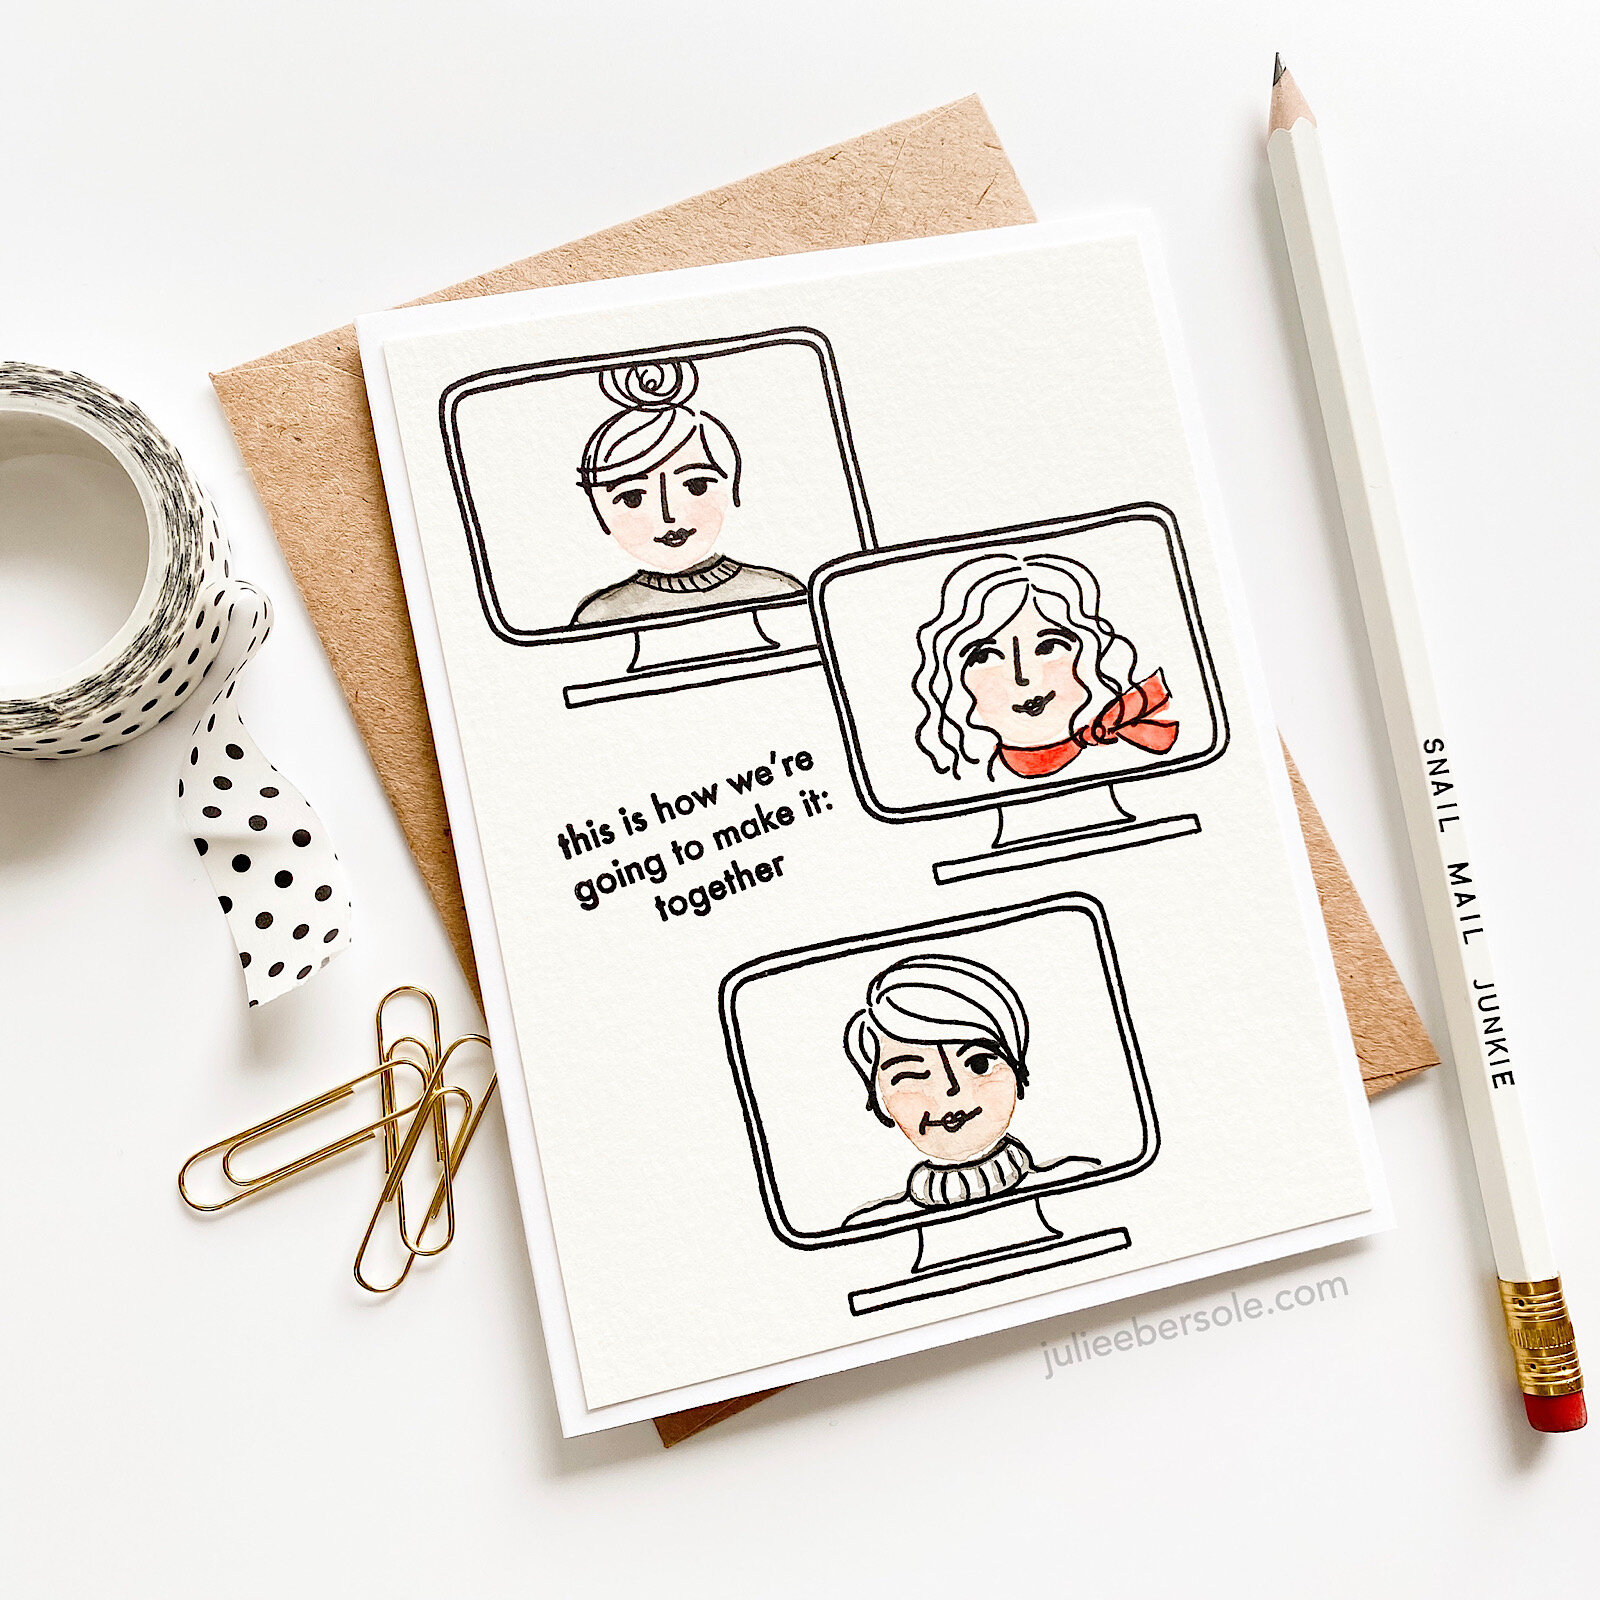
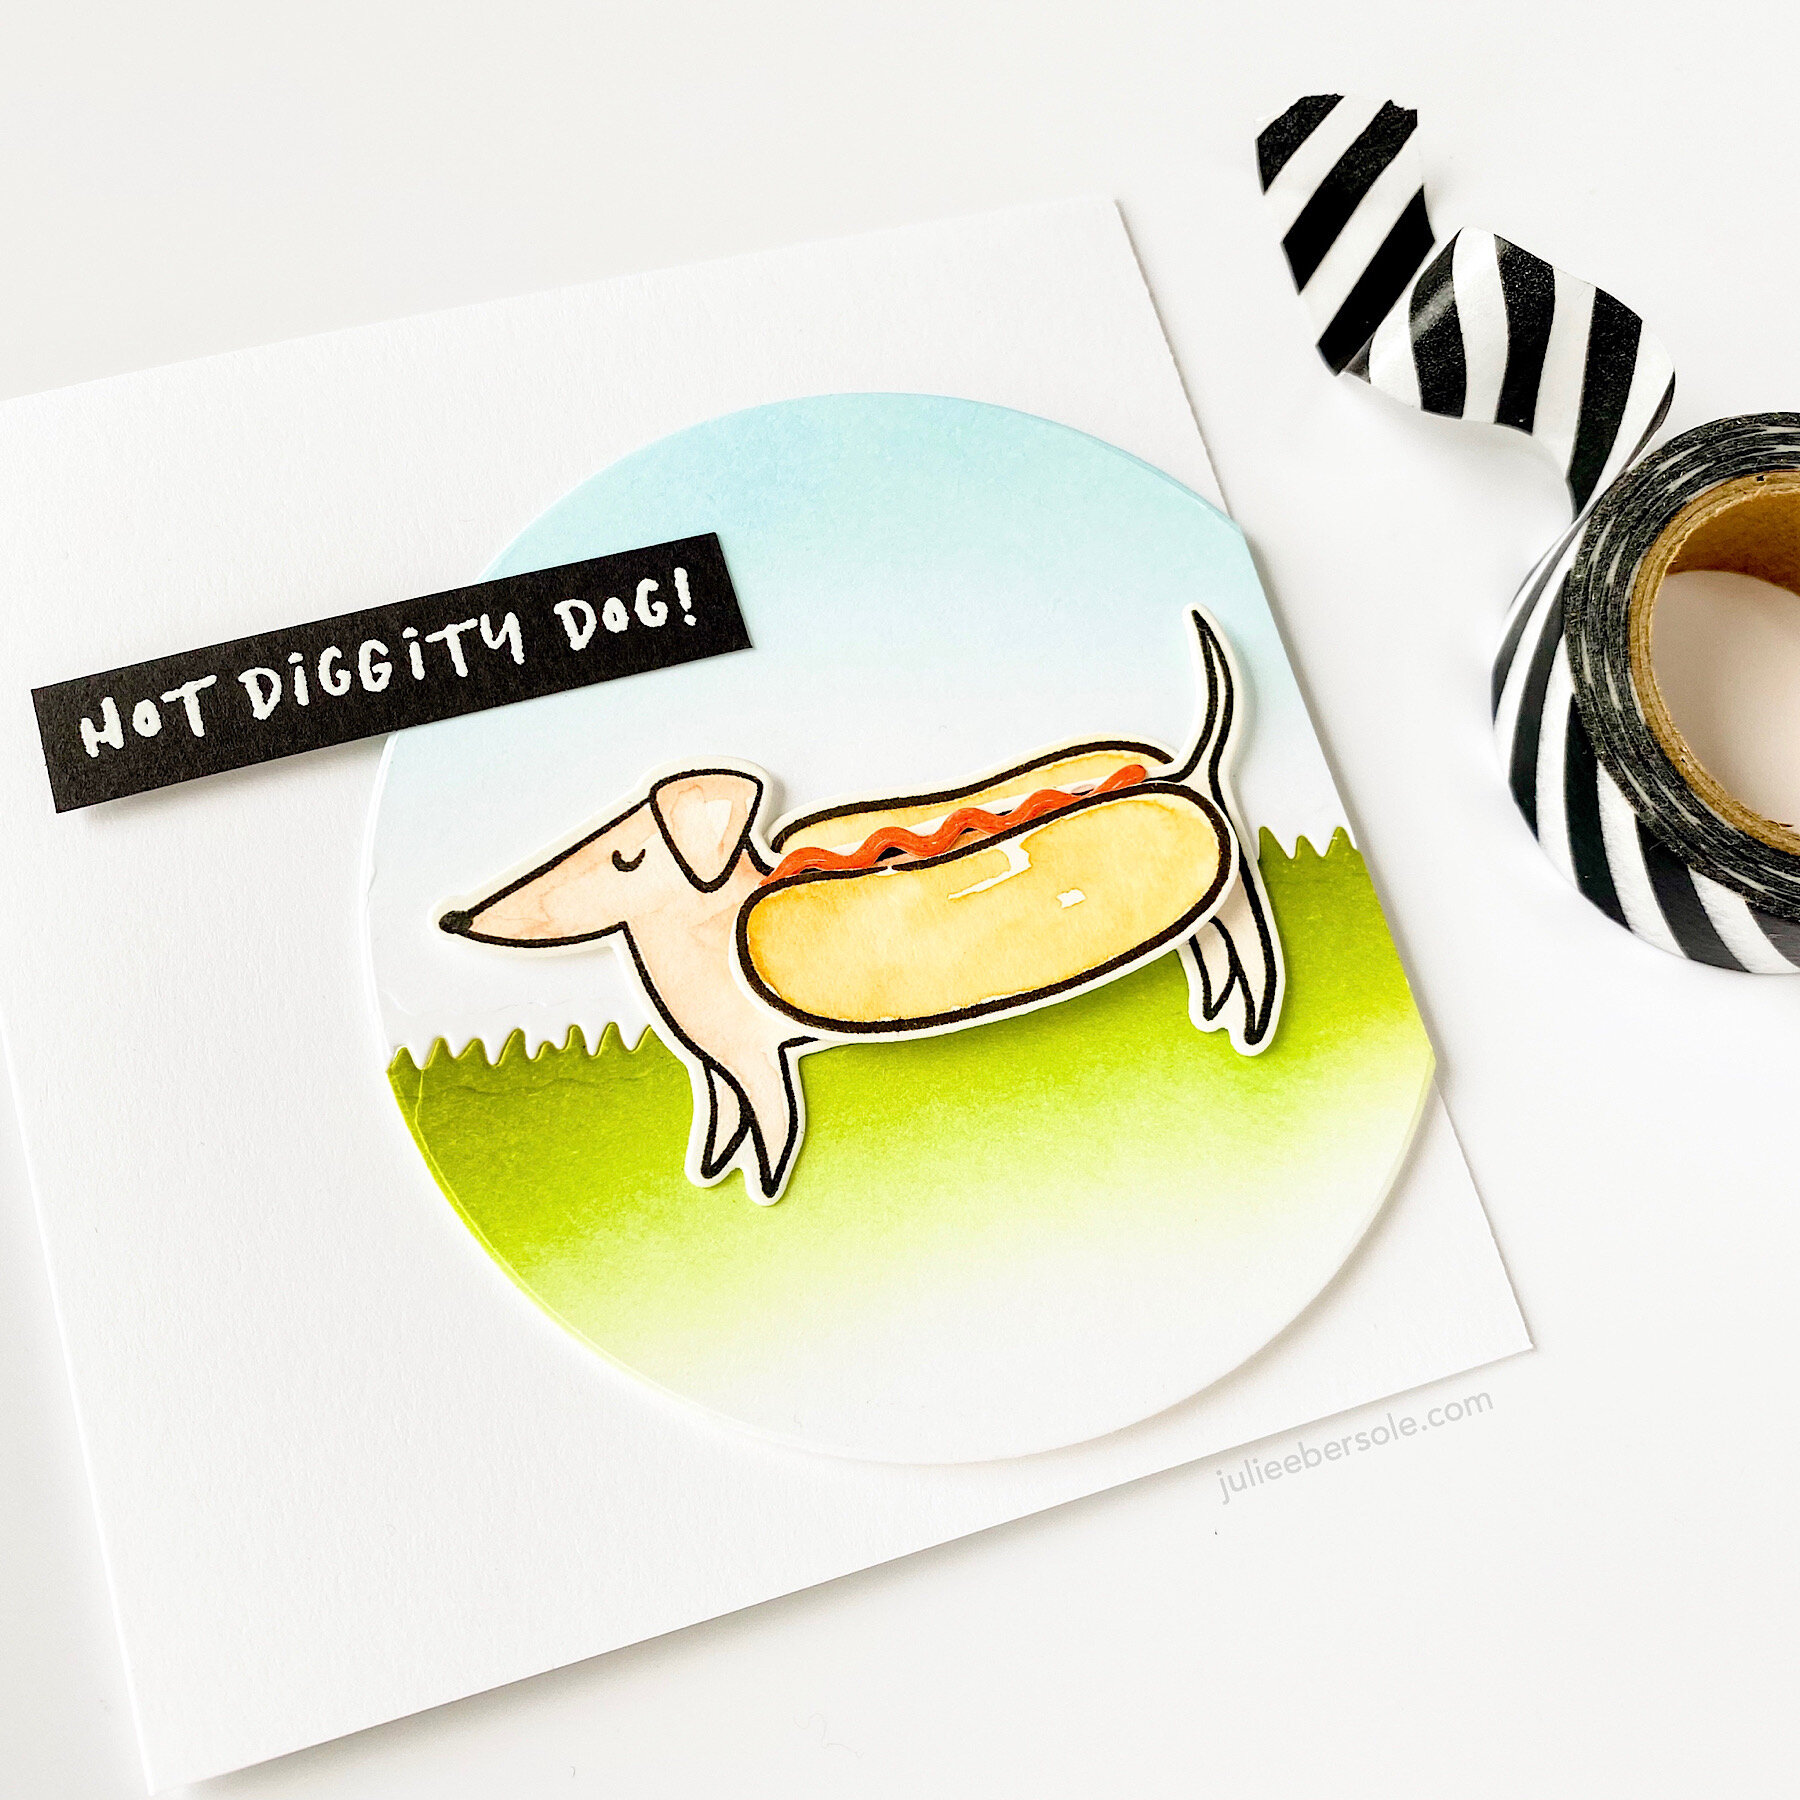
That expression from Brandi’s “You Should Know” set just seemed to suit my design nicely, so I had to borrow it. Seriously, this turned out so cute I let out a squeal when I finished! •all the heart eyes•

Hope you are continuing to stay safe and I appreciate you stopping by!


CREATE FOR YOURSELF

Crafting, just for me—for the fun of it—is a rare and elusive event. Nowadays, working as a creative within the industry involves a hellalot more than just “making a card”. Truth.

But, when you get the chance to make, just for the sake of making, for yourself—without restriction or parameters, without a million other things and deadlines looming over you or interruptions . . . oh my, how refreshing that is for the creative soul and your inner well-being. Ask me how I know . . .

I filmed myself making the above card and gave myself permission to NOT spend an hour in the master bedroom closet and possibly 25 gazillion takes on a voice over (pollen + allergies have been driving me nuts)—just me making a card from start-to-finish, with some relaxing music. Uploaded to my IGTV channel so you can see it there or here. ↓


Thanks for stopping by and hangin’ with me for a few minutes out of your day.

Stay safe, stay healthy!


SIMPLE INLAID DIE CUTTING

diggitydog-001-A.JPG

Hot diggity dog, it’s Friday! I know, another Clever Sausage card. And pun. But, seriously, how can you not chuckle over this one?

After I die cut a circle, I split it with a Landscapes die (the grass), and ink blended the sky and the lawn. My secret weapon for holding the the two pieces together: Scotch tape on the back. BOOM! And, then I just 3D mounted the whole shebang onto a square card.

diggitydog-001-B.JPG

Watercolored all the stamped images, then die cut ‘em; trimmed the hot dot bun’s foreground away so I could mount the back onto the other side of the dog, and 3D mount the bun on his front side.

The ketchup squiggle? It’s part of the coordinating die set. I wonder if folks noticed that. Watercolored a tomato red color swatch onto a scrap of watercolor paper and then die cut it out. Finishing touch after assembling the whole card was some glossy accents. Cuz ketchup is always enticingly glossy and yummy looking, right?! Heh, heh, heh!

Have a fab weekend!

Stay home. Stay healthy. Stay crafty!

(mondo squishy virtual hugs)


THREE WAYS TO USE MONDO CHRYSANTHEMUM

mondo-chrysanthemum-natural-001-1.jpg

One of my favorite looks for floral stamps is to leave the flowers themselves uncolored (for the most part), and just color the leaves . . . In this case, watercolor them with green and gold shimmery metallic watercolors.

The flowers were stamped, and then I heat set the ink so I could mask them off to stamp the leaves.

mondo-chrysanthemum-natural-001-2.jpg

OK, so I guess this is really two ways, but one way gets you two cards for the price of one. These two were created by stamping, watercoloring and die cutting a whole bunch of leaves and then using the floating die cuts / frame technique. I’ve done floating die cuts before, but hadn’t tried this variation yet and followed a video done by my friend Jennifer McGuire to create this pair.

mondo-chrysanthemum-natural-001-3.jpg

No flowers at all?

mondo-chrysanthemum-natural-001-4.jpg

I think it works.

I have another post scheduled for tomorrow. Holiday cuteness involved.

Thanks for poppin’ in!


ESSENTIALS BY ELLEN AUGUST 2019 RELEASE

Hello, HELLO!!! (envision me monkey clapping and bouncing on my chair) And welcome to the August EBE hop! So glad you’re here—hope you like eye candy. . . (chuckle) You can see the whole August collection and lots of inspo here: Essentials by Ellen August 2019 

Along with our hop, there will be prizes so be sure to read the details on that following my project photos! Yes, photos. I have three projects I’ve been dying to share, and more to come. YASSSSS!!!! (pats self on back)

Halloween is the Mister’s birthday so we have a lotta fun this time of year—I had so much fun illustrating the characters in this set! I’ll be sharing some adorable treat packaging ideas soon, as well! And, did you happen to see the sneak peek from this webisode of Hello, Monday on YouTube??? Another fun version using the very same stamp set, very same layout and similar color scheme.

So! What do you think of Bear’s new companion? Li’l Bear is down at the pumpkin patch today with Dad, but has sooooo much more to do as the holidays approach… (wink) . Big Bear (the original) is from All Inside.

How ‘bout dem Pom poms? Santa and Snow dude have been taking selfies and needed a cute garland to dress up the Polaroid frame. Soooooo cute!!!


PRIZES:

We've got super fun prizes!!! One random & lucky commenter will win $25 to the EH shop and one will win the whole August Essentials by Ellen release!!! To enter for a chance to win, make sure to leave comments at each stop along the hop! Comment before Thursday, August 15th at 11:59pm PST. Winners will be notified by email.

Hope you found these ideas inspiring and be sure to check out all our designers’ fab creations!