holiday cards

COZY HOLIDAY GIFTING AND TAG IDEAS

You know the saying, “Good things come in small packages!”? TRUTH!!!

feat. WIDE HOUSE BOX & HOLIDAY-ADD ON COMBO*

The Wide House Box Die and Holiday Add-On assemble very similarly to the Tall House Box Die (video tutorial link) and Halloween Add-On (video tutorial link).

Hostess gifts, teacher gifts, co-worker gifts, party favors . . . small, thoughtful tokens can have a HUGE impact when presented in charming packaging! Here are some fab ideas to tuck inside this adorable house box:

  • A gift card to the local coffee shop

  • Cookies or chocolates (Heath Miniatures are my personal fave, LOL!)

  • Lip balm and/or nail polish would be so cute

  • Sweet smelling hand-made soap

  • Purse or travel sized lotion/hand-sanitizer

  • Individually packaged tea bags & honey packets

  • Jewelry, like a fun pair of earrings or a necklace

  • Pretty hair ties or scrunchies

  • Cute stickers, washi tape, magnets and fun shaped paper clips for stationery lovers

  • Vials/bottles of essential oils or a mini refillable perfume atomizer

  • Battery operated tea lights or strings of mini LED fairy lights (the house box can be safely lit up as a decor item)

  • A personalized key ring or fob

These are actually useful and fun gifts for any occasion, not just the holidays. Heck, it’s just as much fun to present cash inside one of these as I’m sure it is to receive! I have no doubt you will come up with even MORE ideas for great tiny gifts. Just sayin’ . . . ! 😉

feat. WIDE HOUSE BOX & HOLIDAY-ADD ON COMBO (also available separately)

Santa and his sleigh are designed to attach and fit between the flaps of the roof peaks; I like to die cut two or three and layer them together before before attaching, especially if I’m working with 80# or lighter weights of card stock.

You can mix and match the windows/doors between the Wide House Box and the Holiday Add-On sets for a lot of versatility. The little gables look so cute on the snow capped roof and there’s even a wreath for the door and a tree in the Holiday Add-On set.

If you read my post the other day, I mentioned watching from the window as the family played in the snow, while sipping a coffee and Baileys . . .

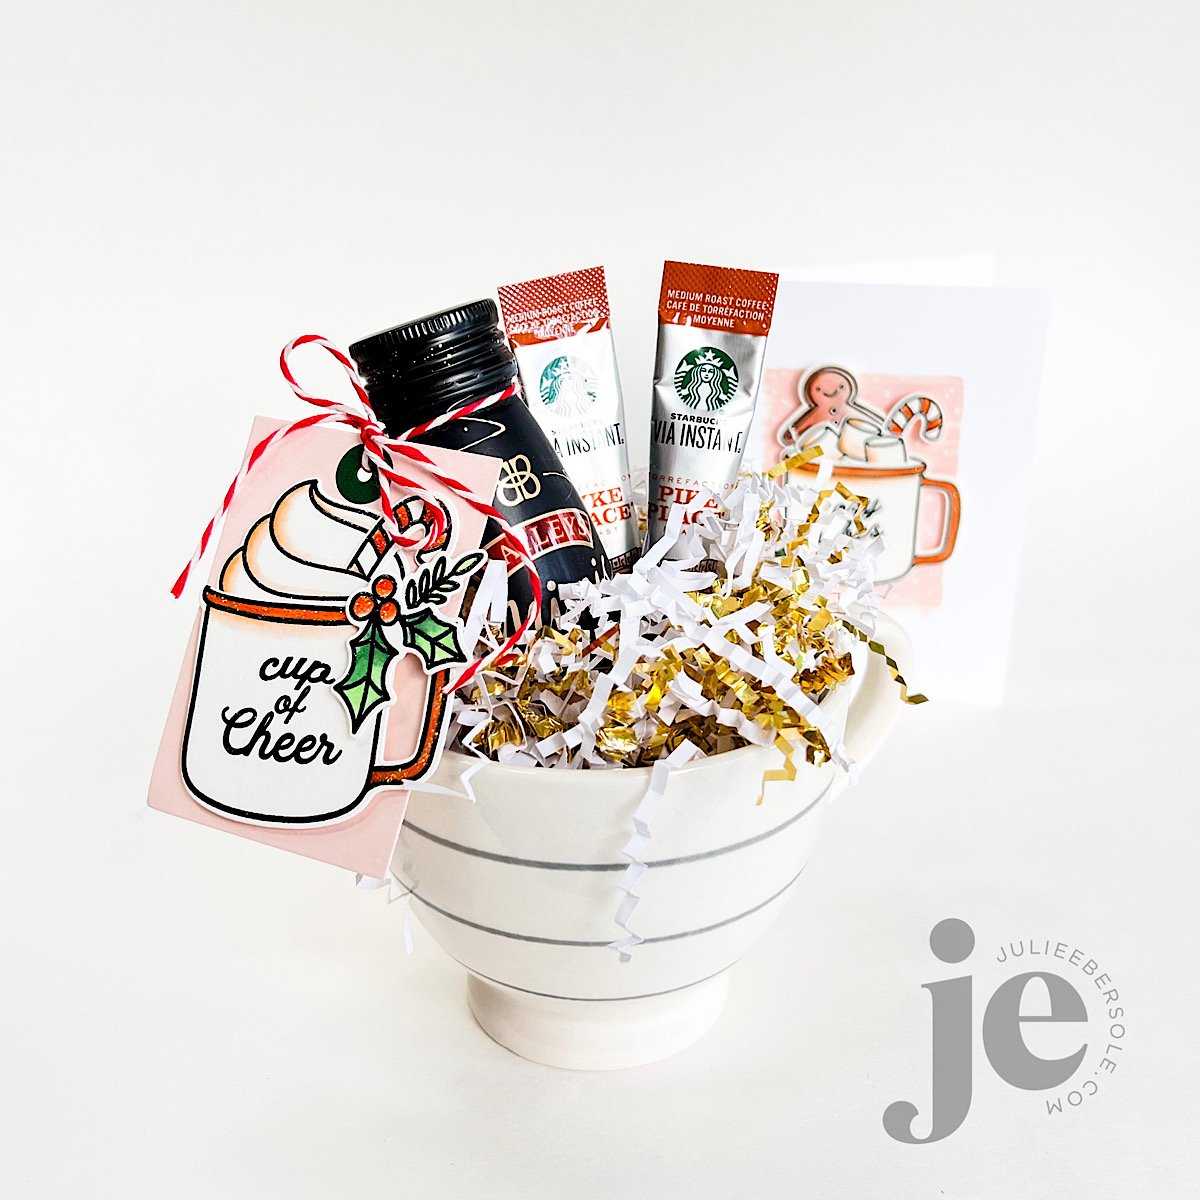
feat. COZY CUPPA STAMP & DIE COMBO (also available separately) / MODERN TAGS DIE SET

A holiday, or even a simple, plain white mug serves as a “gift box”, and nestled among the paper shreds are a mini bottle of Baileys (a fun grocery store find—yes, I found 3 mini bottle packs of these at the grocery store! SCORE!!!) and some instant coffee packets!

My design elements from Cozy Cuppa were all watercolored, 3D mounted to a simple tag and tied to the bottle. Whip up a stack of tags and you’ve got an easy peasy, enchanting gift ensemble!

feat. COZY CUPPA STAMP & DIE COMBO (also available separately)

This adorable design just makes me think of my granddaughters—they love hot cocoa. AND marshmallows. So fun to tuck a gingerbread cookie and a candy cane inside to boot! Like the tag, I watercolored all the elements and that background was made by dragging my Tattered Rose Distress OXIDE Ink Pad across the front of the card and then dotting it with a white gel pen before assembling the rest of the card.

And, don’t forget the Stickles.

Speaking of which . . . what’s the golden rule about Stickles? Anybody? Anybody?

Need a super simple, highly impressive gift tag you can mass produce quickly?
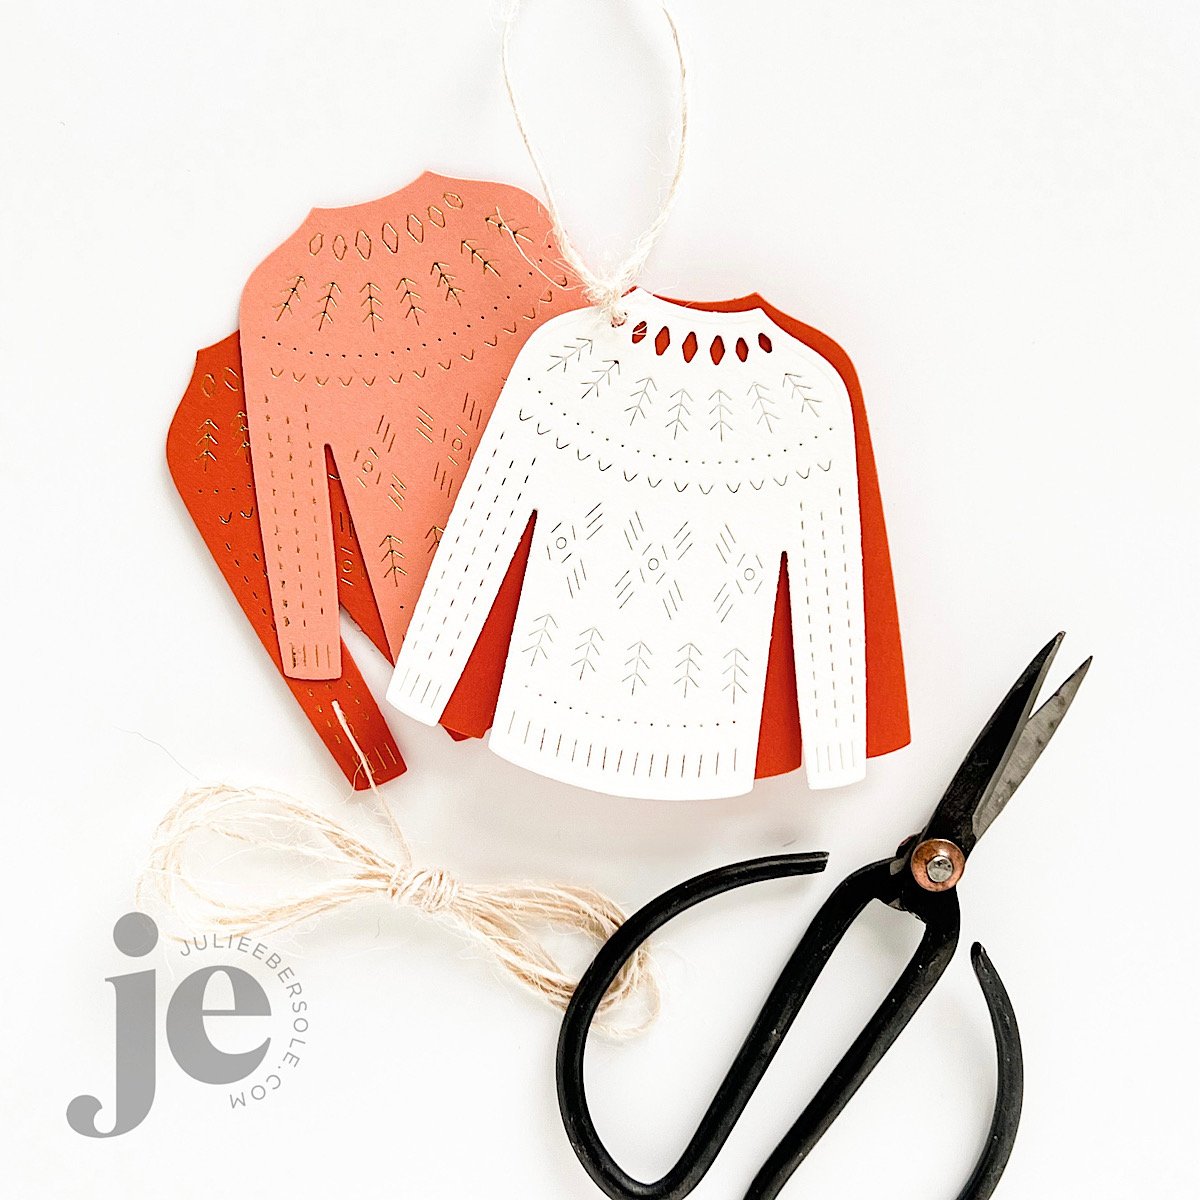
This one is perfect for those of you who are short on time, long on love, LOL! I’m a sucker for a pretty sweater and this one has such a lovely pattern! I REALLY love to “deboss” it into watercolor paper because it’s thicker/heavier and the combination of textures between the pattern and the paper itself just looks and feels so luxe! I also think it looks pretty chic layered with a solid sweater shape underneath in a hue that coordinates with your wrapping paper.

The added bonus is being able to foil the pattern if I want an extra touch of glam!

Yes, you can foil low-profile dies and it doesn’t cut through the paper! Here’s a video I did on the Ellen Hutson YouTube Channel showing how to do that: Hot Foil Stamping with Low Profile Dies (Gemini Foil Press System used at the time; you can, however, also use the Glimmer Foil System by Spellbinders)

Speaking of foiling, you can obtain gorgeous results on that Canson XL Watercolor Paper, as shown on this interactive mailbox die:
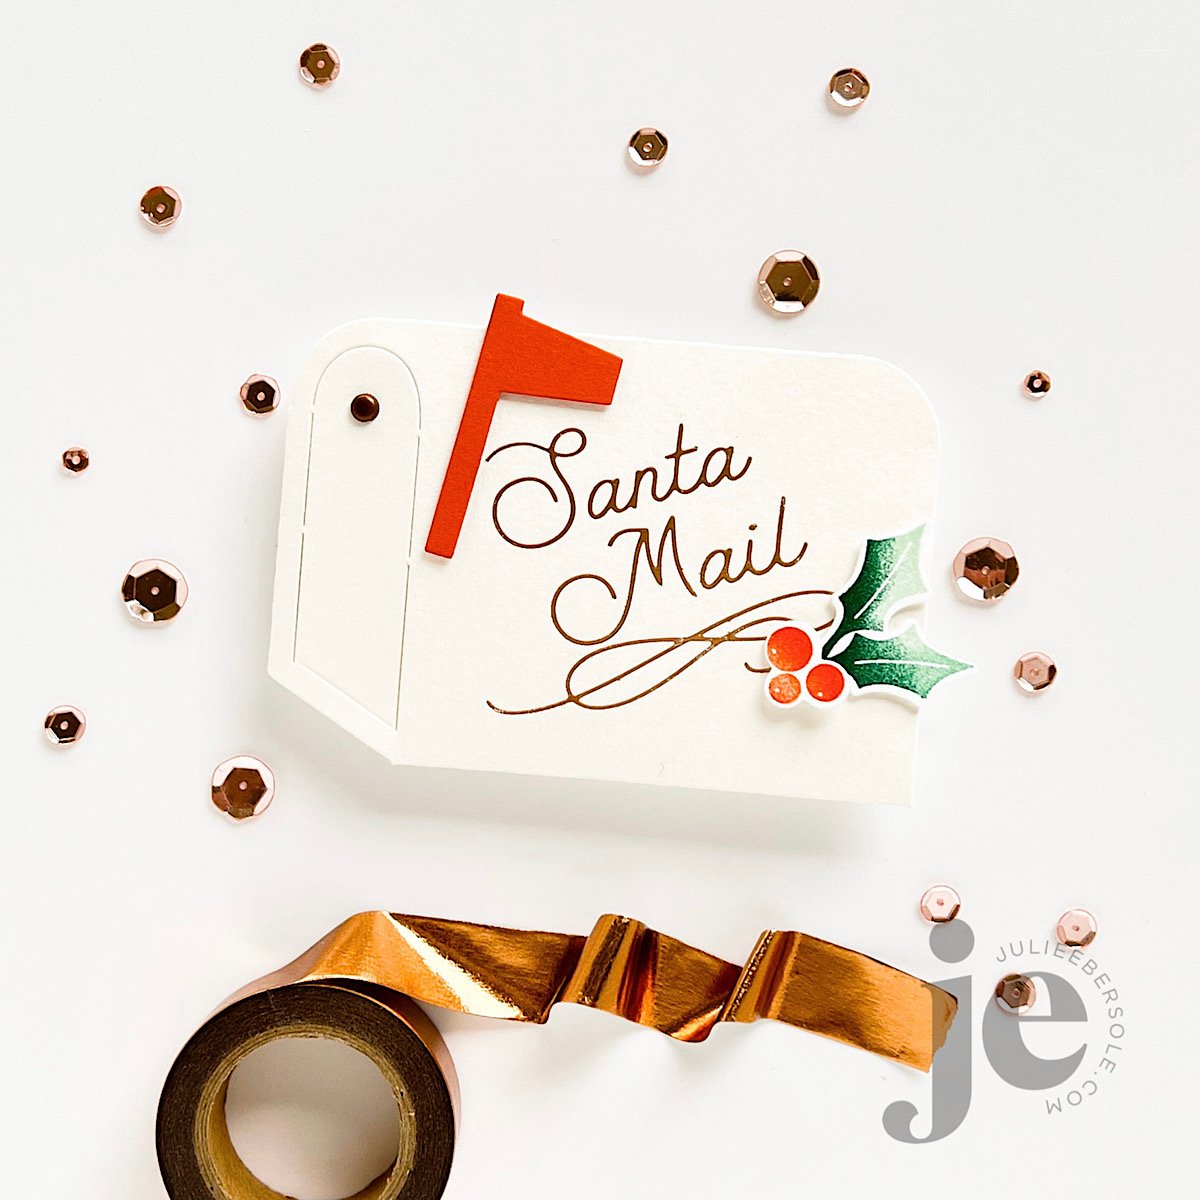
  1. After die-cutting the shape, I hot foil stamped the designs I wanted onto the front side of the mail box.

  2. After creasing all the main fold lines well (a bone folder really helps because the paper is thicker than average) I inserted a mini brad from my stash, added strong, double-sided sticky tape (1/8” Scor-Tape —great for skinnier/tighter areas— and 1/4” Scor-Tape) to the flaps.

  3. Then I positioned a gift card inside and attached all the flaps to assemble, sealing the gift card.

  4. I added the mailbox flag, and a stamped/die cut holly sprig to further embellish.

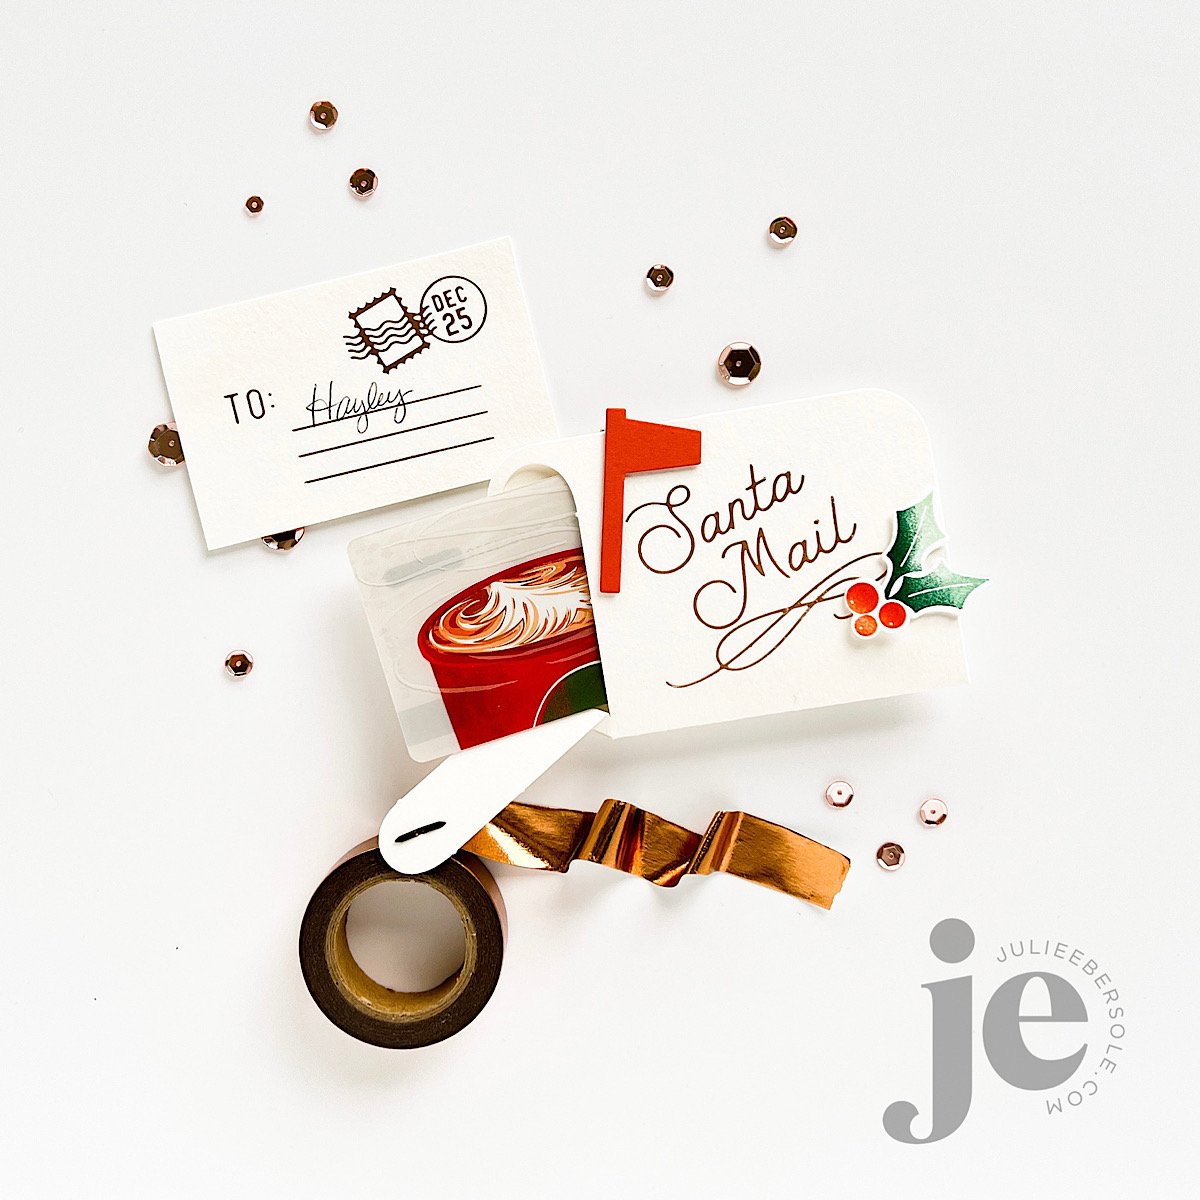
I also foiled a piece of watercolor paper cut to the same dimensions as the gift card—it could be used as a gift tag, without the mailbox, but I think it’s just soooo stinkin’ cute to have a little mini letter to go with! (insert lots of monkey clapping here)

When the recipient pulls on the “handle/latch”, the mailbox door bursts open along the perforations and he/she can then slide the gift card out. SO FUN!!!

Hope you enjoyed these ideas for gifting at the holidays and thanks for stopping by!


Disclosure: I include affiliate links to the products used in my projects and make a small commission when you purchase via those links, at no extra dimes to you. 🙂 Thank you for buying all the things!

ONLINE CARD MAKING EVENT COMING IN FEBRUARY 2022

Truth: When it’s quiet around here, that means there’s an awful lot going on behind the scenes! I’ve been busy with some “creative” professional development stuff and really enjoying the process—I consider myself a life-long learner and I always feel such an amazing, intrinsic sense of “happy” (massive monkey-clapping!) when I learn how to do something that intrigues me—especially when the things are hard, or require technology.

All that to say, I wanted to share some news that relates to a lot of that behind the scenes stuff!

YASSS!!! I made the team! (virtual high fives)

I was accepted as a presenter (instructor/teacher/speaker) for the February 2022 Card Maker Success Summit! There’s so many talented presenters on that roster! This is a FREE virtual event that will be online for a limited time and if you want full, lifetime access to all the classes after the event ends, you can purchase an All Access VIP Pass. I actually attended a similar virtual workshop for artists last summer and enjoyed it muchly, so I’m waaay stoked to have an opportunity to be a speaker at the Feb 2022 CMSS!

Anyhoo, if a virtual card making event sounds like fun to you, I wanted to let you know that the host of the Summit is now offering a Waitlist for those interested in the All Access VIP Pass for February’s event—just click the button below to go over to the signup:

By the way, have you gotten your holiday cards going yet? If not, here’s some eye candy that I hope sparks ya’:


Hope you have a a wonderful and creative weekend!


Disclosure: I include affiliate links when/where possible in this post and make a small commission when you purchase via those links, at no extra cost to you. Thank you, thank you!!!

ALL WRAPPED UP + TAG IT: CHRISTMAS

feat. All Wrapped Up Stamp Set/ Essentials Arches Dies / Farmhouse Tags Dies/ Tag It: Christmas Stamp Set/ Essential Snowflakes Dies

feat. All Wrapped Up Stamp Set/ Essentials Arches Dies / Farmhouse Tags Dies/ Tag It: Christmas Stamp Set/ Essential Snowflakes Dies

These sweet li’l buddies are helping each other get prepped for the holidays . . . I love loVE LOVE when a darling image takes up enough presence on a card that I don’t have to ponder or agonize about how to combine and layout a card design—All Wrapped Up is the answer to that wish, at least for me, anyhoo!

Ya’ know, those Essential Arches dies are actually PERFECT for making tall snow-globe windows for shakers and/or card fronts—this is a simple window card (clear plastic is sandwiched between the car front and an additional die cut panel so you can peek through). The sentiment beneath is revealed when you open up the card . . . It’s just so sweet, I can’t even . . .

A word to the wise, tho—do all your white paint spattering BEFORE doing anything else; it needs a little time to air-dry before you start die cutting into it and assembling all your pieces. Ask me how I know . . . (chortle). However, if you’re in a hurry, take a clean paper towel and press it down carefully over top to soak up any excess paint droplets.

My paint spatter method:

  1. Squeeze a little white acrylic paint onto an acrylic block. It doesn’t take all that much so don’t get crazy.

  2. Squeeze a little water at a time from your waterbrush into the paint and mix it right on the block until you have a consistency you like.

  3. Hold the acrylic block over the area you want to spatter and use your paint brush to flick it off the block down onto project. Repeat until you have all the spatter you want, then set it aside to dry.

2021-holiday-WM-02.jpg

All Wrapped UP also works lovely for tags—GAAAH!!! All the heart eyes! If you love to layer your tags, that skinny one, combined with the sentiments in the Tag It Set are perfect for doing that—anything that makes mass production easier gets 5-stars from me because I’m always last-minute Lucy at getting things wrapped so I tend to keep tags pretty minimalist. (face palm)

Do you like making tags? My daughter is not a card maker, but she does enjoy making tags for holiday gifts.


HOLLY JOLLY CHRISTMAS

I adore solid stamps. For me, they’re the epitomé of effortlessness (is that a word?) in the world of stamps.

Holly Jolly Christmas is based on my love of clean, bold graphics and ease of use!

2021-holiday-WM-10.jpg

That tree was stamped first with Rockin’ Red, and then I reinked the bottom edge of the [stamp] image with Peppermint Scrub and blended the edge of the ink line so I would have a smooth transition between the colors when I stamped again over top. Easy ombré perfection makes my stamping heart swoon!

Add in that eclipse die cutting effect and BAM! I’m in love! Sidenote: I usually layer my eclipse die cuts about 3-4 deep using 110# card stock.

2021-holiday-WM-11.jpg

The fa la la stamp in this set was white embossed twice on a longer strip of vellum card stock so I could wrap the ends around the kraft panel to secure it. And, this time, I on the tree, I swiped my Concord & 8th Mushroom ink cube across the stamp to create this cool textured look!

I borrowed the gift packages from Sweet Surprises and added a messy nest of metallic thread and those super-shine silver stars—so hard to pick up how brilliantly they reflect light on camera, but I love them so—IRL, they’re pretty doggone dazzling!


PINKFRESH STUDIO HOLIDAY RELEASE

Pinkfresh Studio has a new holiday release and I’m playing along on their Instagram Hop! There’s prizes and GOBS of eye candy, so if you’d like to check it out—which I highly recommend you do—you can hit my Instagram HERE and check out all the details.

Being a girl from the Pacific Northwest, this Wintry Forest Stencil really got me—love! If you haven’t worked with Pinkfresh Studio’s stencils before, they are numbered so you know exactly in which order to proceed. BUT, do you see the white “snow” detail on my trees? That’s stencil #6 in the set; technically, it would be the last, right? But to create the illusion of snow on the branches, I actually STARTED with #6, using a Versamark PEN to hit all those spots. Then I removed the stencil and applied white detail embossing powder and heat embossed. Afterwards, I grabbed a range of green inks and went back to #1 and started with the softest hue of green ink, and used a subsequently darker color with each stencil layer. I used a dry cloth to buff off any remaining ink that was sitting on top of the embossing lines.

Trimmed down to create a nice layer on a simple white base card.

After hot foiling the sentiment, it was die cut and popped up on the card front. Super simple, but I love ow striking it is! I personally LOVE hot toil stamping and am thrilled to see more companies adding this to their product lines.

Here, I used the wreath stamp image to create a shaker on a square card; the image was stamped with black pigment ink and heat embossed with clear embossing powder, then watercolored. The gold frame compliments the hot foiled sentiment quite nicely here without being over-bearing. I had a heckuva time shooting this—foil and acetate are so reflective; this card has a lot of sparkle and glimmer in real life that I just couldn’t pick up with the camera.

The Poinsettia Washi Tape and coordinating die make cards like this a cinch because you can skip the coloring; it’s all done for you! The tape is gorgeous and features gold foiling details. I just spread the tape smoothly along a piece of card stock measuring 4.25 x 11”, die cut everything and positioned them in a pleasing way. I used some NUVO drops to accent the berries. FYI, you CAN cut apart some of the die cuts to create your arrangements—the Crafty Po-Po will not come after you. Truth.

Here is another variation of this beautiful washi tape, using the wreath. Again, sooooooo very simple! I’m honestly not much of a colorist (if I have to color, I usually reach for watercolors because it’s the fastest) so the idea of being able to skip the process of hand coloring when mass producing holiday cards is tremendously appealing to me—the time-savings is HUGE!!!

Hope you found these ideas inspiring and thanks for stopping by!


The Pinkfresh Studio Holiday release is LIVE; please click HERE to view them all.

Disclosure: Yup, those are affiliate links to the products used in my projects and I make a small commission when you purchase via those links, at no extra cost to you. Thank you for buying all the things!