PARTIAL DIE CUT VALENTINE CARD

ANNOUNCEMENT

My Blog RSS feed delivery via MailChimp will be ending soon. If you’d like to remain in the know, please sign up for my email list using the form located at the bottom right of my HOME PAGE (the form will not show up in RSS Feed Emails) , and then you can unsubscribe yourself from the Blog RSS Feed emails without missin’ a beat! Thank you!


I’m always looking for alternative ways to use my tools and supplies and this idea has been rolling around in my head for quite some time:

Less is More . . .

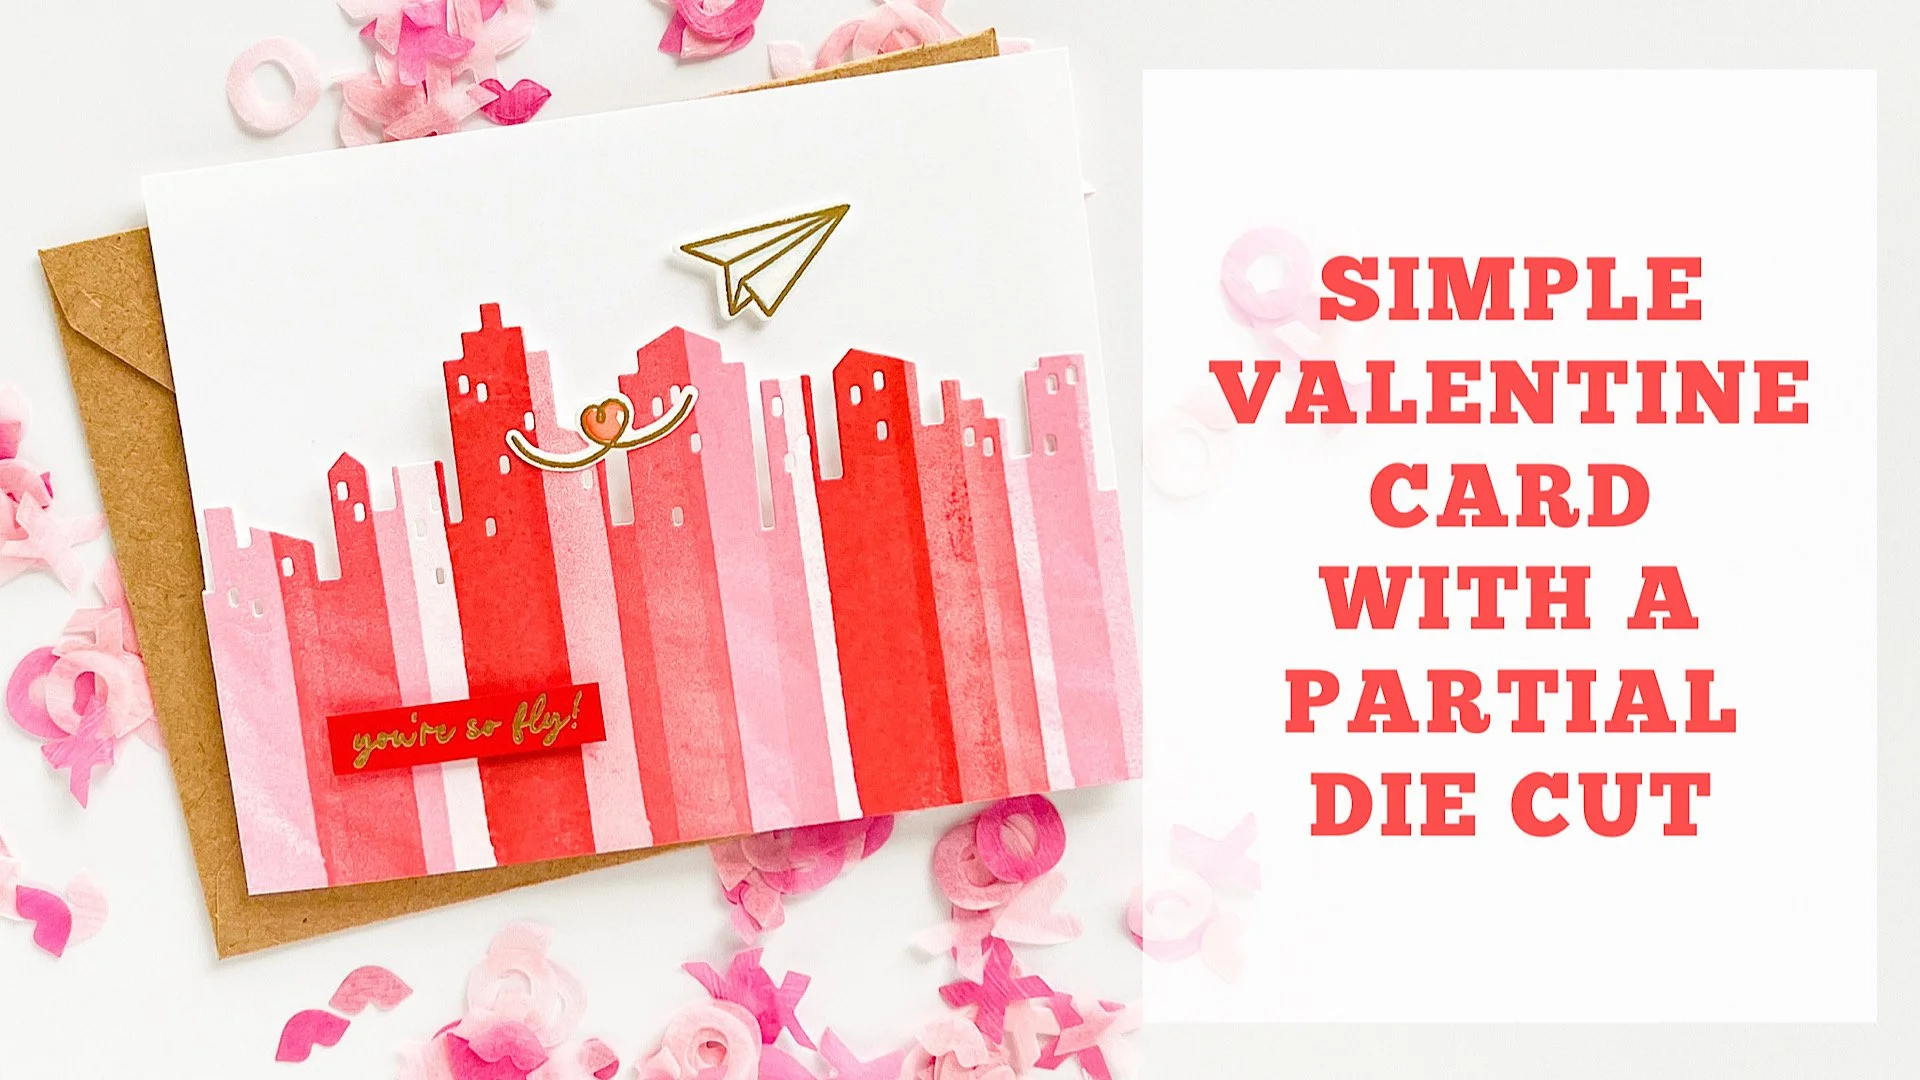
This is one of those “looks-more-complex-than-it-actually-is” kind of cards—the partial die cutting on the card front gives the appearance of more layers because of the colorful, stamped pattern . . . Always a winner in my book!

Full video tutorial below:

HOW TO:

  1. Score a 4.25 x 11” piece of card stock at 5.5” from the short end to make a horizontal side-folding card.

  2. Fold the card and place into the MISTI (the original sized MISTI works best for this because you get more platform area and can move the paper for repeat stamping.

  3. Stamp the longest paint stroke image in a series of stripes, some overlapping, some 2nd generation impressions and some reinked and stamped again to intensify the color.

  4. Use the partial die-cutting method to cut the cityscape through the card front only; trim away the negative piece with scissors or a craft knife (if you’re unsure, just watch the video above).

  5. Gold emboss images from Love Notes onto watercolor paper and watercolor using Zig Clean Color Real Brush markers and a waterbrush. Die cut when dry.

  6. Mount images to card as shown, taking care to position so that the card still swings open freely.

  7. Gold emboss sentiment onto scrap of red card stock; 3D mount to card front.

If you haven’t yet, this is a simple but fun die cutting method to try! Thanks for stopping by!


FREE ONLINE CARD MAKING EVENT

Last week I let you know about the Card Maker Success Summit, which kicks off next week. You’re going to hear from me on Day 1, Feb 17 2:00pm Pacific about Beginner-friendly digital die cutting for card-making.

You’ll also hear from some of my friends, including:

  • Daniel West

  • Therese Calvird

  • Laurie Willison

  • And a whole lot more!

These presentations are totally free to you for the first 24-hours, as long as you’re registered.

You can also get your hands on the VIP All-Access Pass for a reduced price right now. With it you’ll get:

  • VIP All-Access Pass to all 25+ presentations - no waiting!

  • Lifetime access to all 25+ presentations ($1,200 value)

  • 275+ page Card Project Digital Workbook with a card project planning calculator ($59 value)

  • 1 Live Virtual Crop over Zoom with fellow VIP attendees ($59 value)

  • Premium bonus content from our speakers and sponsors, including a Craft room Organization Guide Workbook, SVG Bundles, Free Card and Technique classes, exclusive discounts to your favorite craft stores, and much more! ($600+ value)

 Check out more details HERE


CARD MAKER SUCCESS SUMMIT + AN ANNOUNCEMENT

ANNOUNCEMENT

In case you have missed previous announcements here on my blog, I’m currently transitioning to Flodesk and going to be ending my Blog RSS feed delivery via MailChimp.

If you’d still like to be notified when I have any kind of news to share or post anything on the blog, please sign up for my email list using the form located at the bottom right of my HOME PAGE (the form will not show up in RSS Feed Emails) , and then you can unsubscribe yourself from the Blog RSS Feed emails without missin’ a beat!

THANK YOU!!!


Just sharing about a FREE upcoming card-making event!

I will be presenting at the Card Maker Success Summit, coming in February! My topic is “Make a Card Using SVG Files and a Cricut Machine”. This is a very beginner-friendly project and includes a free digital cut file I designed so you can follow along with me every step of the way. If you’ve never worked with a Cricut machine, or you’re curious or you actually have one, but, er-umm, still haven’t taken it out of the box yet (not judging!!!) this class will be a great starting point!

You can learn absolutely everything you’d ever want to know about the Summit over HERE, but as a quick overview:

  • The summit will run from February 17th-20th

  • Each day will be packed with amazing speakers who are ready to help you create beautiful, professional hand crafted cards for all occasions that will WOW your friends and family.

  • We’ve got a pop-up Facebook group where you’ll find crafting friends, connect with other card makers, ask the speakers questions, and whatever else we come up with!

  • You can attend the summit absolutely FREE, but you can choose to grab the VIP All-Access Pass at any time. The VIP All-Access Pass will give you an all-inclusive pass to the summit (meaning you get all the videos for life or at least as long as Stamp Me Some Love business is around):

    • On-going access to 30+ presentations

    • 275+ page digital workbook

    • Virtual Card Making Crop over Zoom

    • Premium bonus content from a number of speakers including svg files, courses, free memberships, exclusive discounts and more!

Please note: The VIP All-Access Pass is currently being offered at significant savings right now, and it will disappear for good once the summit is over, so I encourage you to start thinking about it now.

In the meantime, you can click the button below to grab your free ticket!

My fellow presenters and I have been workin' hard behind the scenes to make this a super fun-tastic experience and I hope to see you there! Thanks for stopping by!


Disclosure: This post includes my affiliate link(s). If you use my links to make a purchase, thank you so, so much for your support!

VALENTINE CARD HACK + AN ANNOUNCEMENT

ANNOUNCEMENT

In case you have missed previous announcements here on my blog, I’m currently transitioning to Flodesk and going to be ending my Blog RSS feed delivery via MailChimp.

If you’d still like to be notified when I have any kind of news to share or post anything on the blog, please sign up for my email list using the form located at the bottom right of my HOME PAGE (the form will not show up in RSS Feed Emails) , and then you can unsubscribe yourself from the Blog RSS Feed emails without missin’ a beat!

THANK YOU!!!


On with today’s post:

Created this card (and video) on the Ellen Hutson Blog the other day, linked HERE.

I call it a hack because I have pretty much zero Valentines specific stamps and dies. LOL! Desperate times call for desperate measures, right?! I was feeling quite smug over how this turned out—cuter than what I had in my head. That’s always a win, right?!

HOW TO:

  1. On a panel white card stock (a quarter sheet), make pencil marks 1” apart along the top long edge (starting from the right to the left) and and then along the left short edge starting from the top and working your way down.

  2. Using a score board, align the first pencil mark (remember, you started from the right!) and the lower right corner of the panel along the same groove and deboss (score) a line from the pencil mark to that corner.

  3. That corner will be your “pivot” point as you shift the panel to align the next pencil mark and score another line; repeat until you have all your “sunrays” completed! If that doesn’t make sense, just watch the video I did for Ellen’s YouTube channel.

  4. Trim 1/4” off the top long edge and the left short edge; mount this to the front of a standard A-2 (4.25 x 5.5” when folded) card base made from white card stock. Set aside.

  5. Die cut All The Feels twice from pink card stock and once from red. Glue the die cuts together and onto the card front, creating a “drop-shadow” effect, as shown.

  6. Stamp the hand/heart image from Love Notes using red ink onto pink card stock and die cut; pop up onto card as shown.


BOOM❣️

I love making projects like this—it’s a fabulous way to stretch your supplies and tools!

Hope you get some creative time this week and thanks for stopping by!


EASY SWING VALENTINE CARD (INTERACTIVE)

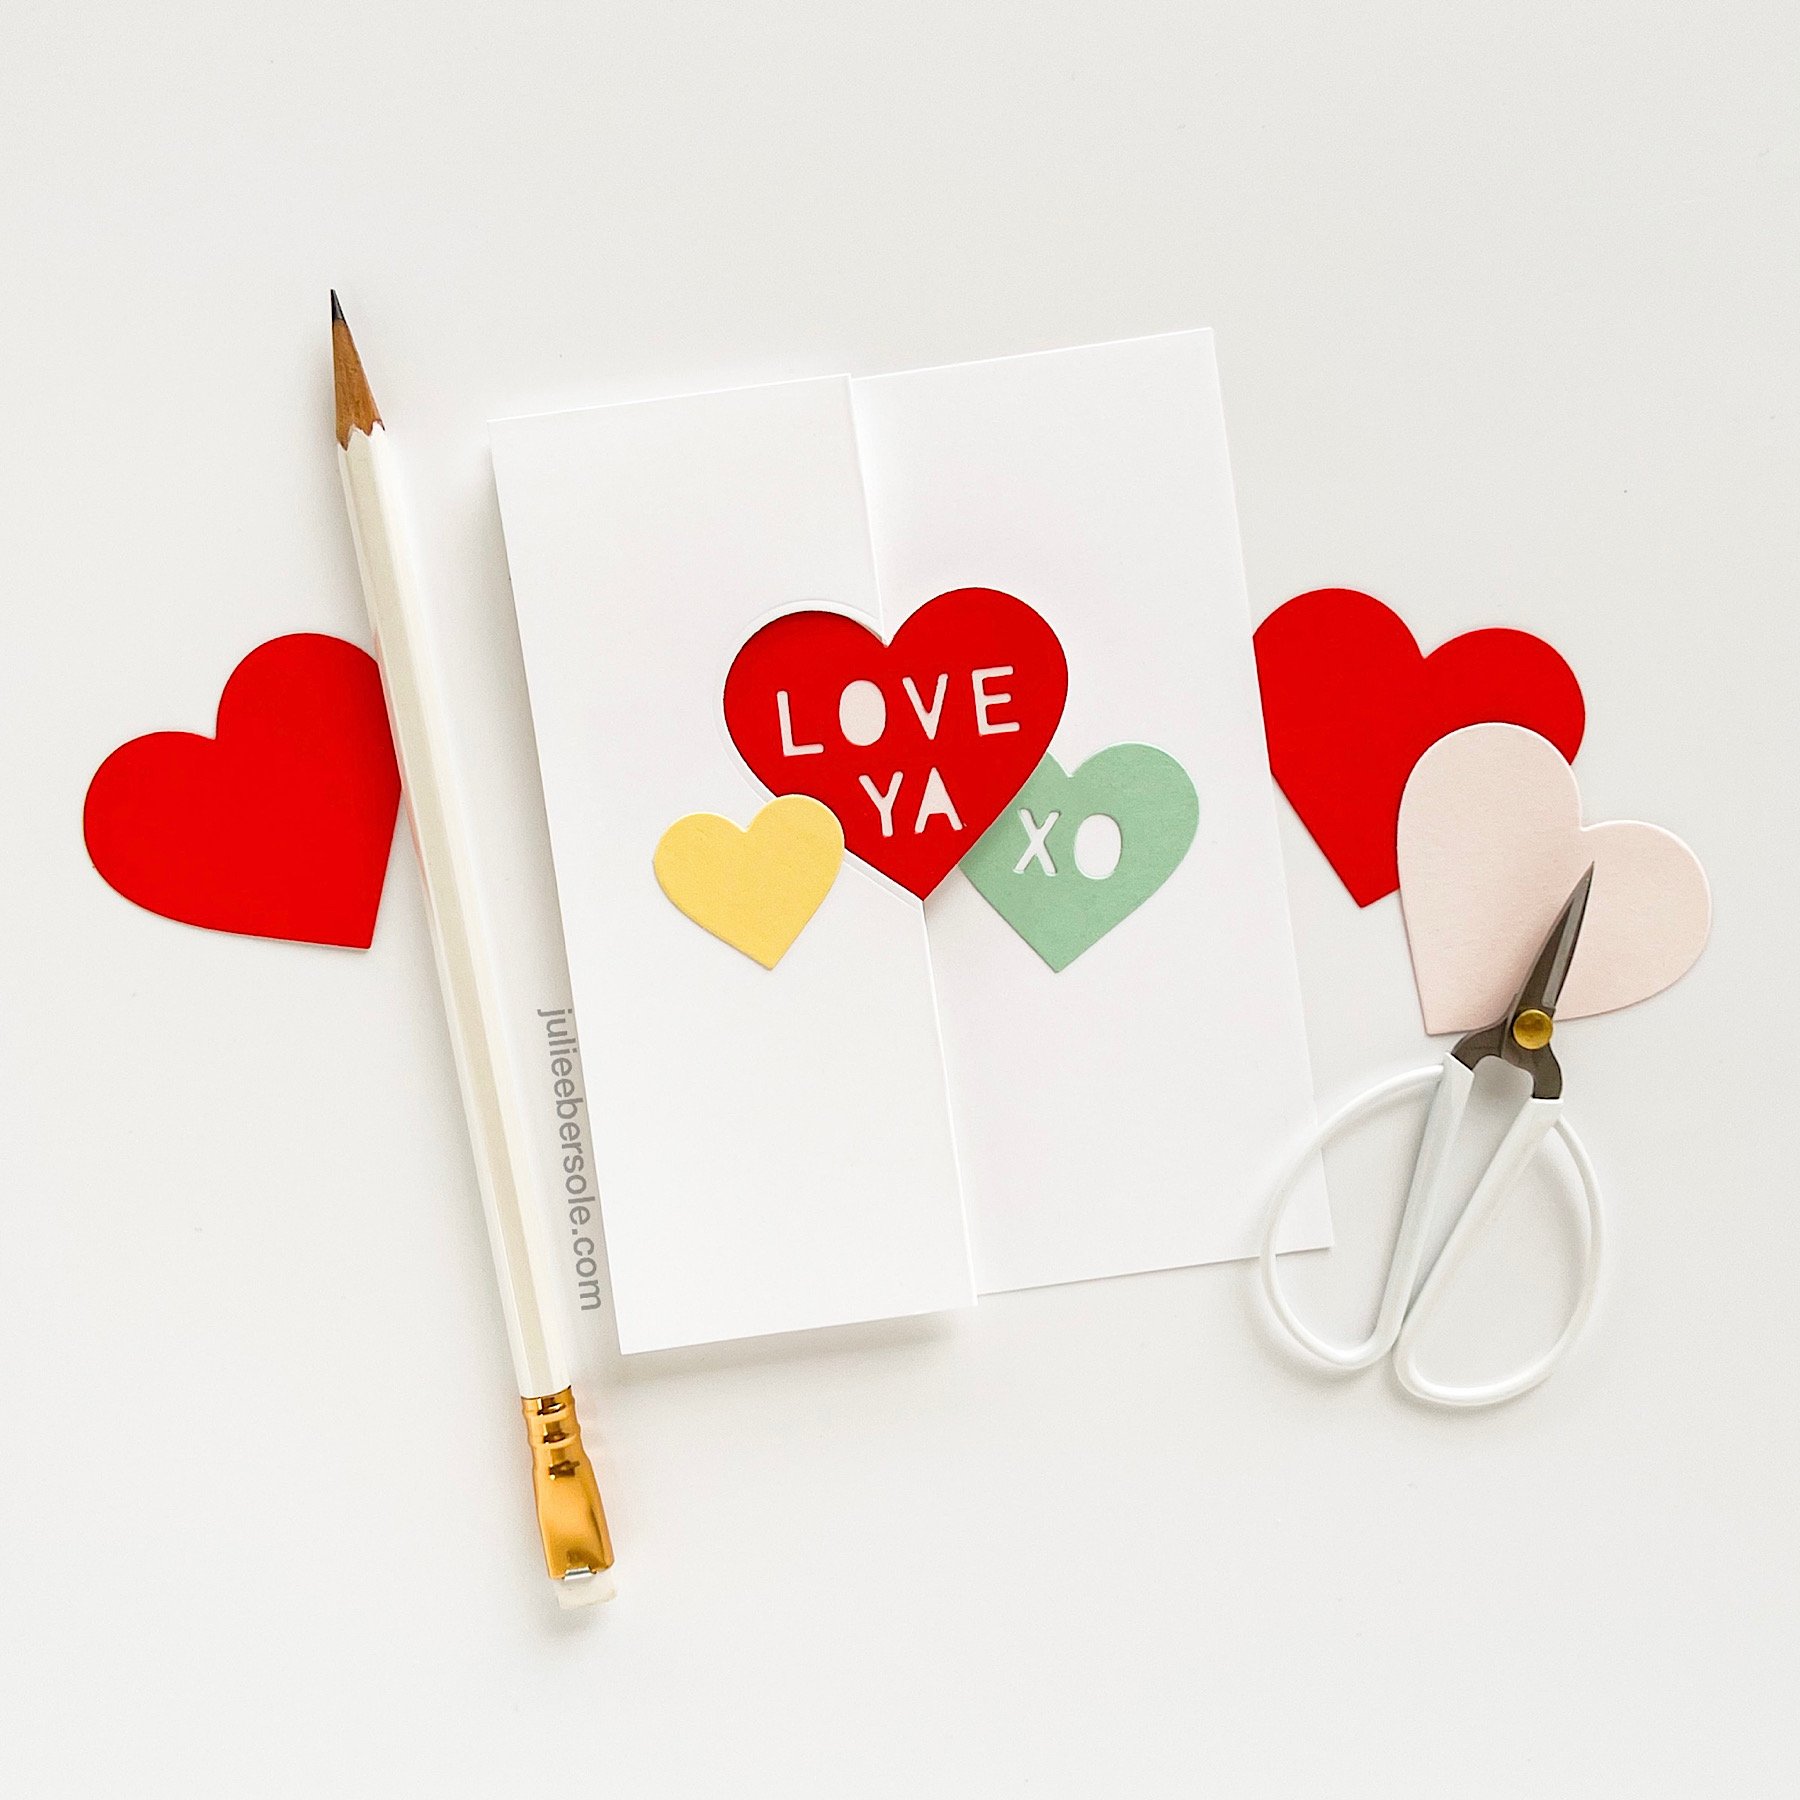
Swing (a.k.a. flip) cards have been around for a long, loooong time—nowadays, you can, of course, purchase dies that make the cuts and score lines for you, which is always nice! However, if you’ve never made one and want to give it a try, they’re quite simple/easy to do; just make sure that the shape you’re using is symmetrical (equal on both sides opposite each other, i.e. a circle, a butterfly, a square, a rectangle, an oval, a star and, in the case above, a heart) for best effect. Anything asymmetrical will be problematic.

BASIC SWING/FLIP CARD INSTRUCTIONS:

  • Start with a card base measuring 5.5 x 8.5”.

  • At 2 1/8” from the left short side, draw a faint pencil line.

  • Center a symmetrical shaped die along the pencil line and use washi tape to anchor in place.

  • Position the top cutting pad over the die and paper, aligning the edge with the pencil line; this insures that there will only be pressure applied up to that point.

  • After completing the die cut, remove die and tape and erase pencil line.

  • Score card base at 2 1/8” from the left short side (in the same position as your original pencil line), taking care not to score through the shape itself (start from the top of the card base and score right up to the top of the shape, skip over the shape, and then continue to score from the bottom of the shape down to the bottom of the card).

  • Score another line at 4.25” from the left short side (this will be the gutter/main fold) of the card.

  • Fold the card in half along the gutter, creasing well, then fold the smaller section back on itself, creating a “z-fold”.

  • As you open and close the card, the shape will swing or flip back and forth; embellish each side as desired.

  • Finished card is A-2 (4.25 x 5.5”) size when folded.

TIP:

If you plan to create a similar “Conversation Hearts” with a knock-out text effect, it helps to use alphabet dies that have extra letters, OR use phrases that don’t require multiples of the same letter. Here are some “Valentine” phrases that don’t require multiples of any given letter:

  • HUGS

  • HEY GIRL

  • WINK

  • U R HOT

  • CUTIE

  • U R LOVED

  • SWAK

  • U ROCK

  • HUG ME

  • ILYSM (Acronym for “I love you so much”)

  • SOUL MATE

  • LOVE BUG

  • XO

You’re welcome!


LAST MINUTE HOLIDAY GIFT

This is a very late share, but a share nonetheless; the holidays were crazy busy!

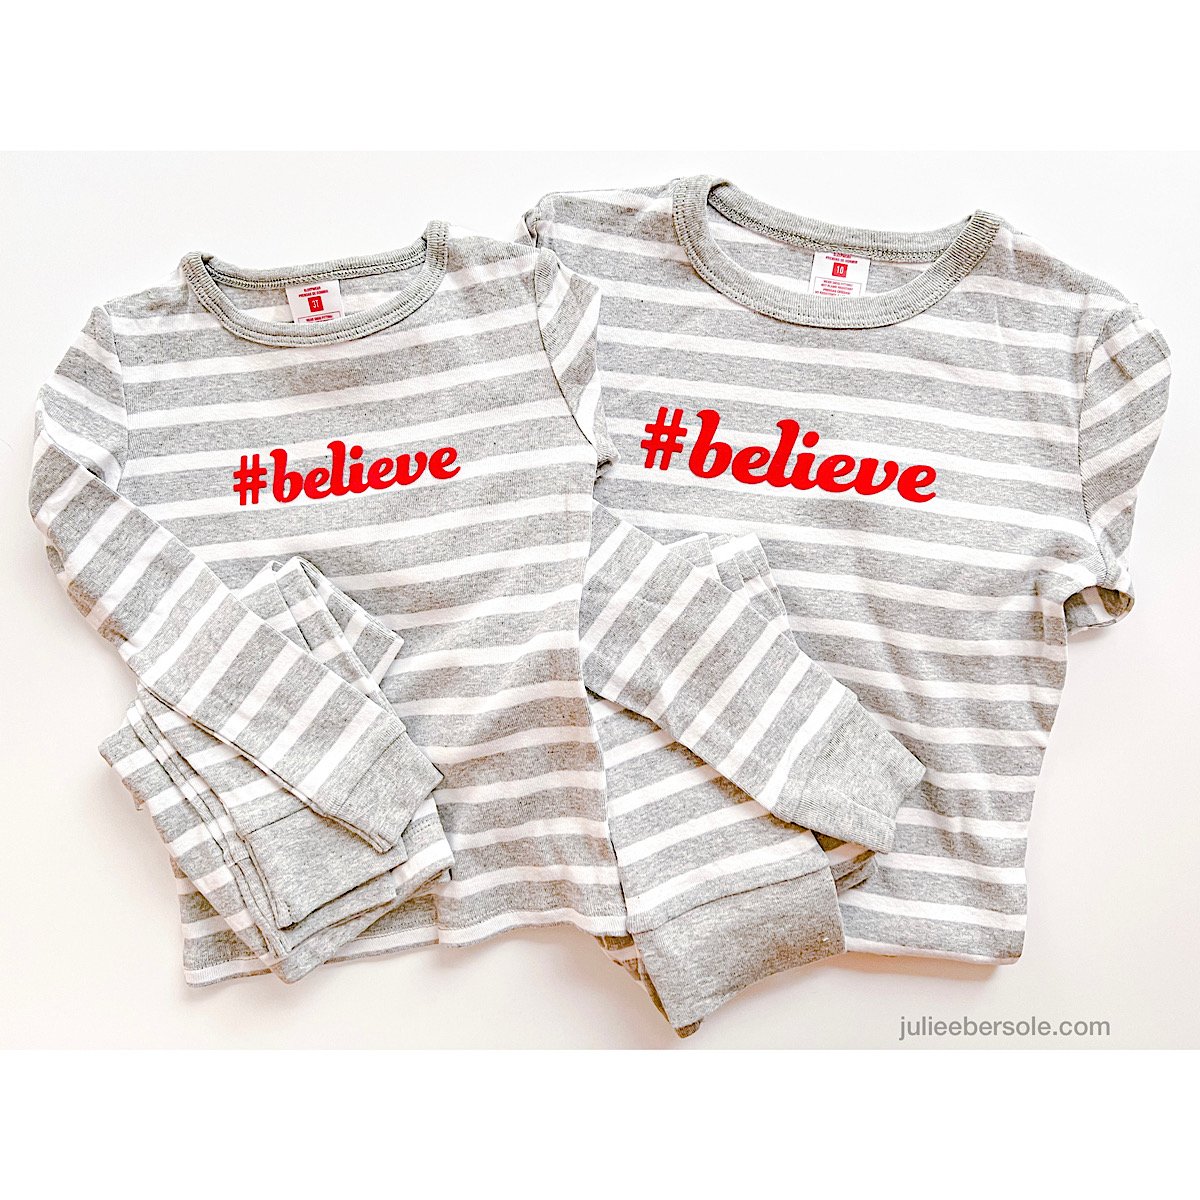
I shared this pic on my Instagram prior to Christmas because I was soooooo excited about how they turned out! My granddaughters are 7 years apart, age-wise. It’s becoming harder and harder to find matching pajamas or sister outfits as the oldest one gets older—ones I actually like, I mean. This year, I finally cried Uncle and decided to buy some matching “plain” pajamas and use my Cricut Maker to get what I wanted. Nana’s gotta do what Nana’s gotta do, am I right?!

Over the years, I have invested in various digital die cutting machines—still own the ones that haven’t died on me (RIP Eclips). Primarily, I got them to test my paper craft metal die designs prior to sending the designs off for production. Beyond that, for whatever reason, I didn’t really feel compelled to use them for much of anything else. When a friend raved about her Cricut Maker, I sat on the fence. C’mon, did I really, really need another such machine? Could it really be that much better than what I already had???

During all the holiday sales going on last year, I decided to “dip” my toe into the waters . . . I was pleasantly surprised at how much quieter it was in comparison to all my previous machines. It cut.like.buttah. Thoroughly impressed by the results, I plunged even deeper . . .

I LOVE playing with it! Honestly, I didn’t anticipate the extent to which I’d enjoy working with it or that I’d want to explore making NON-CARD (gasp!) things, LOL!

It was immensely gratifying to be able to customize/personalize these otherwise plain pajamas for the grandweebles! Note to self: Must get more flocked HTV. Meantime, I’m thinking about making some Valentine’s Day Mugs for them, because they love hot cocoa (Yes, I did get a Cricut Mug Press. And Infusible Ink. When I go deep, I go deep, LOL!) #notkidding #noregrets

Do you have/use a digital cutter? What do you like making with yours? I’ve heard some folks got one and a year later still haven’t taken it out of the box! GAAAAAH!!! (insert horrified look)


MATERIALS/SUPPLIES (I am not currently an affiliate for any of the companies/manufacturers listed below):

  • 100% Cotton Striped Kids Pajamas from Target online

  • Siser Stripflock Pro Red HTV (Heat Transfer Vinyl)

  • Cricut Maker

  • Cricut Easy Press 2


ANNOUNCEMENT

Also, I wanted to give you a heads’ up that I am going to be transitioning to a new email platform; currently my blog’s RSS feed goes out via MailChimp to those of you that signed up. But, how those emails look has always bugged me (like really, really bugged me!), so I’m moving over to FloDesk.

If you’d like to continue receiving updates/news, other yadda yadda via my email list, please sign up! There’s a new form along the bottom right of my site’s home page you can fill out.

If you’re not interested, no worries; I just didn’t want those who are accustomed to receiving that RSS feed via email to miss out when I finish the transition.

Thanks muchly!