card design

COZY HOLIDAY GIFTING AND TAG IDEAS

You know the saying, “Good things come in small packages!”? TRUTH!!!

feat. WIDE HOUSE BOX & HOLIDAY-ADD ON COMBO*

The Wide House Box Die and Holiday Add-On assemble very similarly to the Tall House Box Die (video tutorial link) and Halloween Add-On (video tutorial link).

Hostess gifts, teacher gifts, co-worker gifts, party favors . . . small, thoughtful tokens can have a HUGE impact when presented in charming packaging! Here are some fab ideas to tuck inside this adorable house box:

  • A gift card to the local coffee shop

  • Cookies or chocolates (Heath Miniatures are my personal fave, LOL!)

  • Lip balm and/or nail polish would be so cute

  • Sweet smelling hand-made soap

  • Purse or travel sized lotion/hand-sanitizer

  • Individually packaged tea bags & honey packets

  • Jewelry, like a fun pair of earrings or a necklace

  • Pretty hair ties or scrunchies

  • Cute stickers, washi tape, magnets and fun shaped paper clips for stationery lovers

  • Vials/bottles of essential oils or a mini refillable perfume atomizer

  • Battery operated tea lights or strings of mini LED fairy lights (the house box can be safely lit up as a decor item)

  • A personalized key ring or fob

These are actually useful and fun gifts for any occasion, not just the holidays. Heck, it’s just as much fun to present cash inside one of these as I’m sure it is to receive! I have no doubt you will come up with even MORE ideas for great tiny gifts. Just sayin’ . . . ! 😉

feat. WIDE HOUSE BOX & HOLIDAY-ADD ON COMBO (also available separately)

Santa and his sleigh are designed to attach and fit between the flaps of the roof peaks; I like to die cut two or three and layer them together before before attaching, especially if I’m working with 80# or lighter weights of card stock.

You can mix and match the windows/doors between the Wide House Box and the Holiday Add-On sets for a lot of versatility. The little gables look so cute on the snow capped roof and there’s even a wreath for the door and a tree in the Holiday Add-On set.

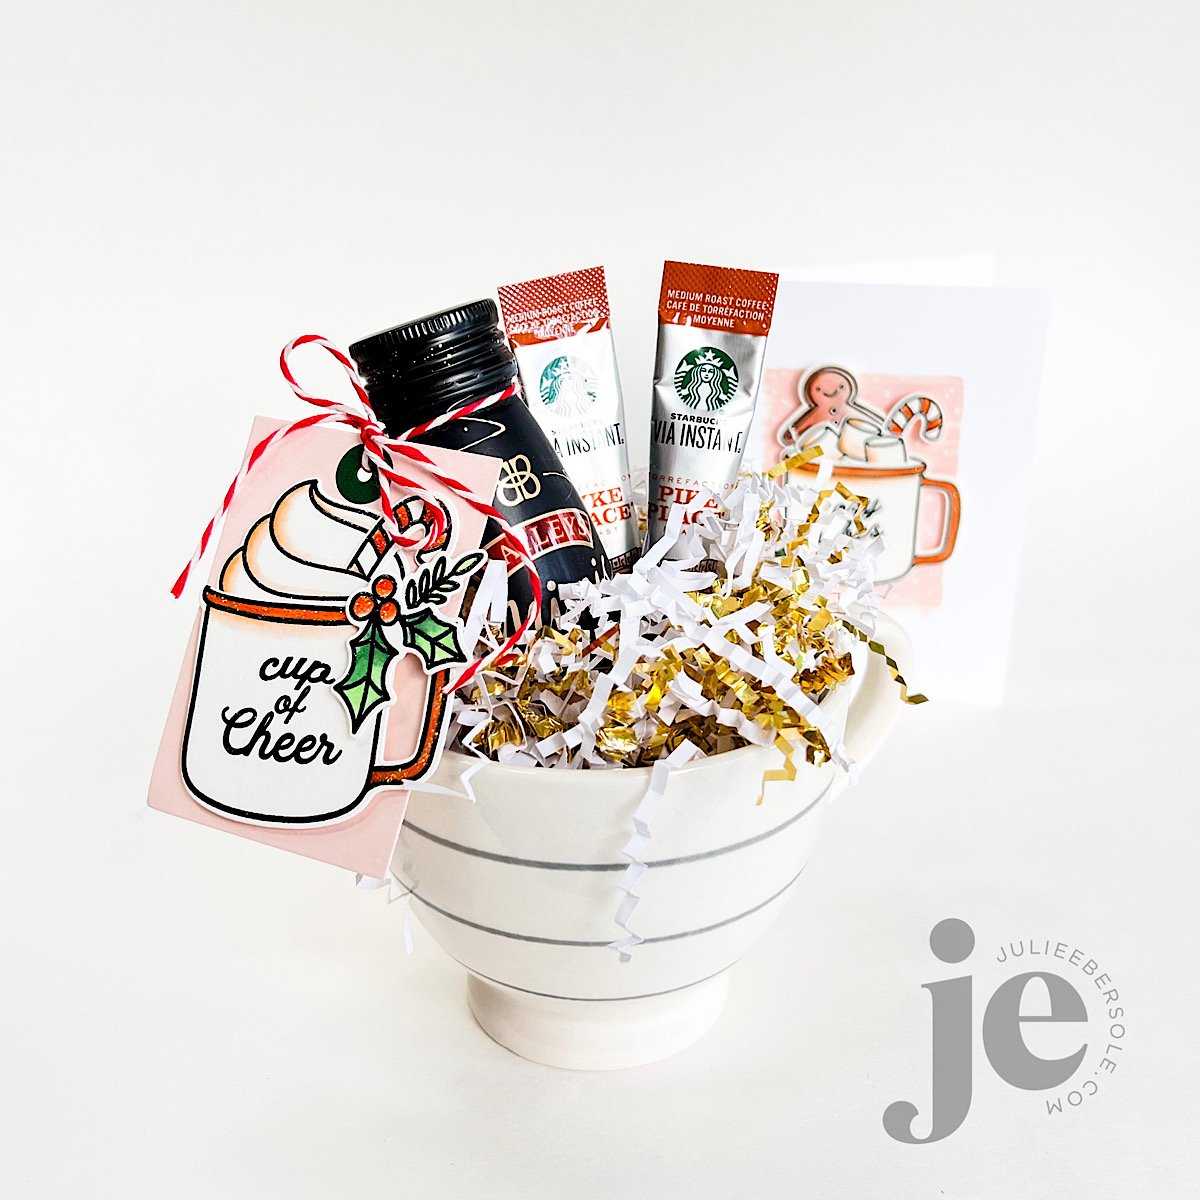
If you read my post the other day, I mentioned watching from the window as the family played in the snow, while sipping a coffee and Baileys . . .

feat. COZY CUPPA STAMP & DIE COMBO (also available separately) / MODERN TAGS DIE SET

A holiday, or even a simple, plain white mug serves as a “gift box”, and nestled among the paper shreds are a mini bottle of Baileys (a fun grocery store find—yes, I found 3 mini bottle packs of these at the grocery store! SCORE!!!) and some instant coffee packets!

My design elements from Cozy Cuppa were all watercolored, 3D mounted to a simple tag and tied to the bottle. Whip up a stack of tags and you’ve got an easy peasy, enchanting gift ensemble!

feat. COZY CUPPA STAMP & DIE COMBO (also available separately)

This adorable design just makes me think of my granddaughters—they love hot cocoa. AND marshmallows. So fun to tuck a gingerbread cookie and a candy cane inside to boot! Like the tag, I watercolored all the elements and that background was made by dragging my Tattered Rose Distress OXIDE Ink Pad across the front of the card and then dotting it with a white gel pen before assembling the rest of the card.

And, don’t forget the Stickles.

Speaking of which . . . what’s the golden rule about Stickles? Anybody? Anybody?

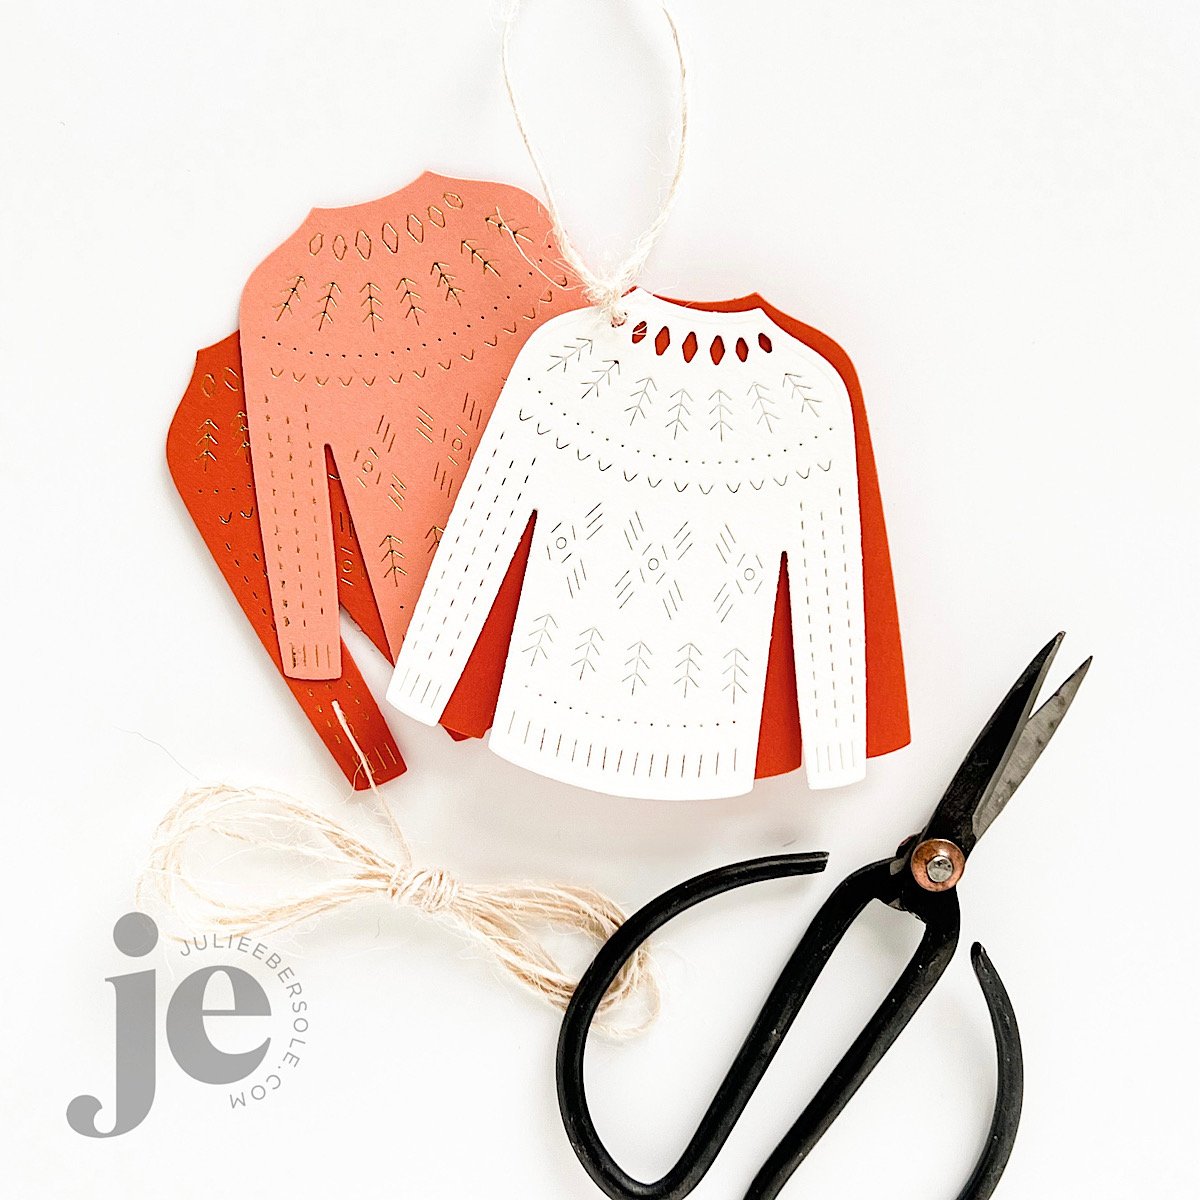
Need a super simple, highly impressive gift tag you can mass produce quickly?

This one is perfect for those of you who are short on time, long on love, LOL! I’m a sucker for a pretty sweater and this one has such a lovely pattern! I REALLY love to “deboss” it into watercolor paper because it’s thicker/heavier and the combination of textures between the pattern and the paper itself just looks and feels so luxe! I also think it looks pretty chic layered with a solid sweater shape underneath in a hue that coordinates with your wrapping paper.

The added bonus is being able to foil the pattern if I want an extra touch of glam!

Yes, you can foil low-profile dies and it doesn’t cut through the paper! Here’s a video I did on the Ellen Hutson YouTube Channel showing how to do that: Hot Foil Stamping with Low Profile Dies (Gemini Foil Press System used at the time; you can, however, also use the Glimmer Foil System by Spellbinders)

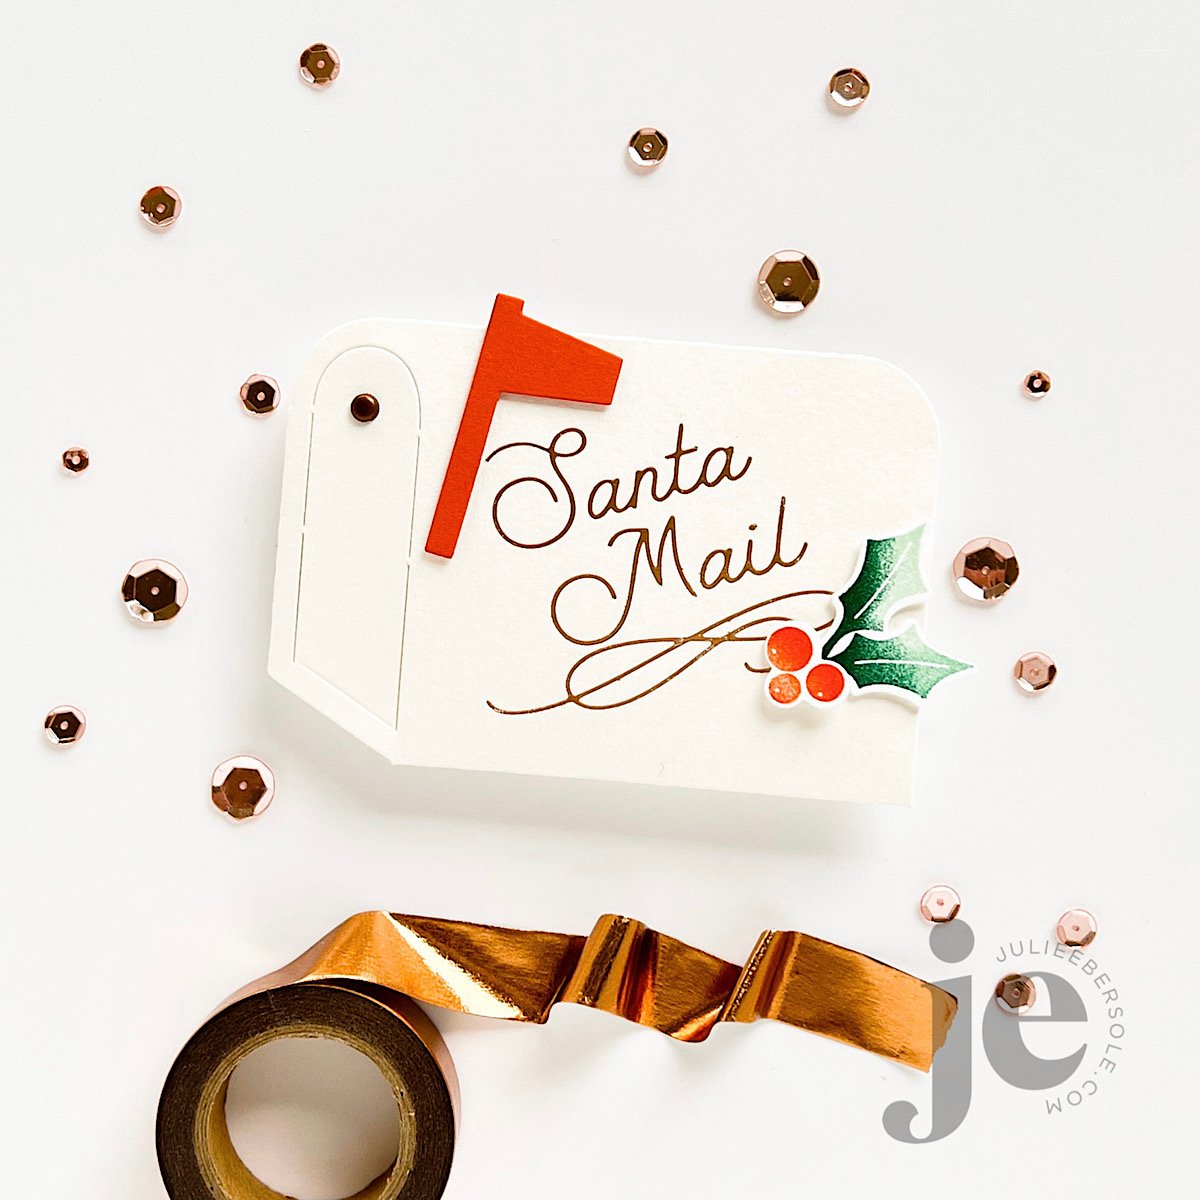
Speaking of foiling, you can obtain gorgeous results on that Canson XL Watercolor Paper, as shown on this interactive mailbox die:

  1. After die-cutting the shape, I hot foil stamped the designs I wanted onto the front side of the mail box.

  2. After creasing all the main fold lines well (a bone folder really helps because the paper is thicker than average) I inserted a mini brad from my stash, added strong, double-sided sticky tape (1/8” Scor-Tape —great for skinnier/tighter areas— and 1/4” Scor-Tape) to the flaps.

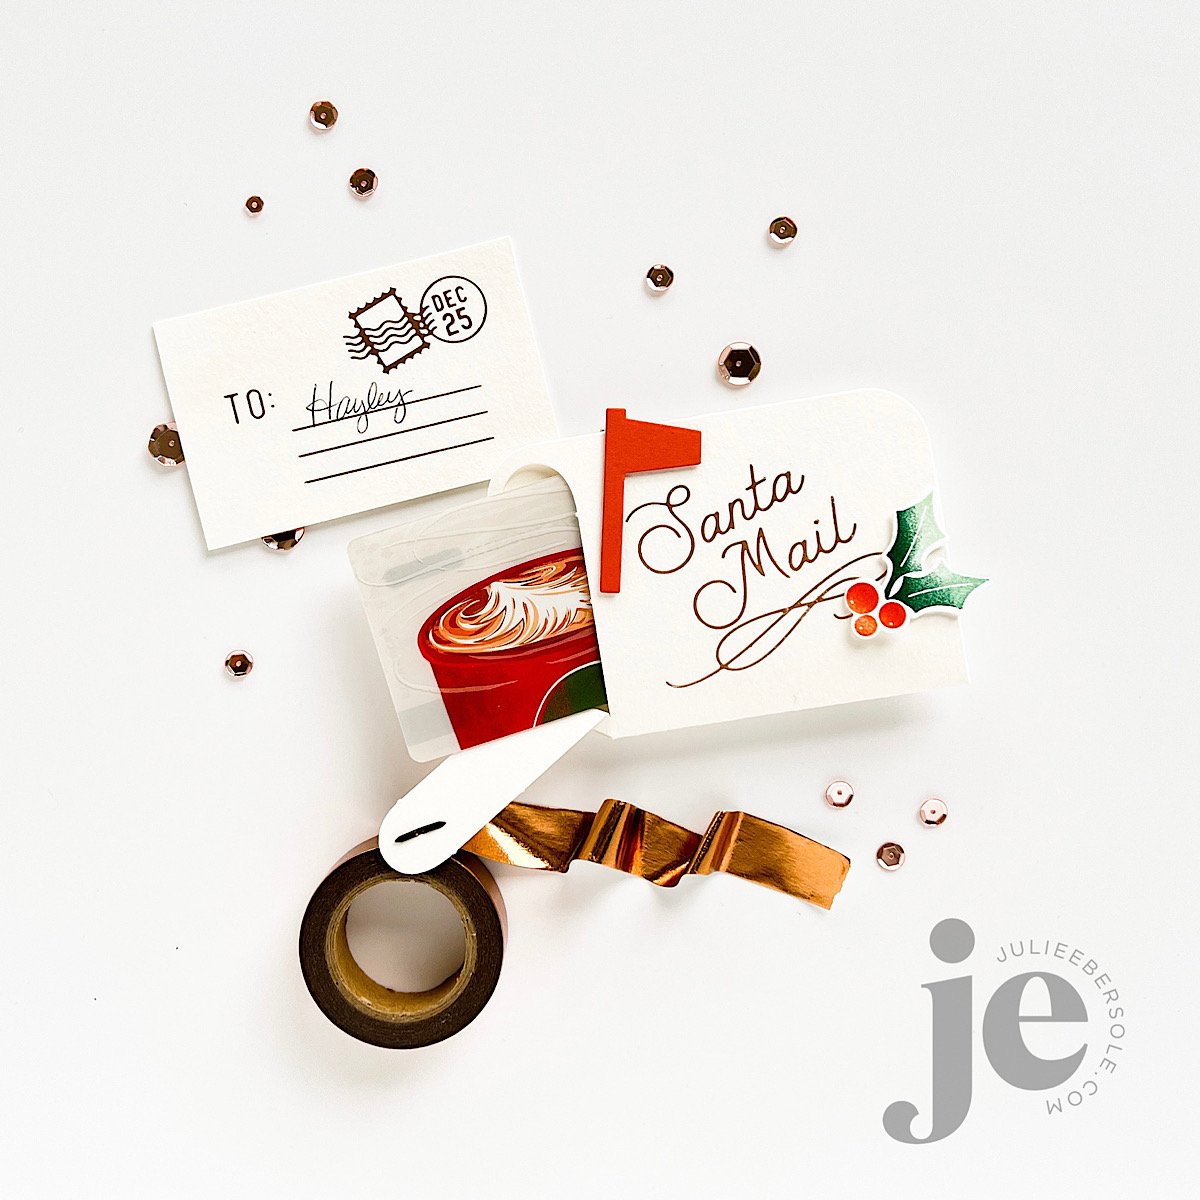
  3. Then I positioned a gift card inside and attached all the flaps to assemble, sealing the gift card.

  4. I added the mailbox flag, and a stamped/die cut holly sprig to further embellish.

I also foiled a piece of watercolor paper cut to the same dimensions as the gift card—it could be used as a gift tag, without the mailbox, but I think it’s just soooo stinkin’ cute to have a little mini letter to go with! (insert lots of monkey clapping here)

When the recipient pulls on the “handle/latch”, the mailbox door bursts open along the perforations and he/she can then slide the gift card out. SO FUN!!!

Hope you enjoyed these ideas for gifting at the holidays and thanks for stopping by!


Disclosure: I include affiliate links to the products used in my projects and make a small commission when you purchase via those links, at no extra dimes to you. 🙂 Thank you for buying all the things!

IT'S THE HOLIDAY SEASON!

The Essentials by Ellen Holiday 2022 Release is now live and available at ellenhutson.com (affil. link)

You can follow the Instagram hop at 9am Pacific and leave some comment love all along the way to enter the giveaways—who doesn’t love a prize, #amiright?

Snow Much Fun is based on the memory of getting my Christmas wish last year; snow. AND LOTS OF IT! My driveway had the grand littles whooping and swooping down into the front yard, building snowmen and warming their hands by a fire the Mister started when darkness fell and the twinkling tree lights came on. I watched them from the window, with my hands wrapped around a mug of coffee and Baileys. The scene outside wasn’t perfect picturesque nor Instagram worthy, but hearing the shouts and squeals of pure happy and seeing those grinning faces with rosy cheeks? Priceless!!!

feat. SNOW MUCH FUN STAMP/DIE (affil. link)

Hooray for snow days! Sure hope we get one or two this year!

Bundled Up makes me think of all things cozy and warm. And, I love a good solid/2 step stamp set sooooooo much!

NEW: BUNDLED UP STAMP SET & DIE / OH WHAT FUN! (last year’s gift with purchase set) (affil. links)

That knit pattern, those warm wintery colors . . . I just love this combo! It’s like . . . warm fuzzies all around!

OK, this next one is interactive—soooo much fun to play with and so stinkin’ CAYUUUTE!!! Even if I do say so m’self! (chinkle)

feat. SNOW ANGELS STAMP & DIE COMBO (affil. link)

But . . . WHAT DOES IT DO, Julie? Well, ladies & gentlemen, you can watch a little preview below on my Instagram. 😁

You can also see a full-fledged assembly video right on the release page → Essentials by Ellen Holiday 2022 Release (affil. link)—just scroll down the page towards the bottom, and you’ll see the video player. You can also watch it on the Ellen Hutson YouTube Channel HERE.

So, the color scheme I used on my samples? None other than my go-to inks by Catherine Pooler (EH affil. links):

I have more to share, but I’m tuckered at the moment—please stay tuned for more inspo to come!

Thanks for stopping by!


Disclosure: I include affiliate links to the products used in my projects and make a small commission when you purchase via those links, at no extra cost to you.

Thank you for buying all the things!

ESSENTIALS BY ELLEN FALL 2022 RELEASE

Release Page: ESSENTIALS BY ELLEN FALL 2022 RELEASE (affil. link)

Don’t ask me to pick a favorite, because I just can’t; Halloween will always be extra special for me because it’s the Mister’s birthday. 🎃

Be sure to check out all the creative inspo being shared by the EH Ambassadors on the Instagram Hop beginning at the Ellen Hutson LLC Instagram (link), as well as the Release Page. Soooo many ideas!!!

Below is a closer look at some of the sets in action:

feat. BOO’S INSIDE COMBO (affil link)

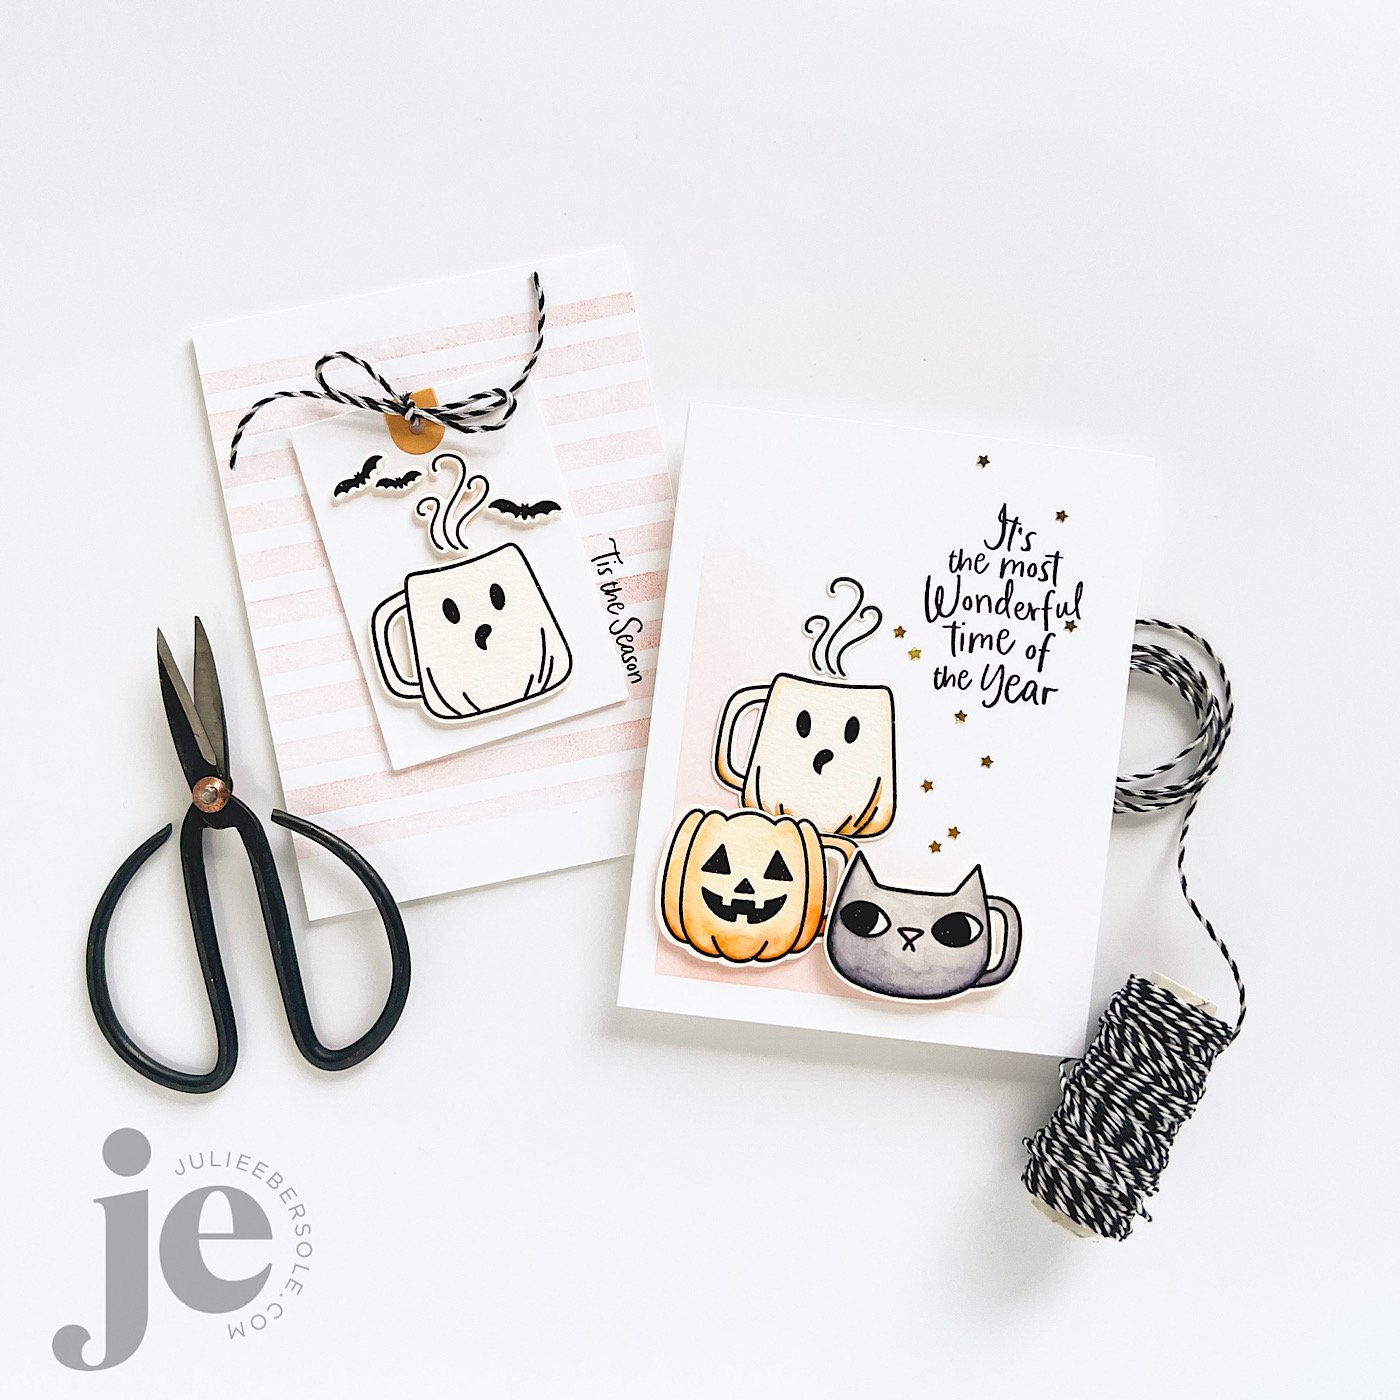
Kitty mug givin’ the jack mug the side-eye . . . (chuckle) Everything tastes mo’h bettah’ in a holiday mug, am I right?!


feat. FALLISH COMBO | THANK YOU (affil link)

I feel a trip to the pumpkin patch and farmer’s market comin’ on—we’re so lucky to have one nearby on our rural island!


feat. GHOST ANCESTORS COMBO (affil link)

I had to do it. Halloween with a mild, but loving snarky twist. I mean, come on!!! Love me a good belly laugh and ujustgaddoo (you just got to) take advantage of these opportunities. That’s my story, and I’m stickin’ to it. 😉


Don’t go into the woods at night! LOL! And, always go in a group when trick-or-treating; more tricksters = more treats.


feat. PUMPKIN MUG | TINY STARS HOT FOIL STAMP | sentiment from BOO’S INSIDE (affil link)

Not sure it shows up well, but I did a soft ink blend of an apricot and grapefruit pink to get this lovely peachy hue. It’s very subtle but hopefully you can see it—I love that this die has separate jack-o-lantern facial features so you can opt to fill the center with sentiments designed to fit right in there . . . 😉 (yes, deliberate)


My granddaughters absolutely LOVE these little house boxes; I have a Halloween village planned for the mantel. These are so much fun to make I had a hard time stopping and had to slap my hands to make samples with the other goodies in this release, LOL!

Catwalk, anyone?

My goal is always to create 3 samples for each set/product but as I’ve mentioned before, I’m a slow designer and time ran out on me. HOWEVER, you will find yourself immensely inspired by the EH Ambassadors, who I am always honored and thankful to for bringing my designs to life, so please check out the IG hop for more creative, and ingenious ideas for this release!

Thanks for poppin’ in!


SUPPLIES:

ESSENTIALS BY ELLEN FALL 2022 RELEASE

Disclosure: Affiliate links to the products used in my projects, that I like and use may be included; I make a small commission when you purchase via those links, at no extra cost to you. Thank you for all your support!

3 STARRY SKIES IDEAS

Honestly, I am not an outdoorsy girl; the family is always teasing me that I need to “get out of the bubble” more often. Which would probably do wonders for my legs, which could use a lot more sun, LOL!

But, I was feeling the nature themes when illustrating and designing for this particular summer release and remembering how last year, we laid out on an airbed in the backyard and gazed up at the night sky, watching the Perseids shoot by . . . Yeah, for real.

Our house is surrounded by very tall evergreen trees, and there are no street lamps in our neighborhood, making it a perfect setting. I used my trusty Speedball brayer to create the sky background, using some dye inks by Concord & 9th (Grapefruit, Stardust ) and Catherine Pooler (Juniper Mist)

TIPS

  • When loading your brayer with ink, always roll and lift, roll and lift (continuous motion), to make sure you get the brayer inked all the way around. Make sure to place scratch paper underneath or you’ll end up with ink all over your work surface. Ask me how I know . . . (face palm)

  • Using the same method of rolling and lifting begin to brayer with your lightest color first, start off the project and roll onto the paper surface, to avoid odd marks to the paper; continue until the brayer goes completely across and off project, onto the scratch paper. If you don’t, you won’t get complete edge-to-edge coverage. Of course, if you don’t want edge-to-edge coverage, disregard.

  • Any excess ink on the brayer can be rolled off onto the scratch paper and then you can load with the next color. You probably won’t need to wash the brayer off until you’re completely done with the last, and darkest, ink color. Less clean-up. Sweet!

  • Want to heat emboss over the top? Well, you can let it sit for a while, OR, if you’re like me (impatient), use your heat gun to “dry” the surface, then pounce it with an anti-static pouch to neutralize any moisture, like oil or lotion from your hands.

  • Blow off or use a soft brush to flick away any excess anti-static powder sitting on the paper surface, then stamp and heat emboss. Why? Because if you don’t, as you press your Versamark inked stamp against the paper, it will collect that excess powder with every impression and transfer it to your Versamark pad when you go to ink up your stamp again. As the powder accumulates into your ink pad, it will become less and less sticky; ink pad no worky after a while!

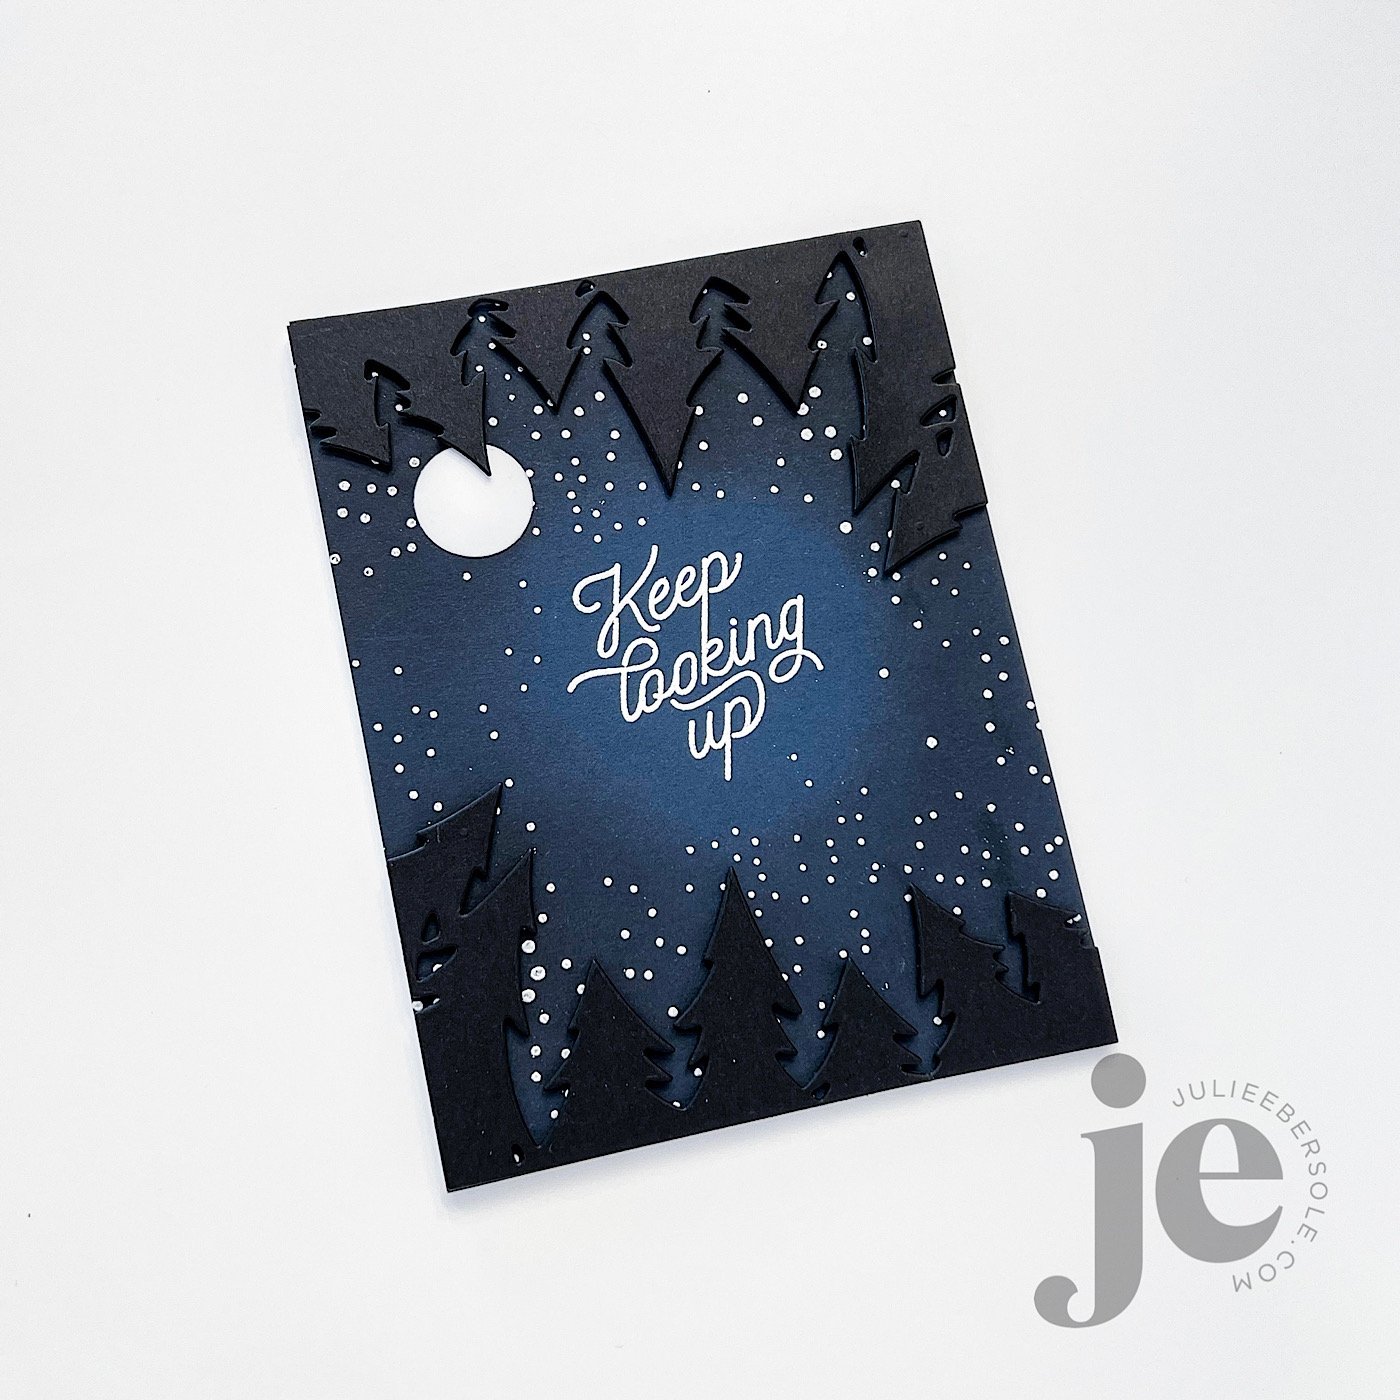
I had a rare flash of brilliance when designing the Through The Trees die, so you could create two different effects. Using one shape makes it appear you’re looking over a row of trees, but cutting it twice and mounting the two opposite each other creates the visual effect of being in a clearing, surrounded completely by trees, looking up through them at the sky. I really, REALLY love that . . .

Before doing all the white heat embossing, I used a blending brush to apply the Juniper Mist ink around the outer edge of a navy blue panel—it draws the eye towards the sentiment in the center there, and gives it a glowing effect, to emphasize it even more. You could also use black ink, but, I didn’t have any that wasn’t permanent/archival and I really didn’t want to ruin a blender brush with permanent black ink. Just sayin’ . . .

When you don’t have the color of card stock you need in your stash, you can make your own.

MORE TIPS

  • Use a blending brush/tool and ink to coat white or short cut your blending by starting with a colored card stock as your base, to get the color you need.

  • Distress Oxide Ink will give the most opaque coloring; I often use that on 110# Neenah or colored card stocks because it’s a lot less work than using dye inks. Just sayin’ . . . A girl with tendinitis in her arm needs all the help she can get!

  • Depending on the look you’re going for, try watercoloring over a panel of watercolor paper, and die cutting from that after it’s completely dry.

DAAAANG!!! If you’ve made it to the end, you’re a trooper and I hope you got at least one tip or idea you can use!

That’s all I got for now. Thanks for poppin’ in!


Disclosure: Affiliate links to the products used in my projects, that I like and use may be included; I make a small commission when you purchase via those links, at no extra cost to you. Thank you for all your support!

MONDO RHODODENDRON

A while back someone asked if I could add our WA state flower, the Rhododendron to the mondo floral series. This set went through many (understatement, OY!) renditions before I landed on this . . . There are about 1,000 species of Rhododendrons. 😳

How in the world are you supposed to choose ONE to translate into a stamp??? The two outside my front door are kinda scraggly looking, but the ones next to my Mother-in-law’s house are ginormous, lush things, with vibrant fuchsia coloring! Her Rhodis make me think of giant floral pom-poms, LOL!

The Gold Finch is also the WA state bird, so it seemed fitting to include her—that flash of yellow is so bright and cheerful!

Clear embossed over black pigment ink , on my favorite Canson XL Watercolor paper and then watercolored with Gansai Tambi before die cutting it out.

I like the effect of the flower itself, repeated as a background to support the focal.

This time, the Rhodi was stamped in a softer pink color, with the Gold Finch mounted over top of it and a hexagon frame cut from gold foil card stock.

If any of you are Washingtonians, I hope this set holds a special place among your stamps! Also, did you know ALL Azaleas are Rhododendrons, but not all Rhododendrons are Azaleas???

I don’t know if that’s a “fun” fact, but it’s a fact . . . ROTFLMBO!

Also, a note of thanks to those of you who left a comment or messaged me via email about my previous post . . . XO∞

You’re the bestest!!!


Disclosure: Affiliate links to the products used in my projects, that I like and use may be included; I make a small commission when you purchase via those links, at no extra cost to you. Thank you for all your support!